Web To Print Store
PrintXpand- Web To Print Solution
Version: 2.0
PrintXpand provides Web To Print Solutions to help organizations of all sizes build eCommerce websites with custom storefronts for their online printing business. It is easy-to-use and technologically advanced.
After integration in the Magento backend side, You will get the THEME FLARE tab menu. From here You can design your Web to Print store and enhance your eCommerce and Printing business.
There are two different themes are provided under THEME FLARE: Cards & Apparel. [2]
Theme Activation
Before managing/importing the theme you need to activate it in your store. Navigate to the Stores ➤ Configuration ➤ Theme Options you will get the Theme Activation section.
Theme Activation
– Activation Key: Firstly you have to Insert the activation key that you have got from the registered e-mail. Once you have inserted the activation code then you will get the below configurations. [1]
– Select Website: Select the website to which you want to activate this theme.
– Flare Theme Enable: Select “Yes” to enable the theme to your e-commerce site.
If your activation code is wrong then you will get the error message.
Note: Once the Flare Theme is enabled admin needs to Save the home pages from page layout then only it will be displayed on the front, otherwise error message will be displayed
Manage Themes
Navigate to THEME FLARE ➤ Theme Selection ➤ Manage Theme and the Theme design configuration page will get open. It contains a grid with the available configuration scopes. To configure the design settings, click on the ‘Edit’ option of the relevant Store. [1]
Under Manage Themes, you can configure the store-specific theme individually. To configure the design settings, click on the ‘Edit’ option of the relevant Store. [2]
Default Theme
Applied Theme: Select the Applied Theme for the new theme. Here you can change it to any of the installed ones. [3]
User Agent Rules:
– Click Add New User Agent Rule under Design Rules. [4]
– From the ‘Search String’ column, enter the browser ID for that particular device.
– From the ‘Theme Name’ column, select the theme used for that particular device.
– Continue the process until entering the adding device.
– Perl Compatible Regular Expression (PCRE) or searching string to match when entering new themes.
-> Under Other Settings, expand each section: [5]
– HTML Head
– Header
– Footer
– Search Engine Robots
– Pagination
– Product Image Watermarks
– Transactional Emails
Please follow the instructions in the linked topics to edit the settings as required.
After inserting all the necessary details, click on the Save Configuration button.
Now, you can add and manage the CMS page and select the New Theme in it.
Theme Installer
Navigate to the Theme Flare ➤ Theme Selection ➤ Theme Installer, you will get the new themes to install to your store. Firstly you need to select the website. Once you select the website then you will get the list of the themes to install. [1]
Now, click on the “Import” button to install the theme to your store. [2]
Once you install the theme, the success message will be displayed. After clicking on “here” you it will land on the Page Layout though which you need to design the home page of the website by selecting the data for the snippets. [3]
General Configuration
Manage Pages
From the backend, you can create a new page with details like multiple images, blocks, variables, and widgets. All of them are design-friendly for search engines that crawl the metadata of the page so that people can find you easily. [1]
Enable Page: You can enable/disable the Page as per requirement. [2]
Page Title: Enter the relevant Title of the Page.
Page Type: Select the type as Is Home Page or Is CMS Page.
By selecting Is Home Page, you will get the “Page Builder” blocks to configure the Home page and by selecting Is CMS Page, you will get the “HTML Editor” to edit the content of that Page.
Select Page Layout: Select the layout of the page you want to apply.
Content:
– Content Heading: Enter the main heading at the top of the page. [3]
– Editor: Enter the text with the WYSIWYG editor, click on Show/Hide Editor button to add blocks, images, and widgets.
After inserting all the details click on Save and Continue Edit.
Search Engine Optimization: Expand the Search Engine Optimization tab and specify URL Key, Meta Title, Meta Keywords, and Meta Description for the page. [4]
– URL Key: Fill out a URL Key for the page, added to the base URL for the new online address of the page.
Note: Remember to insert lowercase characters and hyphens without spaces. i.e. new-page
– Enter the Meta Title, Keywords, and Description for the CMS page, these are important for SEO.
Pages in Websites: You can choose the Store View for any new page. You can also use the page for All Store Views. [5]
Design: In the Layout field, choose one of the options from the dropdown list of the page layout: 1 column, 2 columns with left bar, 2 columns with right bar, 3 columns, Page – full width, Category – Full Width, and Product – Full Width. [6]
Custom Design Update: Scroll down to customize the page design. In the Custom Design section, you can change the theme, layout, and style within an exact time period like holidays or sales. [7]
Click on the Save button to create a CMS page.
Ajax Scroll
Ajax Scroll helps you improve loading speed and thereby makes your customers happy without facing the interruption. Here is how you can enable and manage the Ajax scroll feature.
Navigate to the Stores ➤ Configurations ➤ Ajax Scroll, you will get the configurations related to the Ajax Scroll. You can also configure Ajax Scroll by navigating to Theme Flare ➤ Ajax Scroll ➤ Settings. [1]
General Settings
– Enabled: Select “Yes” if you want to enable the Ajax scroll in your store. [2]
Instances
– Use in Categories: Select the Categories in which you want to enable the Ajax Scroll. [3]
– Use in Search: Select “Yes” if you want to enable the Ajax cart whenever someone searches the product.
– Use in Brand Page: Select “Yes” if you want to use the Ajax scroll in the brand page.
– Use in Blog Page: Select “Yes” if you want to use the Ajax Scroll in the blog page.
– Delay: Insert the duration of delay in Milliseconds to load the product whenever scrolls down to the page.
Selectors
– Content: Selector for the element that surrounds the items you will be loading more of. [4]
– Pagination: Insert the selector for pagination
– Toolbar: Selector for the toolbar (normally pagination, sort-by and display type are inside here)
– Next: Selector for the link to the next page.
– Items (Grid Mode): Selector for all items you’ll retrieve..
– Items (List Mode): Selector for the element that surrounds the items you will be loading more of.
Design
– Loading Image: Use absolute URL or relative path to skin path. Leave empty for default. [5]
– Loading Text: Insert the text to be displayed whenever the product is loading.
– Done Text: Insert the text to be displayed whenever all the products are loaded.
– Hide Toolbar: Select “Yes” if you want to hide the toolbar.
– Local Mode: Instead of watching the entire window scrolling, watch only the element this plugin was called on (set in Selectors->Content).
– Buffer (PX): Set an offset before page end from which the content will start to load. A high number will load the next page a long time before the user reaches the bottom of the screen. [6]
– Load for Threshold: When this page number is reached, a button to load more products will be shown instead of continue loading products automatically with the scroll (this could be useful to help the user to reach the footer). TIP: use a high number to disable this feature.
– Load More Button Text: Set an offset before page end from which the content will start to load. A high number will load the next page a long time before the user reaches the bottom of the screen.
Theme Options
General Configuration [1]
Flare Theme Enable: Select Yes to enable the flare theme to your store.
Contact Us Page
Add Embedded Link Here: Add the link of the location which will be displayed on the Contact us page.
To get this link follow these steps:
- Open Google Maps
- Insert the name of the location and click on the Share button. [2]
- Now go to Embed a Map, copy the source link and paste it. [3]
Slider Configuration
Width: Insert the width of the slider. [4]
Height: Insert the height of the slider.
Autoplay: Select Yes to autoplay the slider else select No.
Autoplay Speed: Insert the speed for the autoplay.
Pause on mouse over: Select Yes to pause the slider on mouse over else select No.
Loop: Select Yes to play the slider in Loop else select No.
Next Prev Navigation: Select Yes to offer the Next & Previous Navigation.
Paging Navigation: Select Yes to give the paging navigation.
Lazy Load: Select Yes to enable the Lazy Load site for better performance.
Instagram Feed Configuration [5]
Access Token: Insert the Access token to showcase the Instagram account on the store.
Note: Authenticated requests need an Instagram Access token. Access Token is an opaque string that identifies a user, app, or page. The app can use it to make graph API calls and is unique to each user.
Shuffle Image: Select Yes to enable the shuffling of the images.
Google Analytics & GTM Configuration
Insert Google Analytics details.
Google Analytics: Insert the code for Google Analytics.
GTM Code: Insert the code for GTM.
Custom Css [6]
Add the custom Css to change the style as per the requirement.
Social Sharing [7]
Footer Social Icon: Select the social media platforms, you want to make visible at the footer.
Frontend Options
By clicking on the Global Settings menu, you will redirect to the “Frontend Options” under the PrintXpand configuration. From here you can configure the appearance of the Web Store.
You will get the following settings under Frontend Options: Theme Color, Button Color, Form Inputs, Theme Font, Rebuild Design, and Links. [1]
Theme Color Settings
Theme Primary Color
You can set the Primary and Secondary colors for the Theme by choosing a color from the Color Picker tool. [2]
Theme Font Settings
Select the Fonts and customize them by selecting size and effects. [3]
– Text Color: Set the text color for default paragraphs from the Color picker tool. [4]
– Google Fonts: Select the Google Font which will be loaded on the site. Set the font family for default paragraphs.
– Generic Font Family: Set the font family which will be visible on the front.
– Fonts Weights: Select the Fonts Weights. These values range from lightest (100) to boldest (900).
Here is a rough guide to match the numerical scale with the most common weight terms:
100: Thin, Hairline, Ultra-light, Extra-light
200: Light
300: Book
400: Regular, Normal, Plain, Roman, Standard
500: Medium
600: Semi-bold, Demi-bold
700: Bold
800: Heavy, Black, Extra-bold
900: Ultra-black, Extra-black, Ultra-bold, Heavy-black, Fat, Poster
Note: Please check this link for more details for Google Fonts & Fonts Weight.
– Font Size: Set the font size for default paragraphs. If the left blank, the default font size is set to 14px.
– Letter Spacing: Increase or decrease the space between characters in the text. Range: -5.0 … 50.0, the value in pixels. Ex.: 0.7.
– Line Height: Set line-height for default paragraphs.
Insert the Font details for Header 1 to 6 and insert the Theme Font Settings for Font Title Home Page.
Note: Above details will be similar for H1 to 6.
Rebuild Design
Any Css change should be rebuilt to compile it in Magento. First Save the configurations and then Rebuild Css. [5]
Custom Header
From here you can configure the header settings and search options for the web store.
Color Variables
Header
You can manage all the color variables for the Header from here.
– You can set the background color for Header Top, and Header Middle Background.
– Header Text Color: To select the color for the Text of the Header part.
Header Settings
– Enable Sticky Header: Select Yes to enable the header settings.
– Show Contact Us Page in Menu: Select Yes to show the contact us page in the menu.
– Store Location Page: Select the store location page from the page list.
– Order Status Page: Select the order status page from the page list.
– About Us Page: Select the about us page from the page list.
– Responsive Logo: Upload the responsive logo from the store. You can also checkmark the delete option and Save the configurations to delete the logo.
– Show Breadcrumbs: Select “Yes” to show the breadcrumbs on the header.
– Breadcrumbs Background Image: Upload the background image of the breadcrumb. Checkmark the “Delete” option and save the configuration to delete the background.
Custom Footer
Color Variables
Footer:
– Footer Top Background Color: Select the color to display in the footer background.
– Footer Title Color: Select the color for the title of the footer.
– Footer Text Color: To select the color for the text.
– Footer Text Hover Color: To select the color for the text when the mouse cursor moves over it. (Hover effects).
– Footer Bottom Background Color: To select the color to display in the footer background of the bottom.
– Footer Social Icon Color: Select the color for the social icon.
– Footer Social Icon Hover Color: Select the color for the social icon text when the mouse cursor moves over it. (Hover Effects)
– Footer Social Icon Background Color: To select the color for the social icon background.
Brand Configuration
Better Blog
SEO
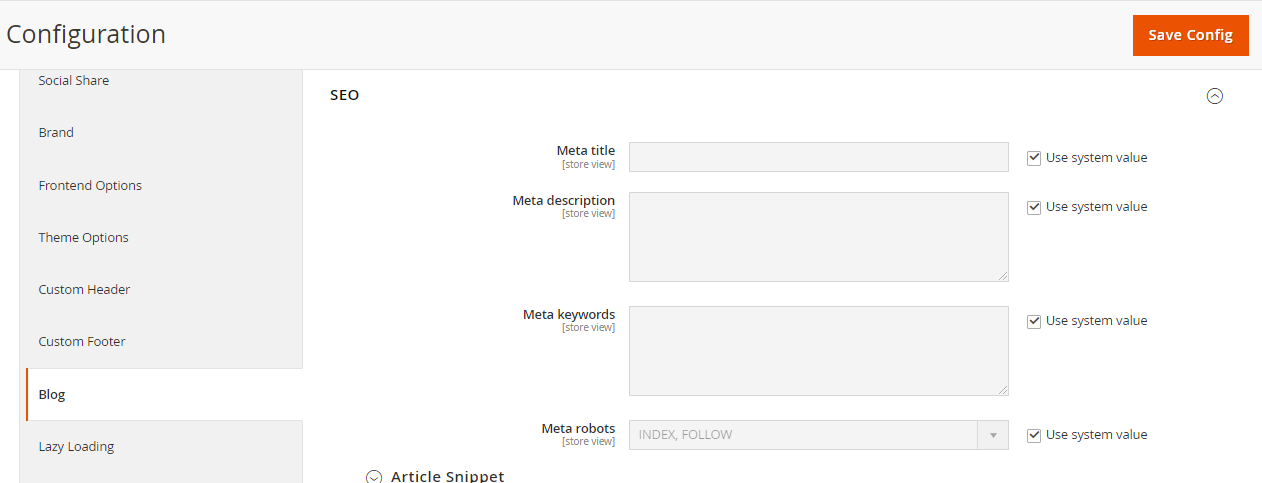
– Meta Title: Set Meta title for posts list page (Blog Page).
– Meta Description: Set Meta description for posts list page.
– Meta Keywords: Set Meta keywords for posts list page.
– Meta Robots: Set Meta Robots for posts list page.
Article Snippet
– Enable: Select “Yes” to enable Article snippet.
– Organize or Website Name: Enter your organize or website name.
– Logo: Upload your logo.
Comments
Type of Comment:
– Default Comment: Customers need to login into a new account to be able to comment, admins can manage those comments in the backend. Choose ‘No’ at the Need for Approval field to disable the comment management feature. After that, those comments will be shown on the frontend as soon as customers comment.
– Disqus Comment: Admin needs to create a Disqus unique name and fill it in the configuration. This also requires the customer to have a Disqus account to be able to comment.
– Facebook Comment: If you choose this type of comment, some add-on fields will display like the below:
-
- Facebook: App ID: Admins need to create a Facebook App to get the AppID to fill this field.
- Facebook: Number of Comments: This limits the number of comments to be displayed on the Post View Page. If you leave it blank, it will show all available comments.
- Facebook: Color Schemes: Choose the color which displays commenter’s information.
- Facebook: Order By: Choose the arrangement for comment displaying. * Social: The comment which has more like(s) will display on the top. * Reverse Time: The comment which is published first will display to the bottom. * Time: The comment which is published first will display on the top.
– Disable Completely: Choose this type if you don’t want to display comments.
– Need for Approval: Select Yes if you do not want to show the comment until the admin has approved it.
Monthly Archive
Enable Monthly Archive: Select “Yes” to display the monthly archive on the frontend.
Number or Records: Set the number of months to display on the frontend. If you leave it blank, the default number is 5 (the last 5 months statistic).
Type of Datetime: Choose your favorite format of the date. We offer 4 types of month/year displays.
Side Bar
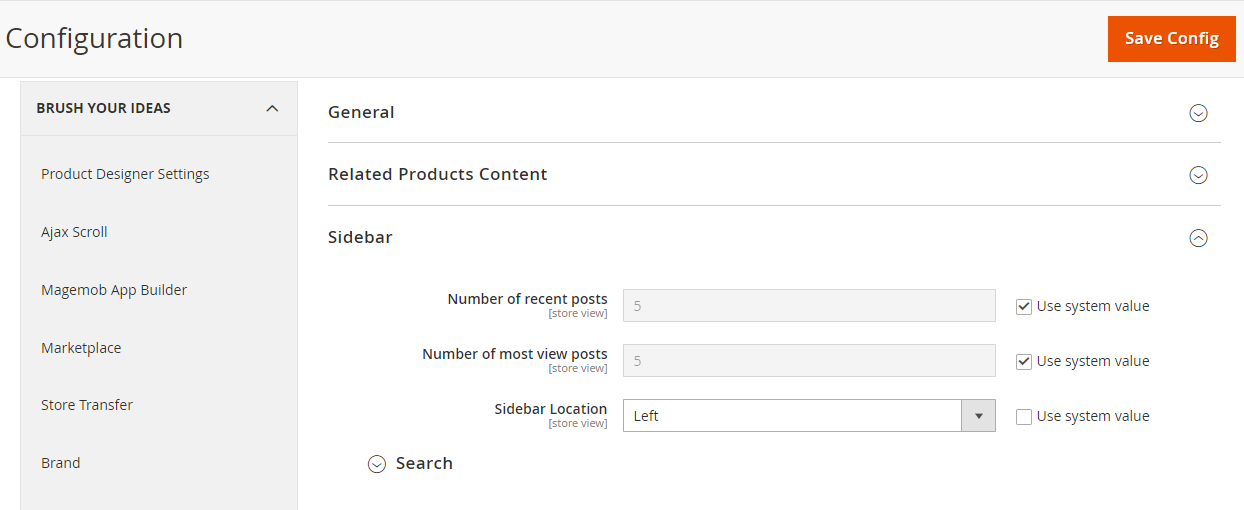
– Number of Recent Posts: Enter the number of recent posts that display on the sidebar. If you leave it blank, the default number is 4. [1]
– Number of most view posts: Enter the number of most view posts that display on the sidebar. If you leave it blank, the default number is 4.
– Sidebar location: Select Left/Right for the location of the sidebar.
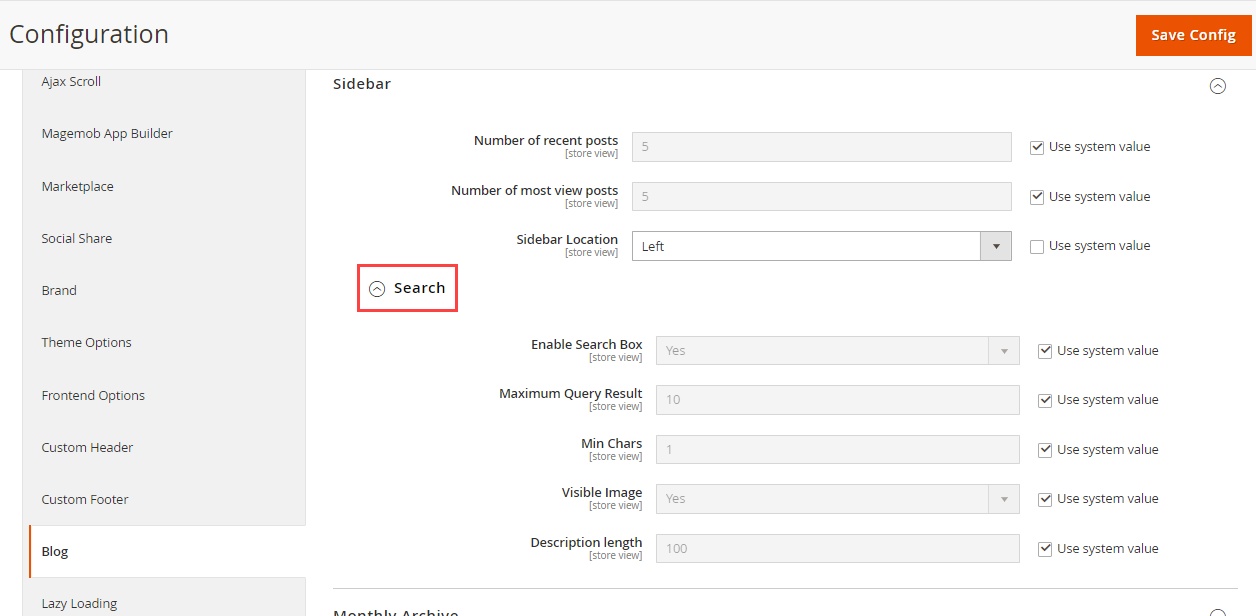
Search [2]
– Enable Search Box: Choose “Yes” to activate the search box at the sidebar.
– Maximum Query Result: Enter the maximum number of posts that the search box will search. Without setting the limitation, the search box will search all posts that match the search character.
– Min Chars: Search results will only be displayed if the customer enters in the search box with enough configured characters in this section.
– Visible Image: Select “Yes” to display the thumbnail of the post when the post is found in the search box.
– Description Length: Limit the length of the short description can show along with found posts. If you leave it blank, the short description will not display.
Related Products Content
Product Detail Page
– Enable Related Posts: Choose “Yes” to show related posts on the Product Detail Page.
– Limit of Related Posts: Enter the number of related posts can display. If you leave it blank, the default number is 1 post.
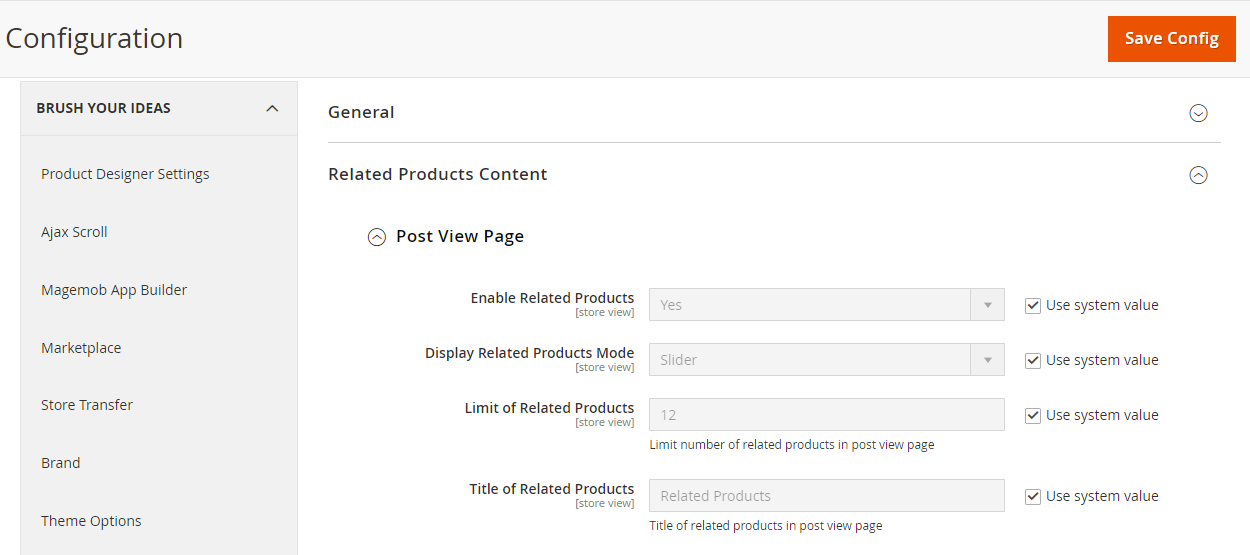
Post View Page
– Enable Related Products: Choose “Yes” to show related products on Post View Page.
– Display Related Products Mode: Set the Related Post at Post View Page shown in grid or slider.
– Limit of Related Products: Enter the number of related products can display. If you leave it blank, the default number is 12.
– Title of Related Products: Name the title of the block which contains related products. If you leave it blank, the default name is “Related Products”.
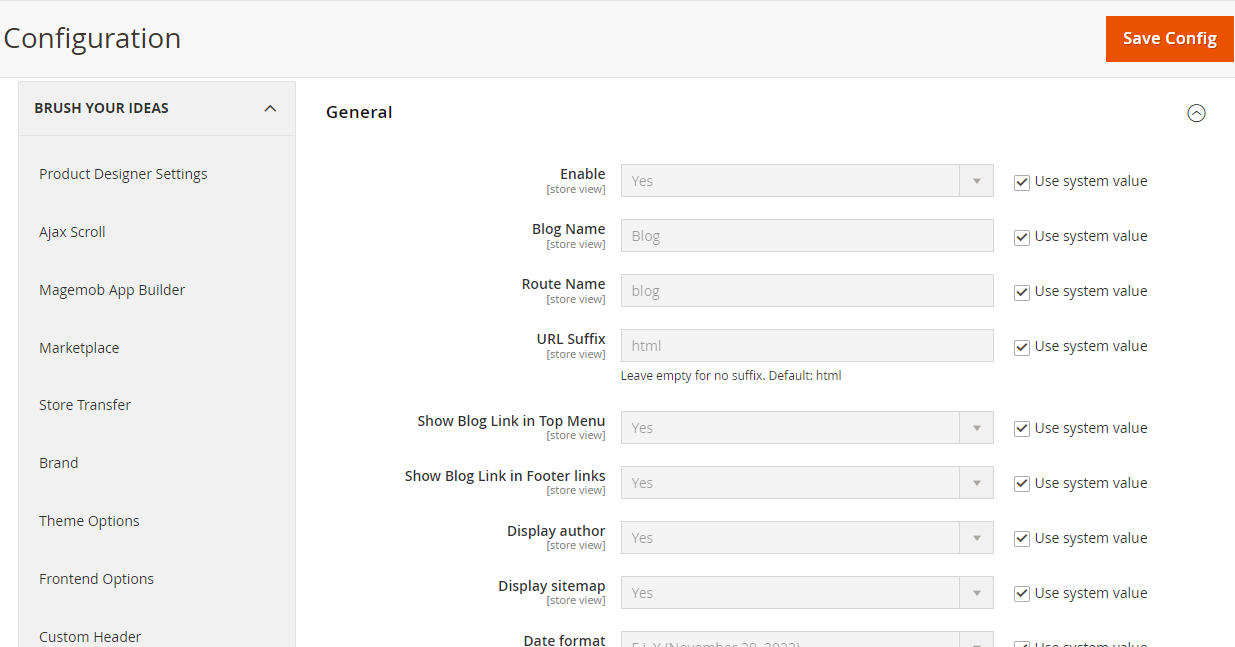
General
Enable: Choose “Yes” to turn the extension on.
Blog Name: Set name for the new blog.
Route Name: Enter the route name which appears on the URL. If you leave it blank, the default Route name is a blog. Ex – https://domain.com/blog
URL Suffix: Enter the Url Suffix. There won’t be a suffix if you leave it blank.
Show Blog Link in Top Menu: Choose “Yes” if you want to show blog links at the top of the menu.
Show Blog Link in Footer Links: To make the blog link visible on footer links on your site, set “Yes”.
Display Author: Select “Yes” to display the name of the post’s author on the frontend.
Display Sitemap: Choose “Yes” to display sitemap at the footer links.
Date Format: Choose the date format to display. We have 12 types of date format.
Limit Related Period: Insert the limit of the blog post in the related section.
Display Related Posts Mode: Set the Related Post at view post page shown in grid or slider.
Display Blogs Mode: You can configure to display posts at post listing page under Grid View or List View.
Blogs per Page Allowed Values: The number of posts per page will be set in this field.
Choose blog’s color: Pick up a color for your blog’s text.
Allows customers to register as an author: Select Yes to allow customers to register as an author for the store
blog.
Automatically approve requests: Select Yes to allow auto-approving request of customer author’s registration.
Automatically approve customer’s posts: Select Yes to allow auto-approving customer posts when creating new posts outside the frontend.
Limit of Posts History: Maximum number of history records in the Edit History of posts section at the backend. Once the number of history records has reached maximum, the oldest one will be auto-deleted if creating new ones. The default is 5.
Allow Voting for Helpfulness: Select Yes to allow Like/Dislike below each post.
Restrict Rating for: Select the customer group that is allowed to vote (Like/Dislike). You can select multiple groups.
Manage Posts
To add the new post navigate to the Theme Flare ➤ Better Blog ➤ Manage Post, you will get the list of the blog posts. Click on the Add New Post button and enter the following information. [1]
– Name: Insert the name for the post. [2]
– Author: Select the Author for the post.
– Status: Select Enable to display the new post.
– Short Description: Insert the short description for better understanding.
– Content: Use WYSIWYG Mode to insert the post content that allows showing right as on the frontend. If you want to show the content under code, tap Show/Hide Editor button.
– Store Views: Select the Store View where you want to display the post.
– Image: Upload the image from the browser in the Image option.
– Categories: Choose Topic, Tag, Category for the post. Also, you can create a new Topic, Tag, Sub Category in this section.
– In RSS: Choose In RSS = Yes to display the post information in the file rss.xml
– Allow Comments: To allow the readers to leave comments on your post, choose “Yes” in this field (Make sure that in the 1.5. Comments, the comment type IS NOT Disable Completely*).
– Publish Date: Configure the displaying of the post date
Assign Product to the Post
In the list of available posts, mark the checkbox that is next to the products you want to assign.
Tap Save and Continue Edit, then hit Save Post to finish.
Grid Edit History: includes information: Name, Short Description, Store View, Categories, Topics, Tags, Modified by, Modified At and some Action such as Edit, Preview, Restore, Delete.
Action = Edit: You can edit information for each post.
Navigate to Theme Flare ➤ Better Blog ➤ Manage Posts, to add the new posts.
Search Engine Optimization
URL Key: Enter the URL Key that the visitor can access the blog post.
Complete Meta Title, Meta Description, and Meta Keywords for your better SEO.
Meta Robots: Set Meta Robots to one of the following options:
- Index, Follow
- NoIndex, NoFollow
- NoIndex, Follow
- Index, NoFollow
Manage Tags
Navigate to Theme Flare ➤ Better Blog ➤ Manage Tags, to add the new tags. [1]
Now click on the “Add New Tag” and fill in the following fields. [2]
– Name: Insert the name of the tag.
– Status: Select “Yes” to active the new tag.
– Description: Insert the description for the new tag.
– Store Views: Select the store view in which you want to display this tag.
– URL Key: Insert the URL key so that the visitor can access the tag.
– Meta Title/Description/Keyword: Insert the Meta Title, Meta Description, & Meta Keywords for better SEO.
– Meta Robots: Set Meta Robot to one of the following options:
- Index, Follow
- NoIndex, NoFollow
- NoIndex, Follow
- Index, NoFollow
After all, the configuration Save the tag.
Manage Topics
For creating a new topic navigate to the Theme Flare ➤ Better Blog ➤ Manage Topics and click on the Add New Topic. [1]
– Name: Insert the name of the topics. [2]
– Status: Select “Yes” to activate the new topics.
– Description: Insert the description for the new topics.
– Store Views: Select the store view in which you want to display this topic.
– URL Key: Insert the URL key so that the visitor can access the topic.
– Meta Title/Description/Keyword: Insert the Meta Title, Meta Description, & Meta Keywords for better SEO.
– Meta Robots: Set Meta Robot to one of the following options:
-
- Index, Follow
- NoIndex, NoFollow
- NoIndex, Follow
- Index, NoFollow
After all the configuration Save the topic.
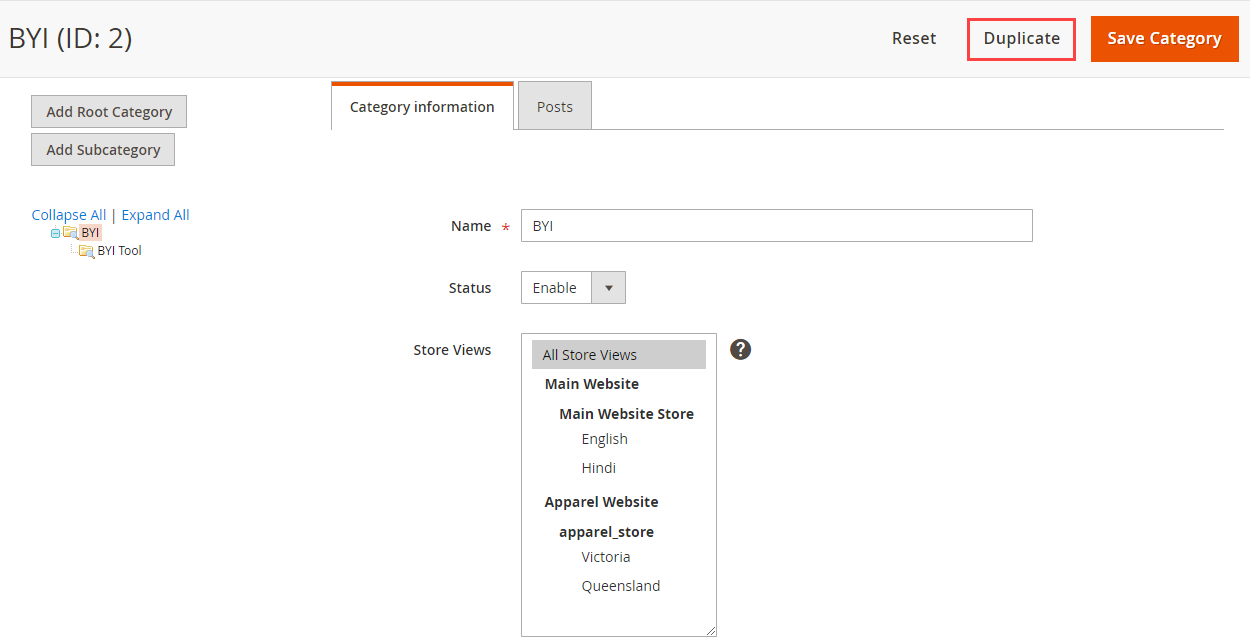
Categories
To create the new categories navigate to the Theme Flare ➤ Better Blog ➤ Categories and fill the following fields.
– Name: Insert the name of the category.
– Status: Select “Yes” to activate the new category.
– Store Views: Select the store view in which you want to display this category.
– URL Key: Insert the URL key so that the visitor can access the category.
– Meta Title/Description/Keyword: Insert the Meta Title, Meta Description, & Meta Keywords for better SEO.
– Meta Robots: Set Meta Robot to one of the following options:
-
- Index, Follow
- NoIndex, NoFollow
- NoIndex, Follow
- Index, NoFollow
After all the configuration Save the category.
Create New Author
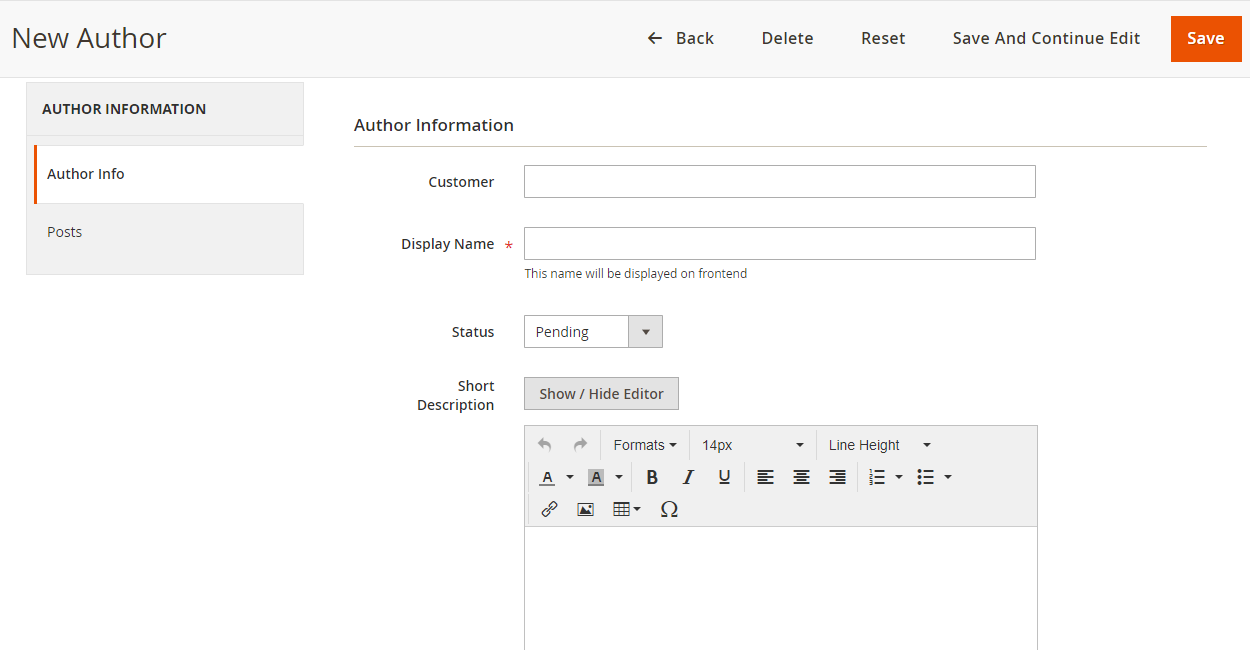
Fill in the following details to create the new author:
– Customer: Select the name of the customer.
– Display Name: Insert the name which will be displayed on the frontend.
– Status: Author’s status, there are 3 author’s status: Pending, Approved and Disapproved
– Short Description: Enter a Short Description for the Author.
– Avatar: Upload the image from the browser in the Avatar option.
– URL Key: Enter the URL Key so that the visitor can access the list post of author.
– Full URL: After saving here will display the full URL link to access the list of author posts.
– Facebook: Insert Facebook link if you want.
– Twitter: Insert Twitter link if you want.
Manage Comments
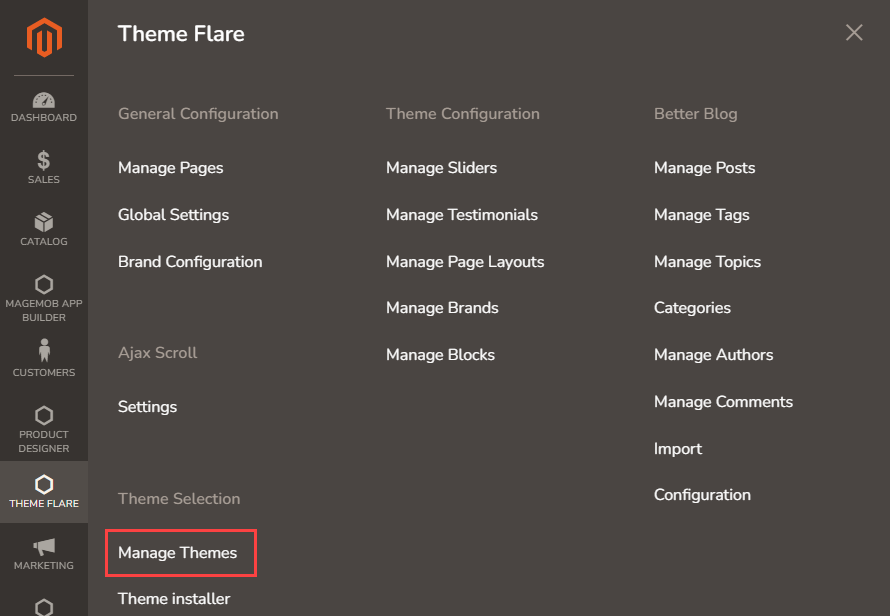
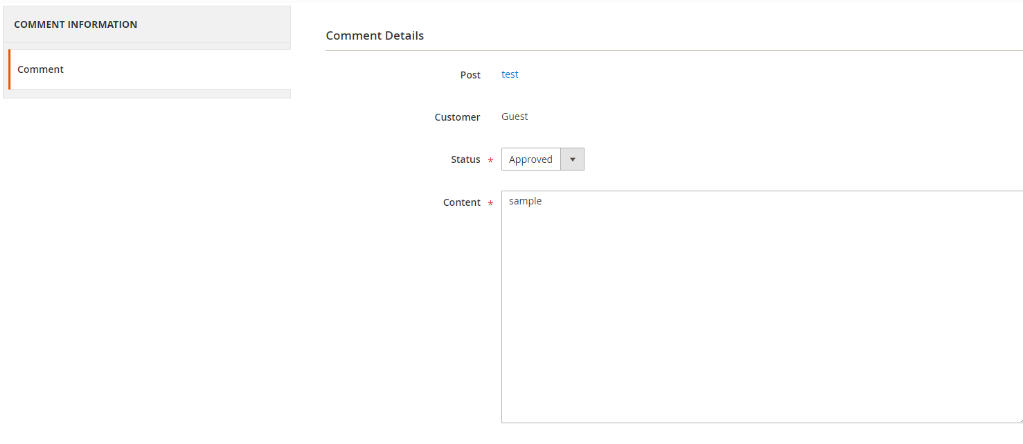
You can also manage the comments by navigating to the Theme Flare ➤ Better Blog ➤ Manage Comments, you will land on the comments page.
when editing a comment, admin need to note as the following:
– Post: The post title which is linked to Edit Post of Manage Post in the backend.
– Customer: The commenter, who is linked to Edit Customer in the backend
– Status: Admins only need to select Status = Approved to allow those comments showing in the frontend.
– Content: Admins can edit the content of the comment at this field. The comment at the frontend will change as the backend. In the comment management grid, admins only see up to 150 characters of the content.
– View on Frontend: link of the post on the frontend.
Import
Navigate to the Theme Flare ➤ Better Blog ➤ Import, you will get the import settings.
Choose import source is “Wordpress” or “AheadWork Blog extension” [Magento 1] or “MageFan Blog” [Magento 2].
– Database Name: Insert your SQL database name.
– Database User Name: Insert your SQL database user name.
– Database Password: Insert your SQL database password.
– Database Host: Insert your SQL database hostname.
– Table Prefix: Insert your table prefix name.
– Import Behavior: In the Import Behavior field, there are 3 actions for admins to choose:
- If you pick Import Behavior = Replace: All current posts in Mageplaza Blog that have the same Url with the posts in WordPress database will be deleted and replaced by the posts from WordPress
- If you pick Import Behavior = Delete: All current posts in Mageplaza Blog that have the same Url with the posts in WordPress database will be deleted. This will be very handy if you import the wrong blogs.
- If you pick Import Behavior = Add/Update:
- If a post has the same Url like the ones in WordPress database, its content will be updated to match with the one in WordPress
- If no post has the same URL as the ones in WordPress database, new Mageplaza Blog posts will be created
Allow update content on existing URL-Key: If Yes, content will be updated on posts with existing url-key. Select No to add a new post.
After going through Check Connection and Import Behavior successfully, admins need to click on the “Import” button to start the importing process from WordPress to Mageplaza Blog.
Aheadworks Blog [Magento 1]
The steps are the same as the ones in Import WordPress with the only difference being changing “Import Type” to “AheadWorks Blog [Magento 1]”
MageFan Blog [Magento 2]
The steps are the same as the ones in Import WordPress with the only difference being changing “Import Type” to “MageFan Blog [Magento 2]”.
Theme Configuration
Under the Theme Configuration, you can manage and design the Page Blocks and manage the contents of the Blocks.
From the Page Builder, you can select the Template among two templates for your Web store theme. The individual Blocks are provided to manage the content.
Manage Sliders
The slider is a powerful marketing tool that helps you create sliders for Banners, Discount Offers, Sales, etc.
Uploading colorful and high-quality images is a great way to enhance your site’s appearance. It makes your website more impressive, and professional which could improve the experience of customers and encourage them to view banners as well as get the information you want to share.
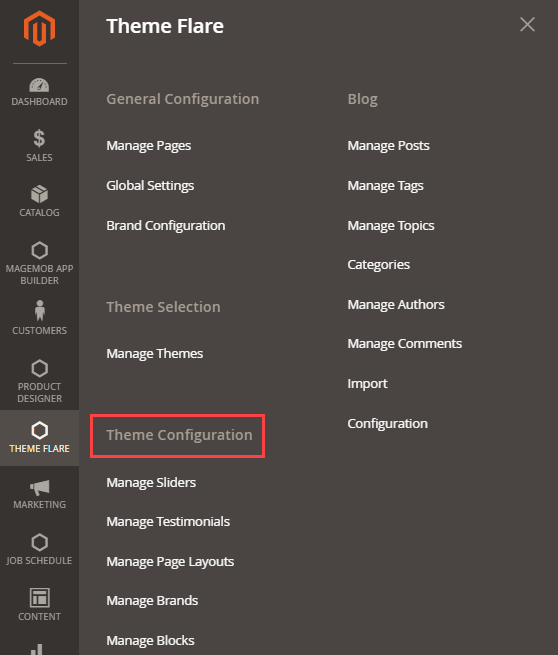
Navigate to THEME FLARE ⇒ Theme Configuration ⇒ Manage Sliders. You will get the list of the Slider in the grid view. From here you can search the Sliders by filter options. You can enable/disable, edit any Sliders, and delete unwanted Sliders as well.
You can add a new Slider by clicking on Add New Slide button from the upper-right corner.
Add New Slide
First, you must Enable the Slide status.
Store View: Select the store view in which you want to enable this new slide.
Title: Insert the title name of the Slider. i.e. Offer, New Arrivals, Marketing campaigns, etc.
Description: Insert the Description related to Slider purpose or subject. You can add the text caption and design using WYSIWYG Editor or select the Widget or Images.
Image: Select high-resolution quality images to display on the slider.
Insert the other detail as per your Slider design like Button Text and its URL when the customer will click on it.
Similarly, you can insert the Button Text and its URL for the Additional Button. Select the Category, Insert the Banner Tag, and Sort Order.
After inserting the details, Save the Slider.
This way, you can insert the Slider and display it on your website for Banner, Offer, or Marketing Campaign.
Manage Testimonials
All visitors are really interested to know what other shoppers think about your products and Web store and how they appreciate the store services, etc. By placing a testimonial, you will be able to show more user impressions of your store products.
You can add and manage the Testimonials to display on your website.
Navigate to the Theme Flare ➤ Theme Configuration ➤ Manage Testimonials. [1] You will get the list of testimonials in the grid view. From here you can search the testimonials in the grid view. From here you can search the Testimonials, and delete unwanted testimonials as well. [2]
Add New Testimonials
Click on the Add New Testimonial and fill the following fields.
– Enable: Enable the testimonials to make it visible on the frontend.
– Store View: Select the store in which you want to make this testimonial visible.
– Client Name: Insert the client name that will be displayed on the frontend.
– Company Name: Insert the company name that will be displayed on the frontend.
– Content: Insert the content or click on the Show/Hide Editor button to insert the widget, image, and variable.
– Live Site: Insert the link of the live site.
– Client Image: Upload the image of the client.
– Sort Order: Insert the sort order of the testimonials.
After entering the details Save the testimonial.
You can also edit the testimonials by clicking on the Edit button from the Actions column.
Manage Page Layouts
The layout of each page in your store consists of distinct sections, or containers, that define the header, footer, and content areas of the page. You can design your own store using predefined layouts and blocks!
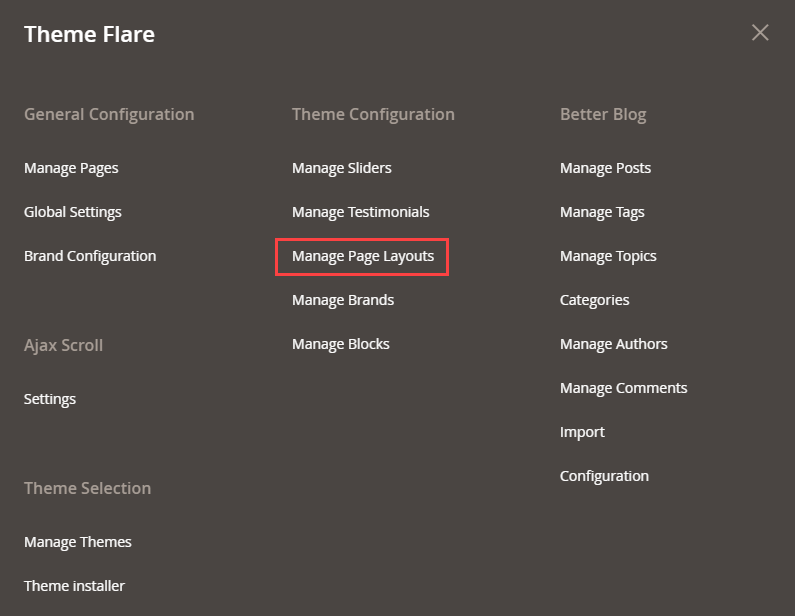
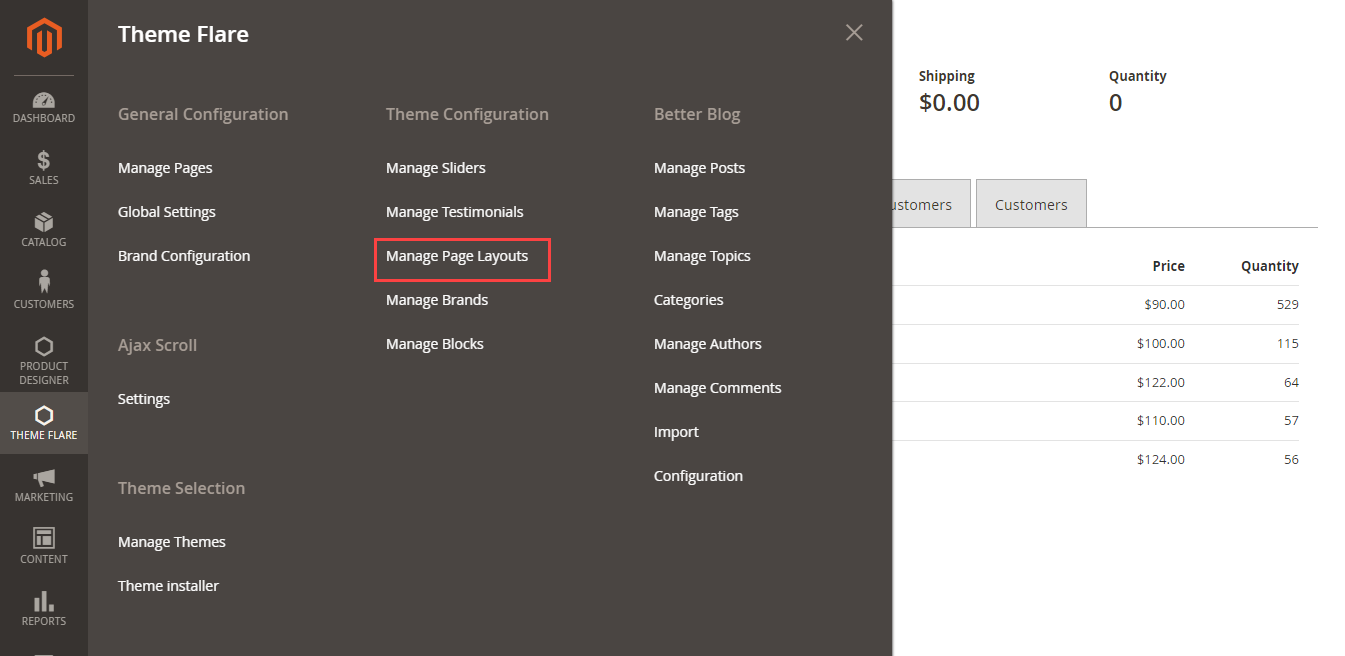
Navigate to THEME FLARE ➤ Theme Configuration ➤ Manage Page Layouts. Here all the added layout pages will be displayed.
Add New Page Layout
By clicking on the Add New Page Layout button, you can add a new Page Layout to create a new web store.
Select Status: To select Enable/Disable for Page Layout.
Select CMS Page: To select the added CMS page from the CMS Pages list. You can build the Page layout based on the selected CMS page.
Store View: Select the Store in which you want to add the CMS Page.
Note: You need to select the “Store View” only for the product listing page, the product details page, the Contact us page, and one-page-checkout.
Click on the Save Layout button. After adding the page layout, you can start designing.
Now click on the Design option to design the Page Layout from the Page Builder. As you click on it, you will be redirected to the Page Builder on the specific Page layout.
Page Layout Design
Choose a Template
From here you can design the Home page by choosing a Template and designing the Block elements with drag and drop functionality.
Click on the Templates icon, you can see the Theme under the Templates: PrintXpand – Card Theme (Template 1) and PrintXpand – Apparel Theme (Template 2).
Click on the Choose and navigate to the Block elements page to build and design the Web Page of the Store.
Blocks
Now, by clicking on Block icons, you can set and manage the Header, Footer, different content blocks like Banner, Top Deals, and many more. You can also manage the blocks for social media like Blogs, Instagram feeds, testimonials, and other relevant blocks.
You can change and replace any block with drag & drop the block snippets on the web page. You can also edit the content of the Blocks by clicking on the edit icon of any block from the Web Page. [1]
Now, you can manage and design the different Blocks for your website as below: [2]
– Header
– Banner
– Top Category
– Trending Categories
– Featured Product
– Deal Management
– Static Content
– Blogs
– Testimonial
– Instagram Feeds
– Brand
– Footer
Header
Drag & drop the ‘Header’ snippet to the Webpage and it will replace the current one. [1]
Edit Header
By clicking on the ‘edit’ icon of the Header block, the panel named “Header” will appear from the right side. From here you can enable/disable the Language Translator, Currency,, Email, Mobile, and Default Menu options to display on the Header. [4]
After editing, click on the Save Page button from the upper-right corner. [5]
Banner
Drag & drop the ‘Banner’ snippet to the Webpage to display the excellent products as banners.
Edit Banner (Slider)
By clicking on the ‘edit’ icon of the Banner block, the panel named “Banner” will appear from the right side. From here you can edit the existing Banner by clicking on the edit icon and delete if you want to remove it from the list of the Banner snippet.
Add Banner (Slider)
By clicking on the Add, you can directly add the banner inserting the details from the panel. Once the details: Title, Button Text, Button URL, Status, Description, and Image are added, click on the Save button, the new slider will be added to the list of the Banner snippet.
Slider Master
Enable the “Slider Master” feature to add the banner directly added from Manage Sliders.
After editing the banner block, click on the Save Page button from the upper-right corner.
Top Category
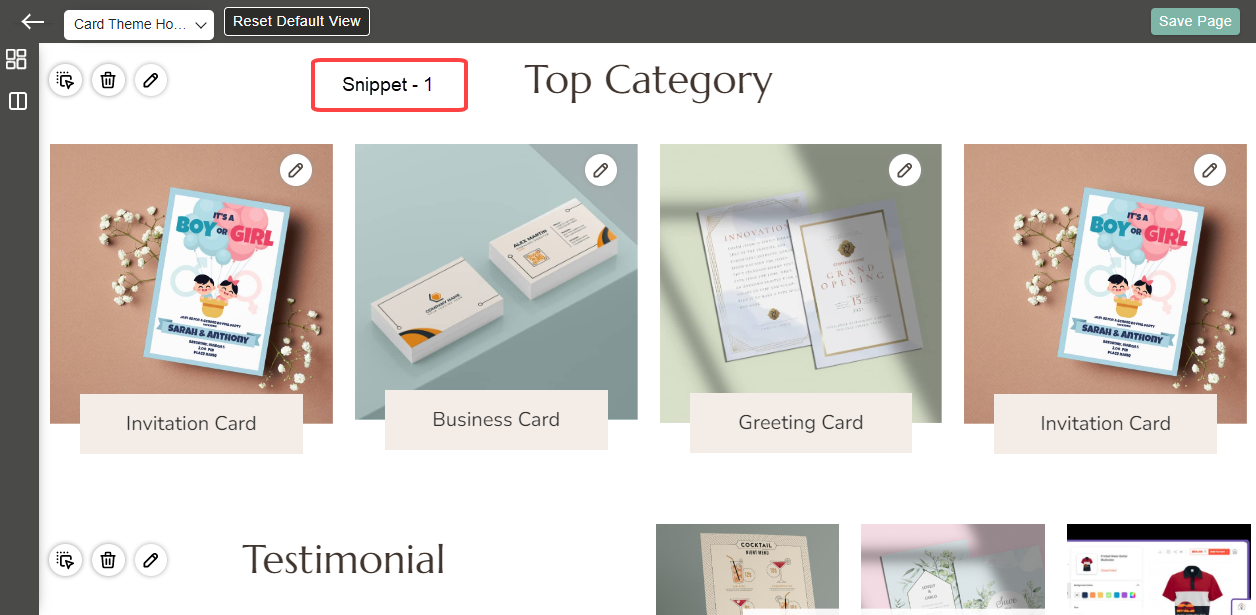
Drag & drop the ‘Top Category’ snippet to the Webpage to display the categories of different product types. [1]
Edit Top Category
By clicking on the Edit icon of the Top Category block, the panel named “Top Category” will appear on the right side. From here you can select the category to be displayed in the “Top Category” list. [5]
You can only display those Top Categories which are added from the backend.
After editing the Top Category block, click on the Save Page button from the upper-right corner.
Trending Categories
Drag & drop the ‘Trending Categories’ snippet to the Webpage to display the products that are most checked and purchased by the customers. [1]
Edit Category
By clicking on the Edit icon, the panel named “Trending Categories” will appear on the right side. From here you can select the category to be displayed in the “Trending Category” list. [2]
The number at the bottom corner shows the count of products in that particular category. The number will only be visible for the card snippet.
After editing the block, click on the Save Page button from the upper-right corner.
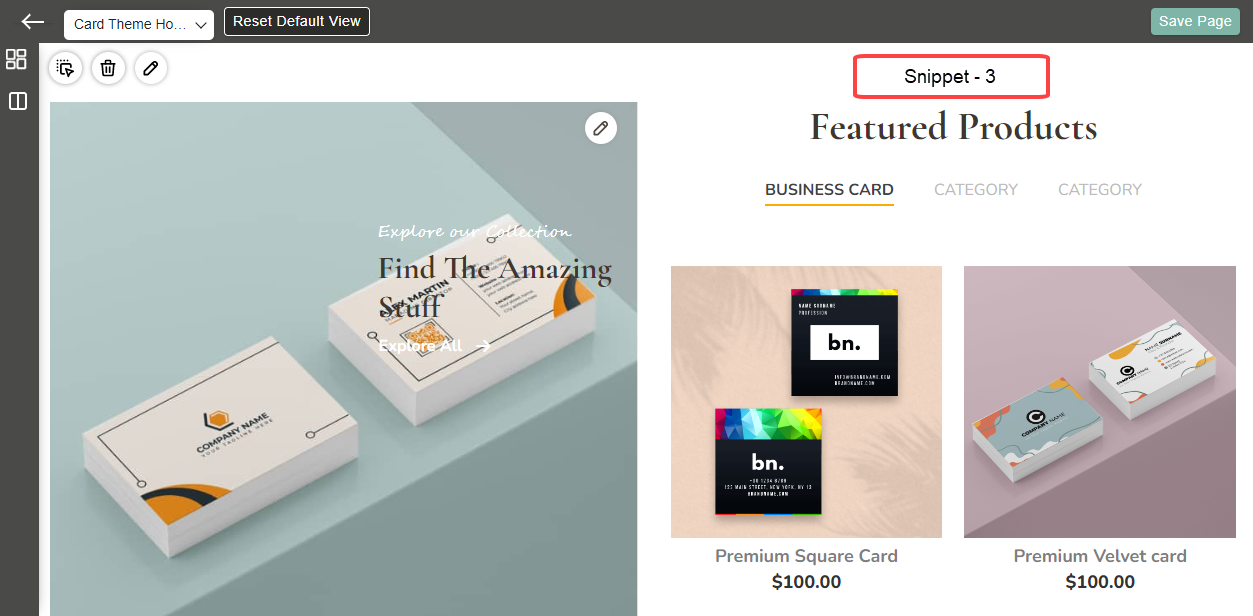
Featured Products
Drag & drop the ‘Featured Products’ snippet to the Webpage to display the latest/featured products. [1]
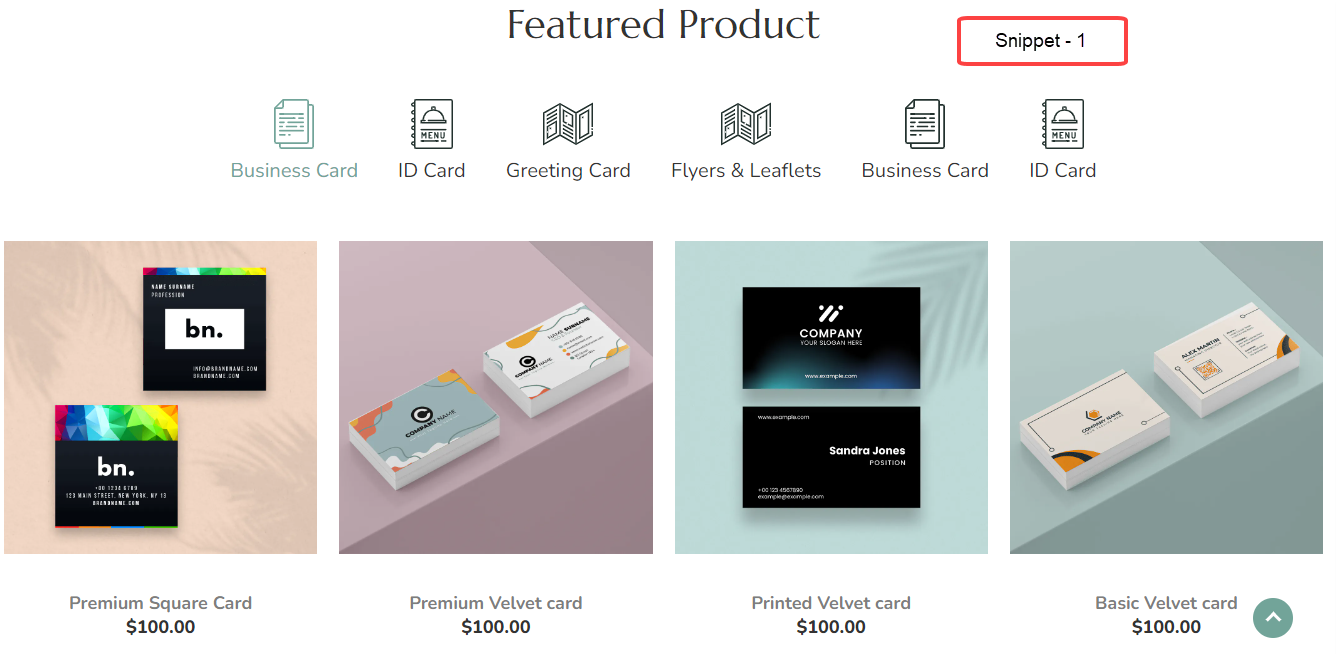
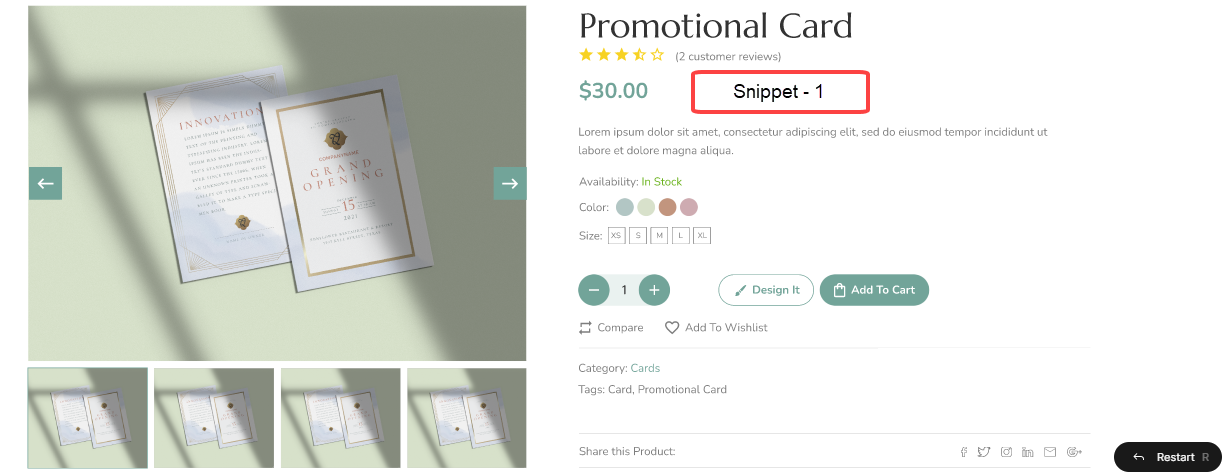
Snippet – 1
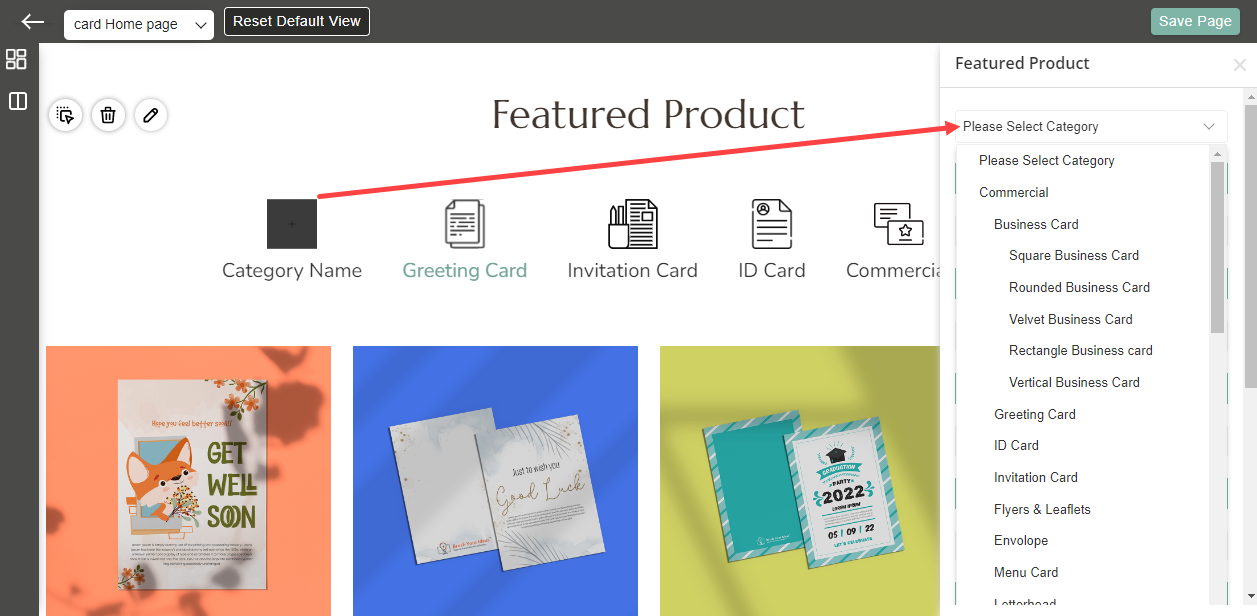
You can set the category to be displayed in the featured products and you can also set the icon of it.
Click on the Edit, Featured Product panel will open up. Now select the Category to be displayed and its icon. [2][3][4]
Note: Icons selected for the categories will be stored once, if snippet is deleted and added back then previously added icon will not be displayed.
You can also Enable/Disable Product Price, Add to Cart, View, Wishlist, and Compare options for the product.
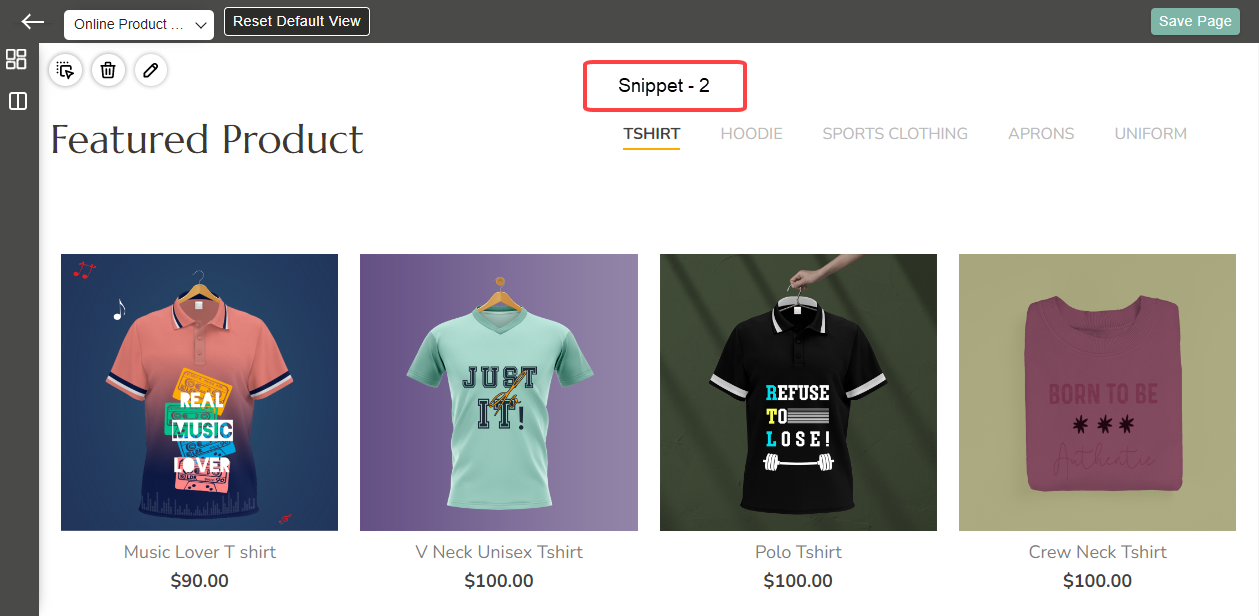
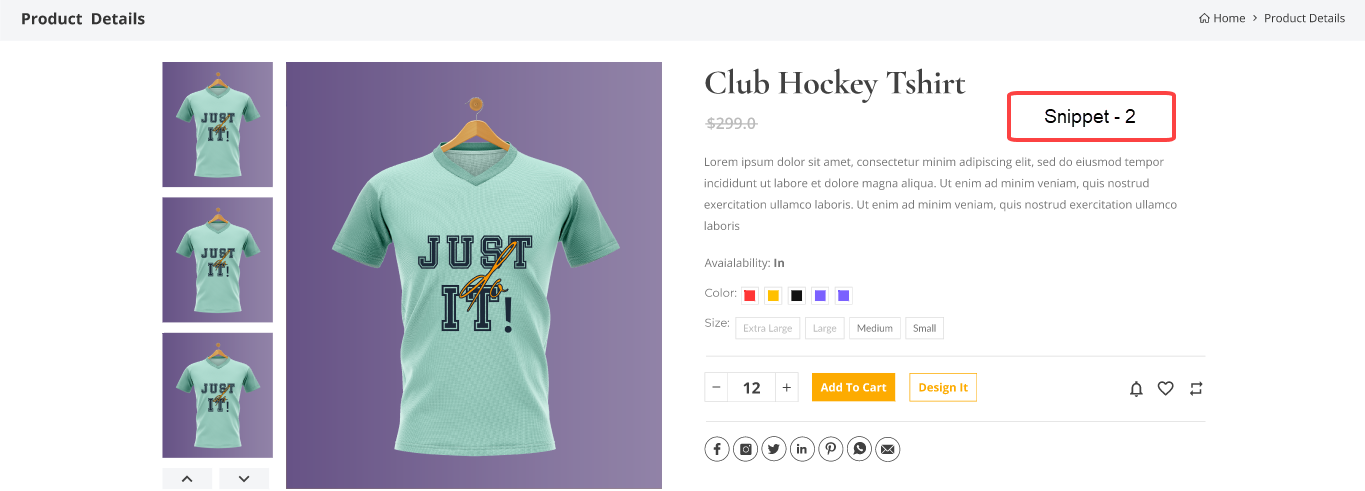
Snippet – 2
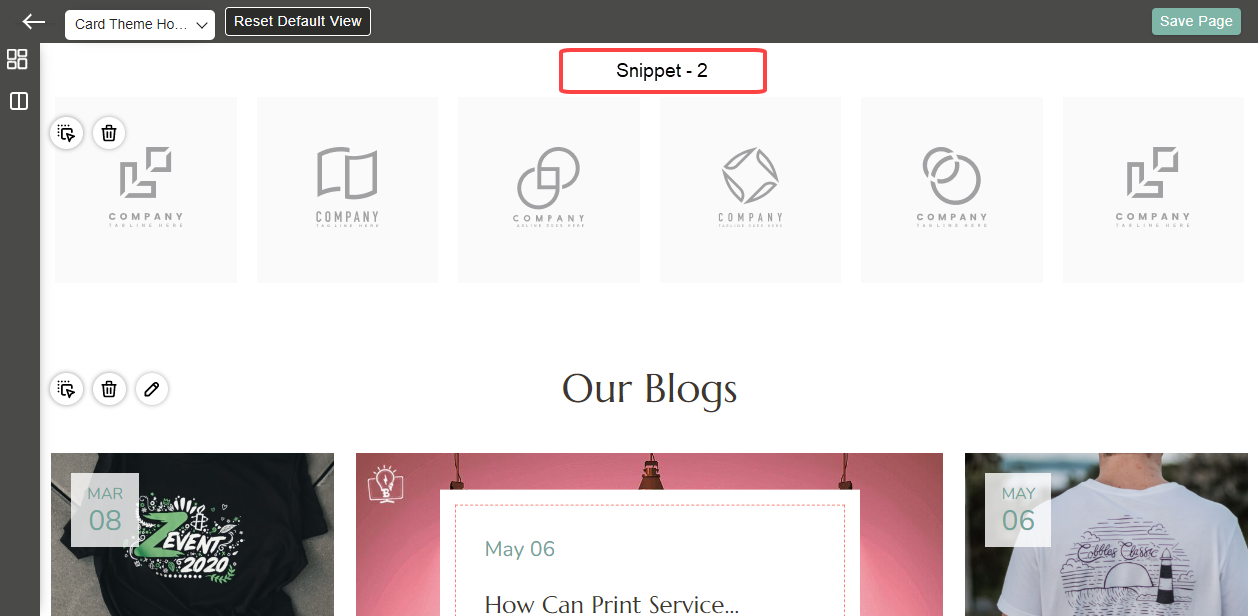
By clicking on the ‘edit’ icon of the Featured Products block, the panel named “Featured Products” will appear on the right side. From here you can select the category to be shown in the “Featured Product” section. [5][6]
After editing the block, click on the Save Page button from the upper-right corner.
Deal Management
Before managing the page layouts for the deal, you must insert the deals under the ‘Catalog Price Rule’ to display the deals/offers on the store to the customers.
After that, you need to configure the page layouts for the deals and offers using the Deals snippet. For that, navigate to the THEME FLARE ➤ Manage Page Layouts, where you can add a new Page Layout and edit the existing layout as per the store.
Click on the ‘Design’ of the store for which you want to manage the deals and display the deal on the store.
Once you click on the ‘Design’ option, you will navigate to the Layout designing page from where you can add/edit the blocks of the different snippets.
Now, by clicking on the ‘Blocks’ icon, you will find the different blocks to add the snippets on the page. Here you will find the Deals block. By clicking on it, you can see a total of 2 different snippets are provided to configure the Deal to display on the store. You will find the discount based & timer-based snippets for the deals and offers.
– Drag & drop any snippet to the page layout.
– Edit the block to configure the deal-related details. By clicking on the ‘edit’ icon, a popup will appear from the right side to insert the details of the snippet.
Discount Deals:
– Deals: Here, you will get the list of the “Catalog Price Rule”. You must select a rule to apply for the selected Deal snippet. Once the rule is applied, deal will load automatically as per the catalog rule pricing.
Note: You can only edit Shop Now button, Left Image, & text above the timer.
After configuring the “Deals snippet”, save the details by clicking on the Save Page button from the header.
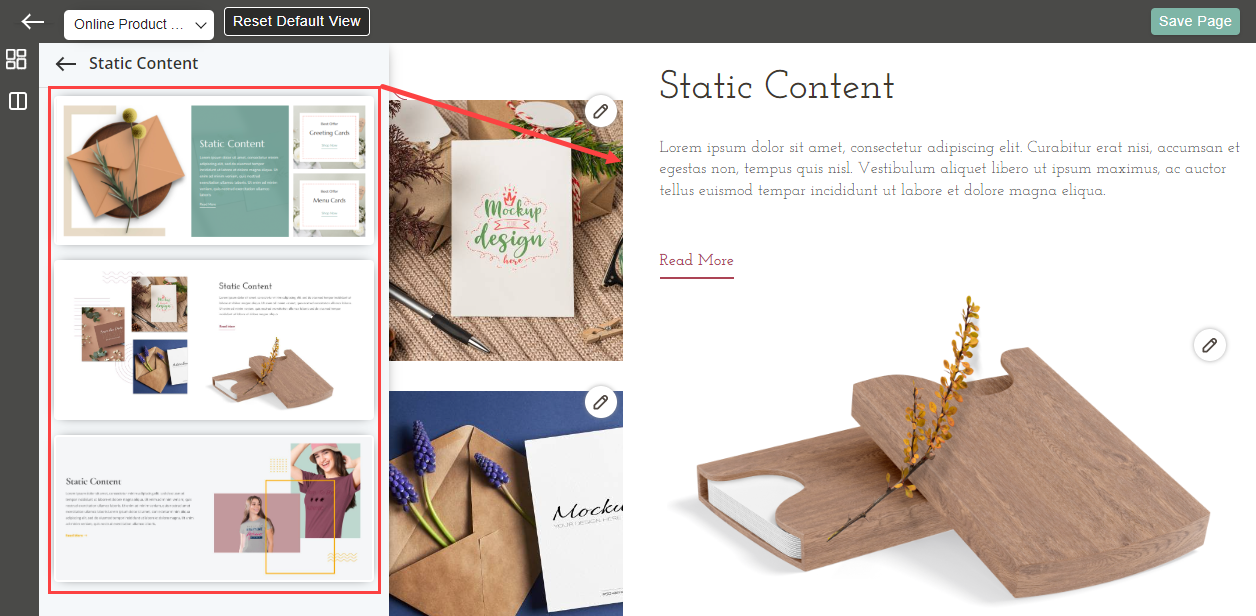
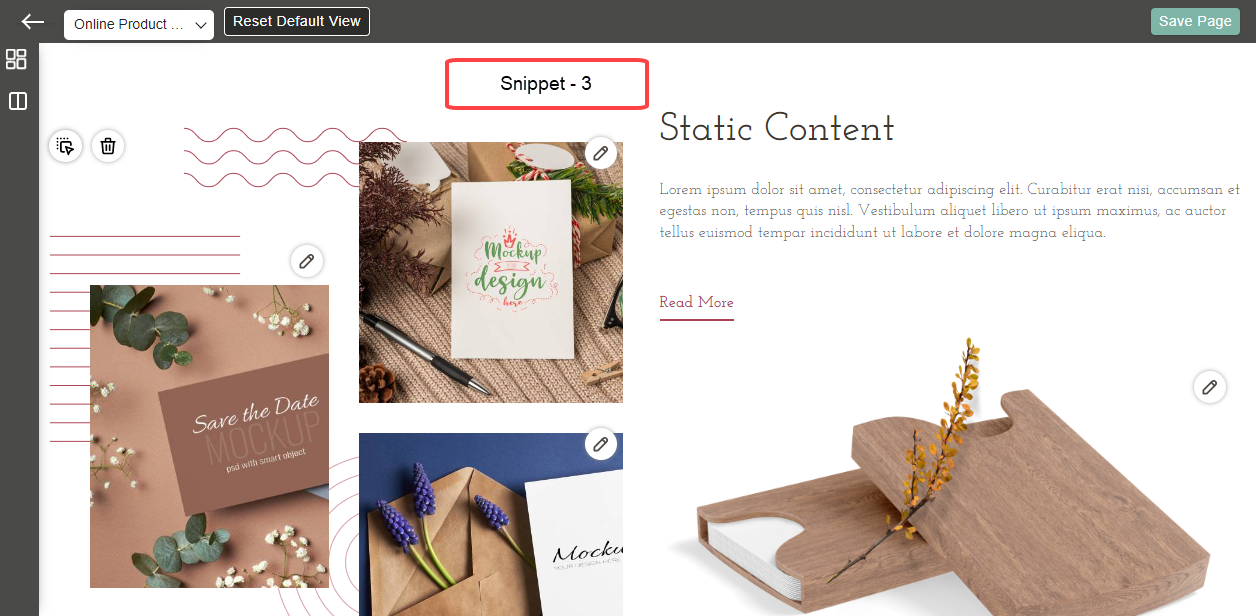
Static Content
Drag & drop the ‘Static Content’ snippet to the Webpage to display how it works, steps, etc.
Edit Static Content
By clicking on the Edit icon these are the editing features you will get.
- Replace: Click on the replace button to replace the background image.
- Reset: By clicking on the Reset button it will load the last saved image.
- Delete: Click on the Delete button to delete the image.
After editing the block, click on the Save Page button from the upper-right corner.
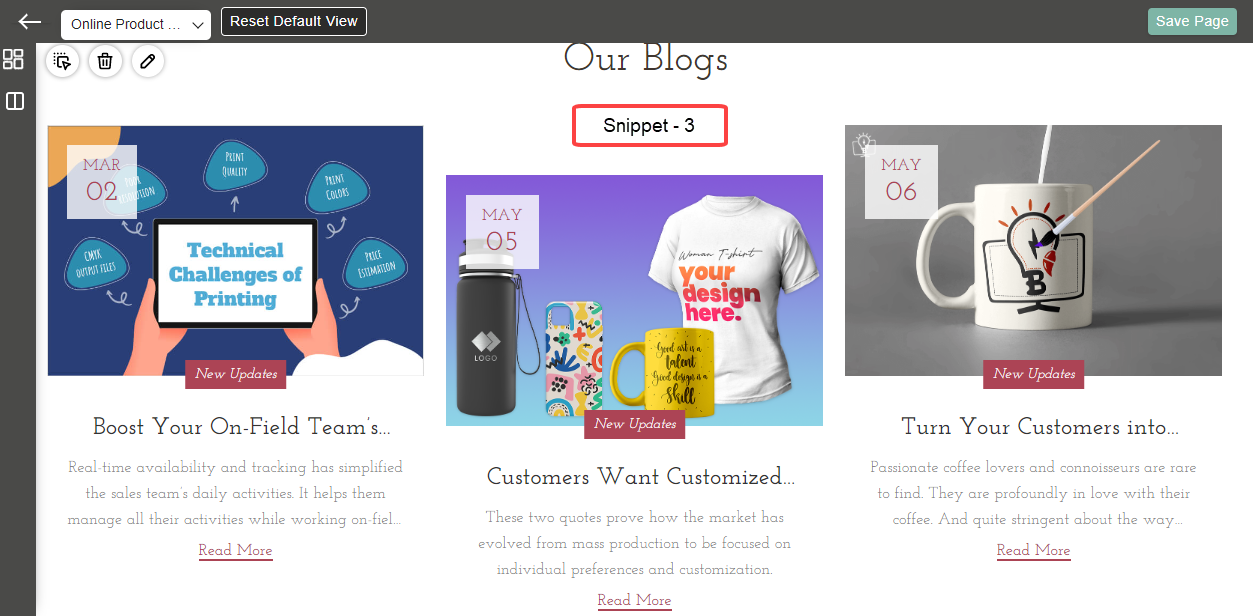
Blogs
Drag & drop the ‘Blog’ snippet to the Webpage to display informative blogs, notes, or articles. [1]
Edit Blogs
By clicking on the ‘edit’ icon of the Blogs block, you can select the blog to be displayed on the web page. [4]
You can only display those blogs which are added from the backend.
After editing the block, click on the Save Page button from the upper-right corner.
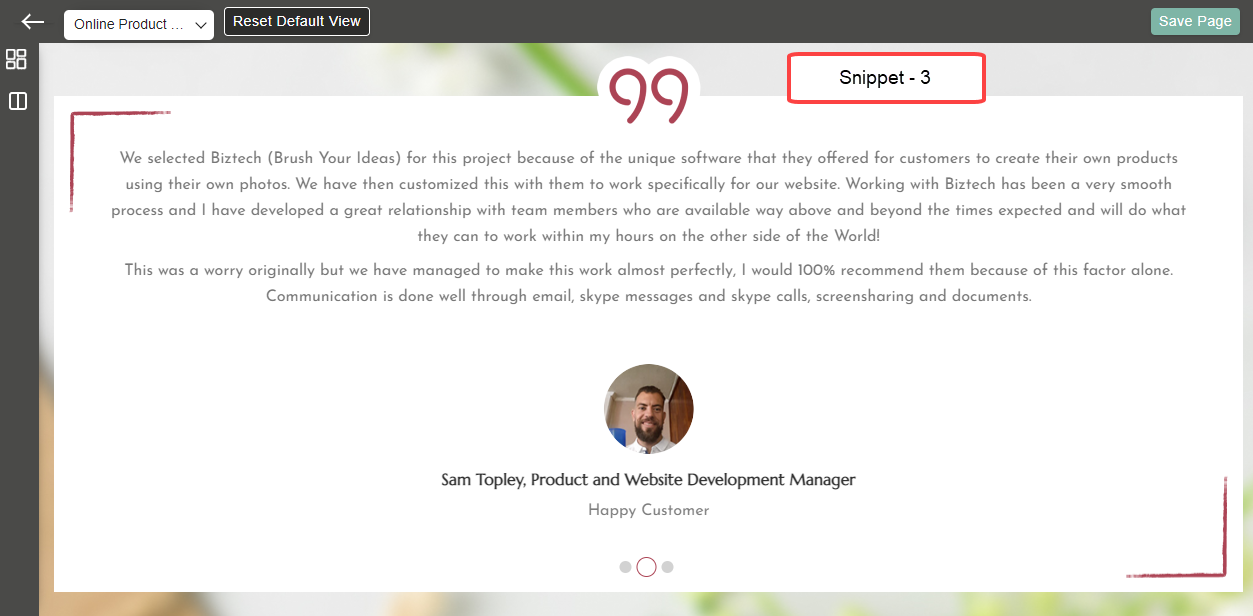
Testimonial
Drag & drop the ‘Testimonial’ snippet to the Webpage to display the customers’ reviews of the products. [1]
Edit Testimonial
Drag & drop the ‘Testimonial’ snippet to the Webpage to display the customers’/visitors review of the Service.
By clicking on the Edit icon of the Testimonial block, you can select the testimonials to be displayed on the webpage. You can only display those testimonials which are added from the “Manage Testimonials” section. [4]
After editing the block, click on the Save Page button from the upper-right corner.
Instagram Feed
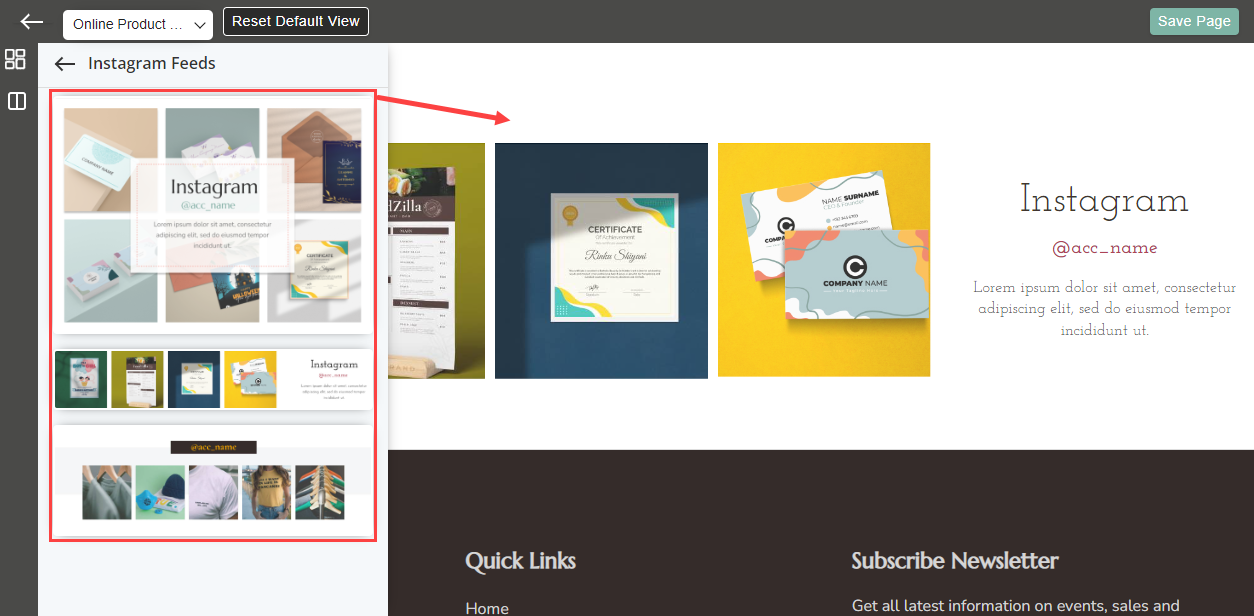
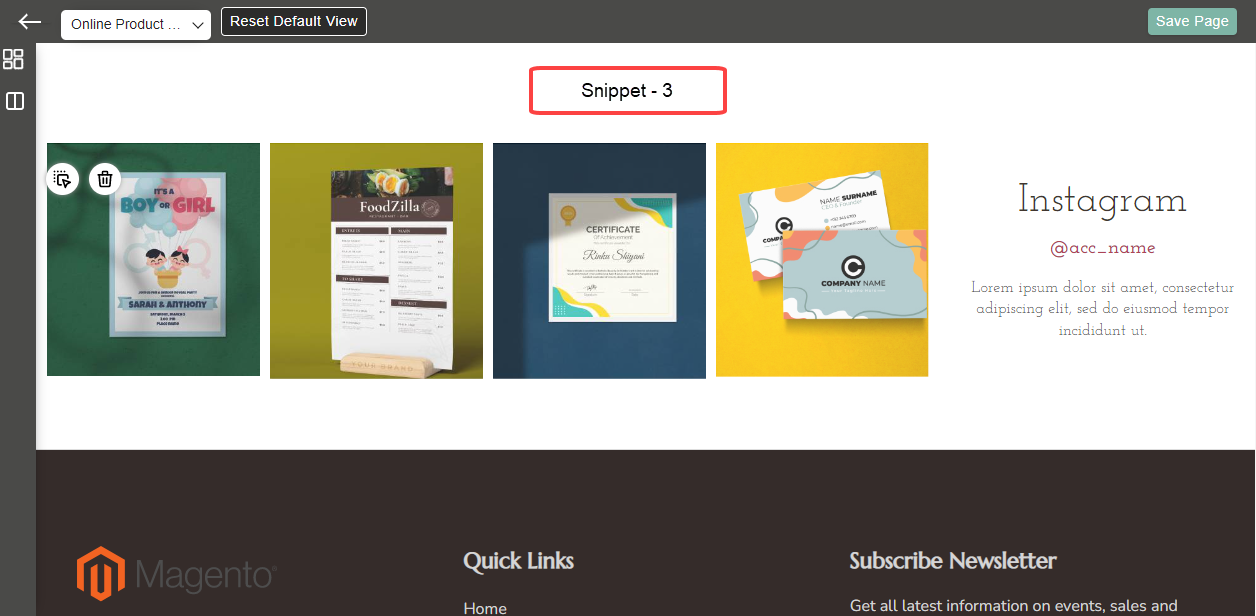
You can also add your Web Store’s Instagram profile on the Web page. You must get the Instagram access token key by registering the client ID. Drag & drop the ‘Instagram Feeds’ snippet to the Webpage to display the images/snaps from Instagram.
Note: You can’t edit the name/images of the Instagram account.
Note: You can’t edit the name of the Instagram account.
After editing the block, click on the Save Page button from the upper-right corner.
Footer
Drag & drop the ‘Footer’ snippet to the Webpage to display details and menus of the web store. [1]
Footer consists of five sections i.e. Content, Quick Links, Top Products, Reach Us, Newsletter and Icons. [4]
– Content: You can edit the content with the help of a content editor.
– Quick Links/Top Products/Reach Us: By clicking on the respective section a panel with quick links will open on the right side. You can Edit and Delete each quick link. You can add the new quick link by clicking on the “+” icon and entering its name and URL. You can also change the font, style, size and apply the different styling to the content. [5]
– Social Media Icons: By clicking on the social media icon a panel with quick links will open on the right side. You can Edit and Delete each social media icon. You can add the new social media icon by selecting the social media icon platform and inserting its icon link. [6] [7]
Note: To upload an image here are some minimum requirements of dimension.
Card Theme
| Banner Size | 710 * 770 |
|---|---|
| Trending Category | 600 * 600 |
| Top Categories | 400 * 400 |
| Featured Products | 500 * 500 |
| Product detail and Product list pages | 1000 * 1000 |
For the “Our Blog” section here are the required image dimensions.
- Small Images: 650 * 600
- Center Image: 800 * 800
For the “Static Content” section here are the required image dimensions
- First Image: 900 * 700
- Center Image: 500 * 700
- Last Image: 600 * 600
Apparel Theme
| Trending Category | 600 * 600 |
| Featured Products | 500 * 500 |
| Top Categories | 1000 * 1000 |
| Instafeed | 400 * 400 |
Blank Snippet
With the Blank Snippet feature, you can add custom-made blocks to your Home Page which will be designed by you.
Backend Configurations
Step 1: Configure Block
Firstly you have to configure the blocks into your system. For that navigate to Theme Flare > Manage Blocks. You will get the list of all the created blocks Now follow these instructions to create the block.
Step 2: Assign Block
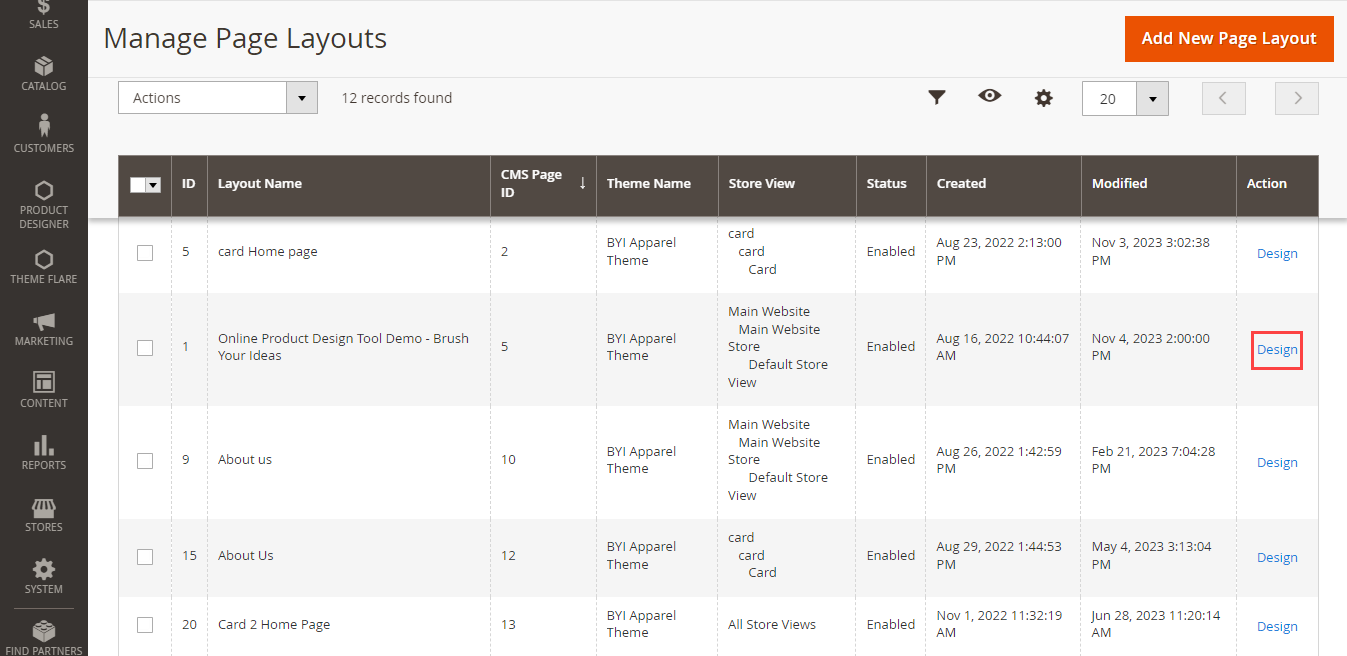
Once the block is created you have to assign it to the home page. Navigate to the Theme Flare > Manage Page Layouts you will get the list of page layouts. [1]
Now open the Home page layout in Edit mode and you will land on the page builder. [2]
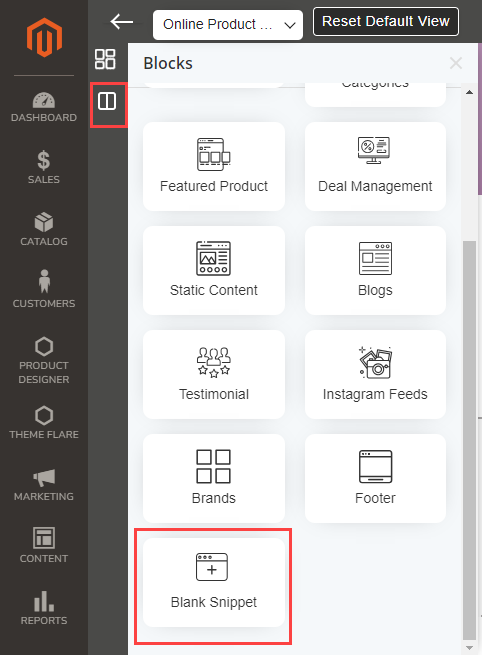
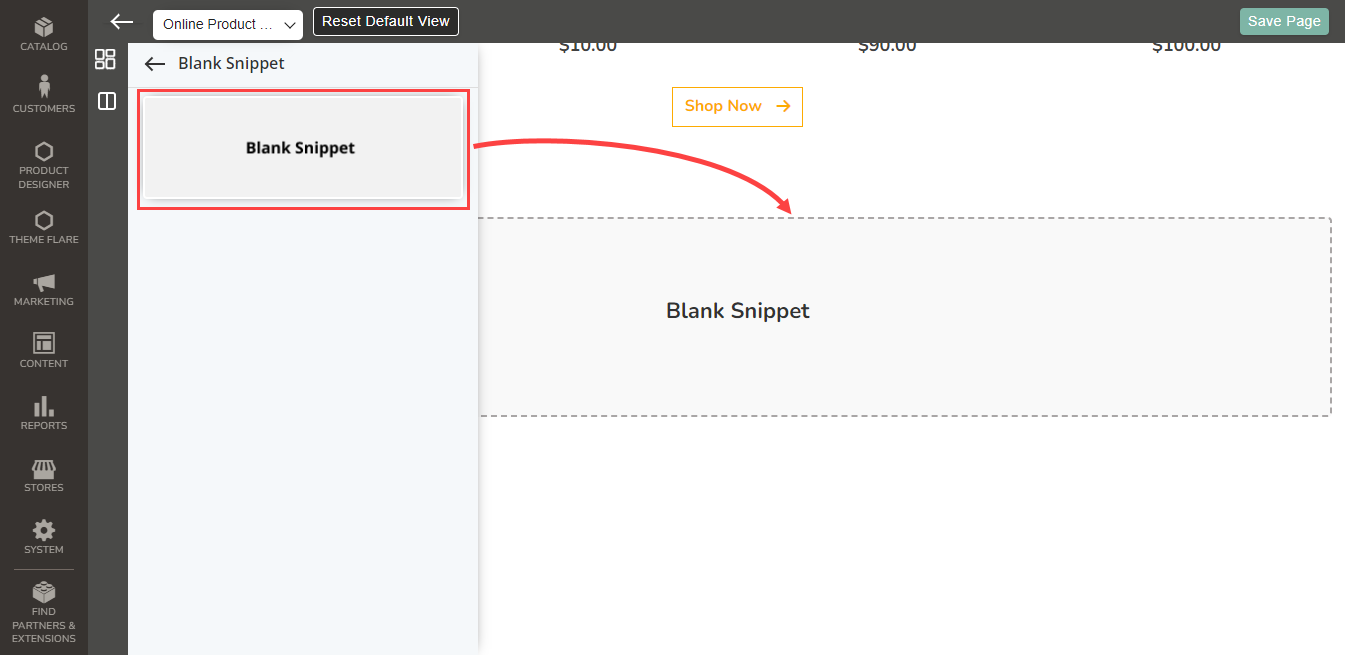
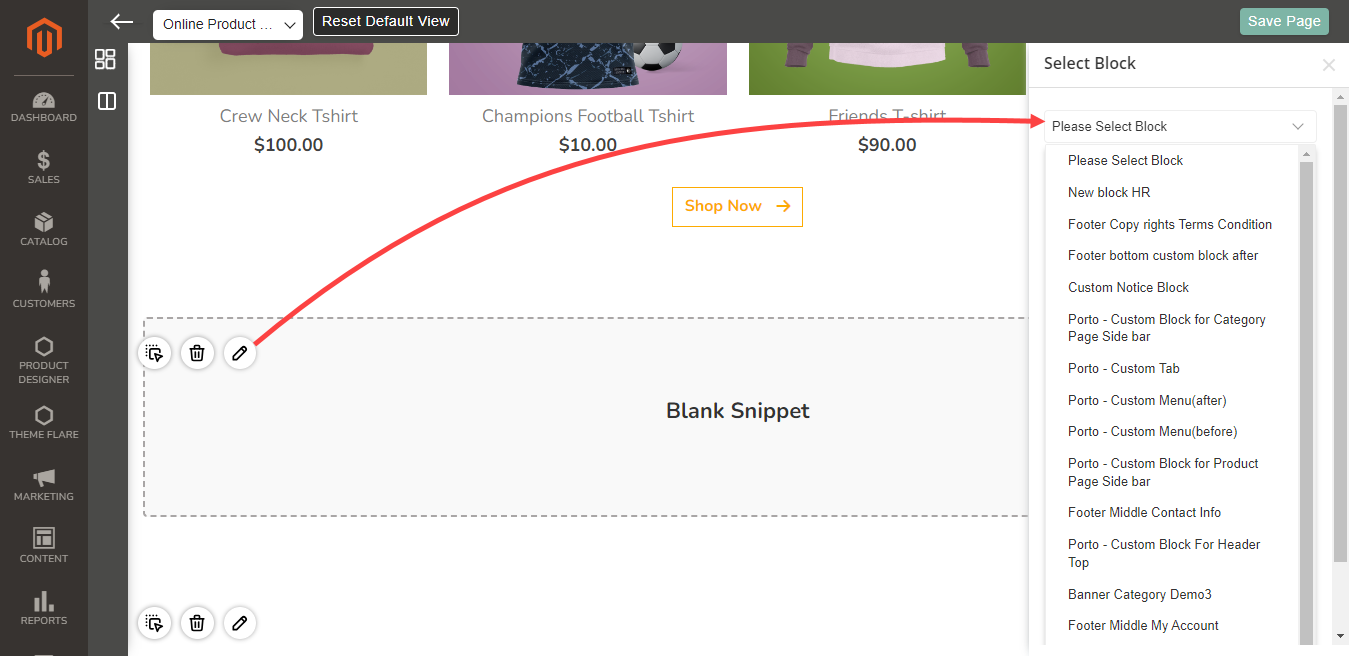
Open the Blocks section on the left side and you can see the Blank Snippet Block. [3] Open the block, drag and drop the snippet to the page where you want to show the custom designs. [4]
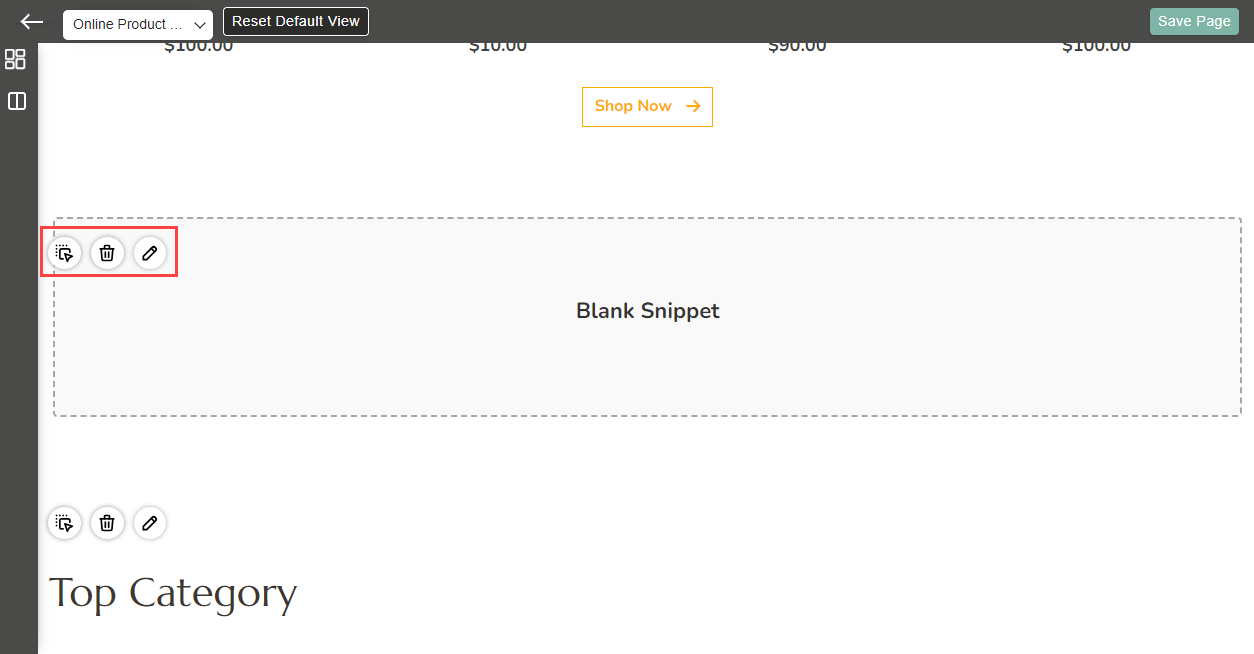
You can perform Three actions on the snippet. [5]
- Drag: You can Drag and Drop the snippet anywhere on the page
- Delete: You can delete the snippet from the page
- Edit: You can Select the block you want to show on the home page. [6]
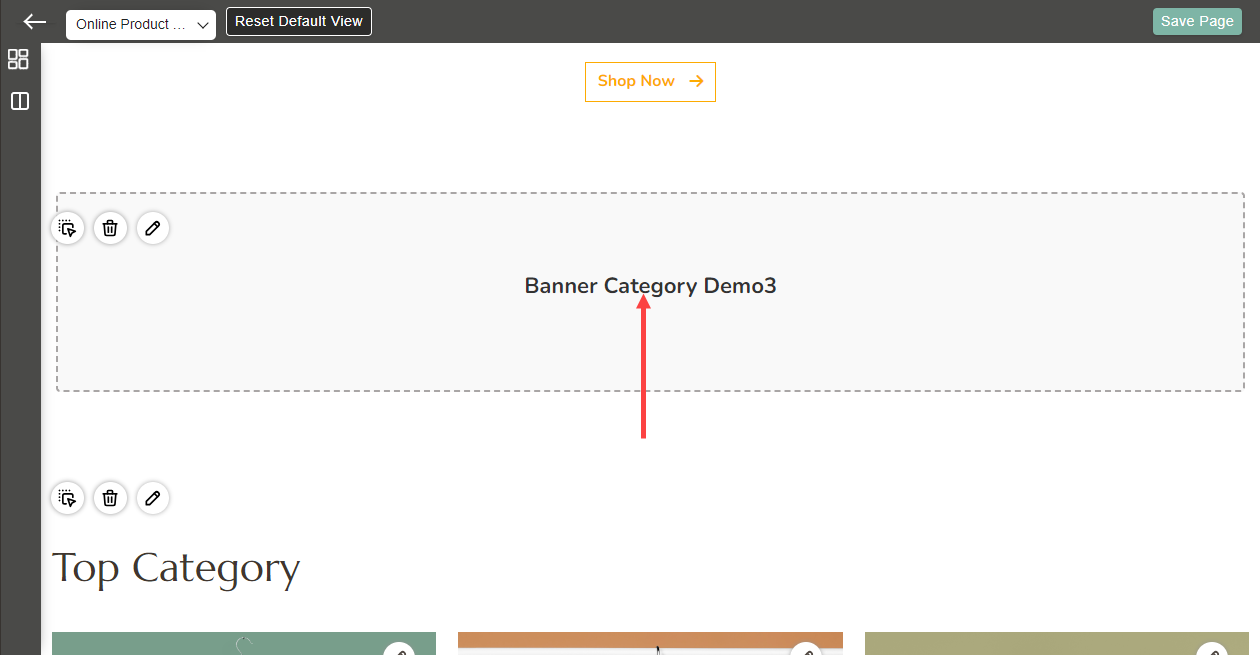
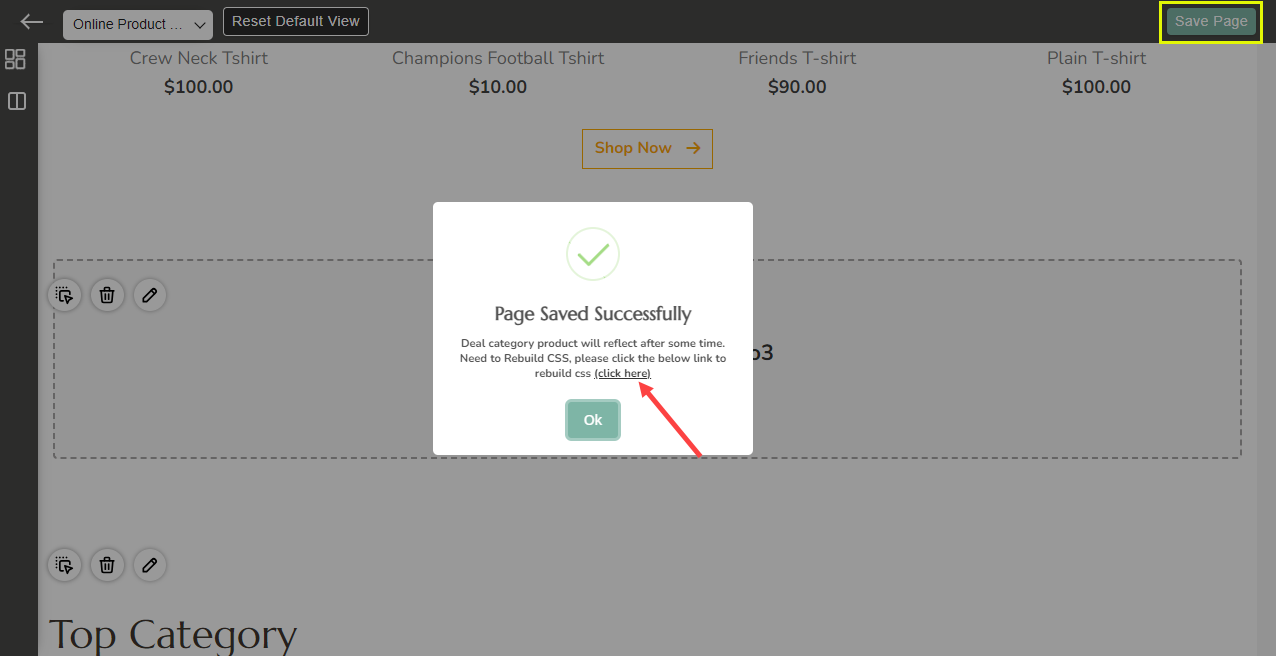
After selecting the block, its name will reflect on the snippet. [7] Now save the page and rebuild CSS to view it on the front end. [8]
Frontend
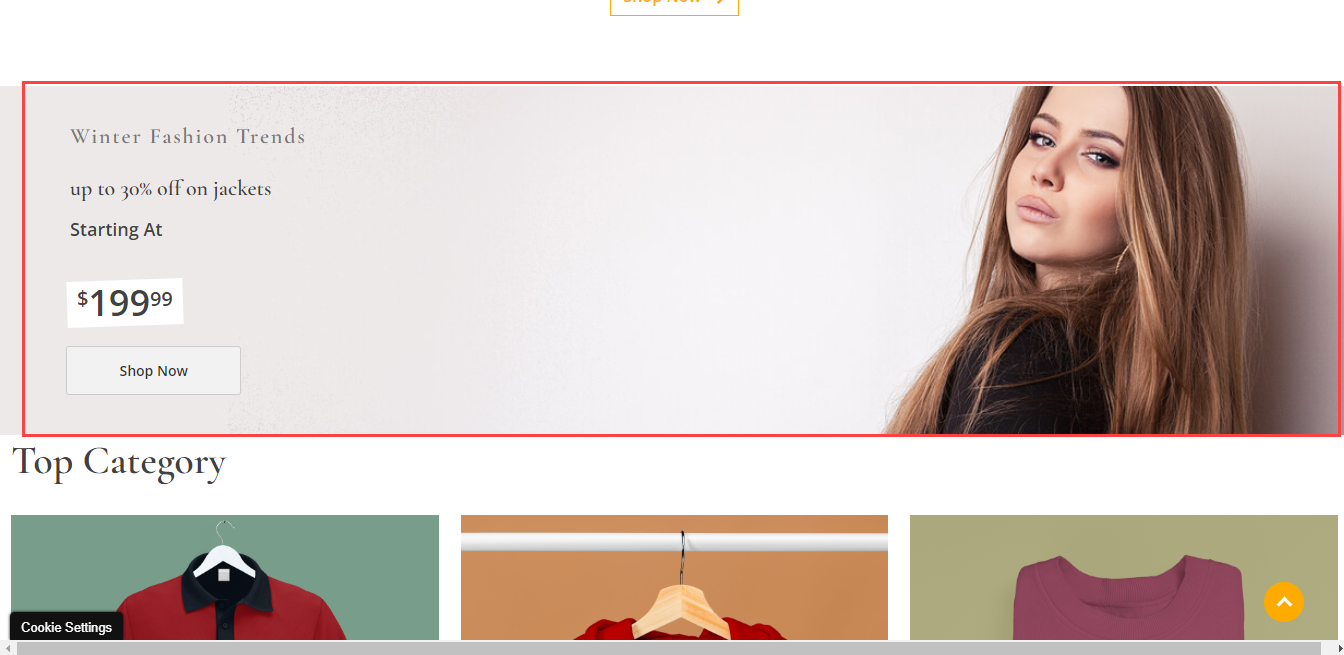
As per the backend configuration, you can see the block on the page. [9]
Product Listing & Detail Page
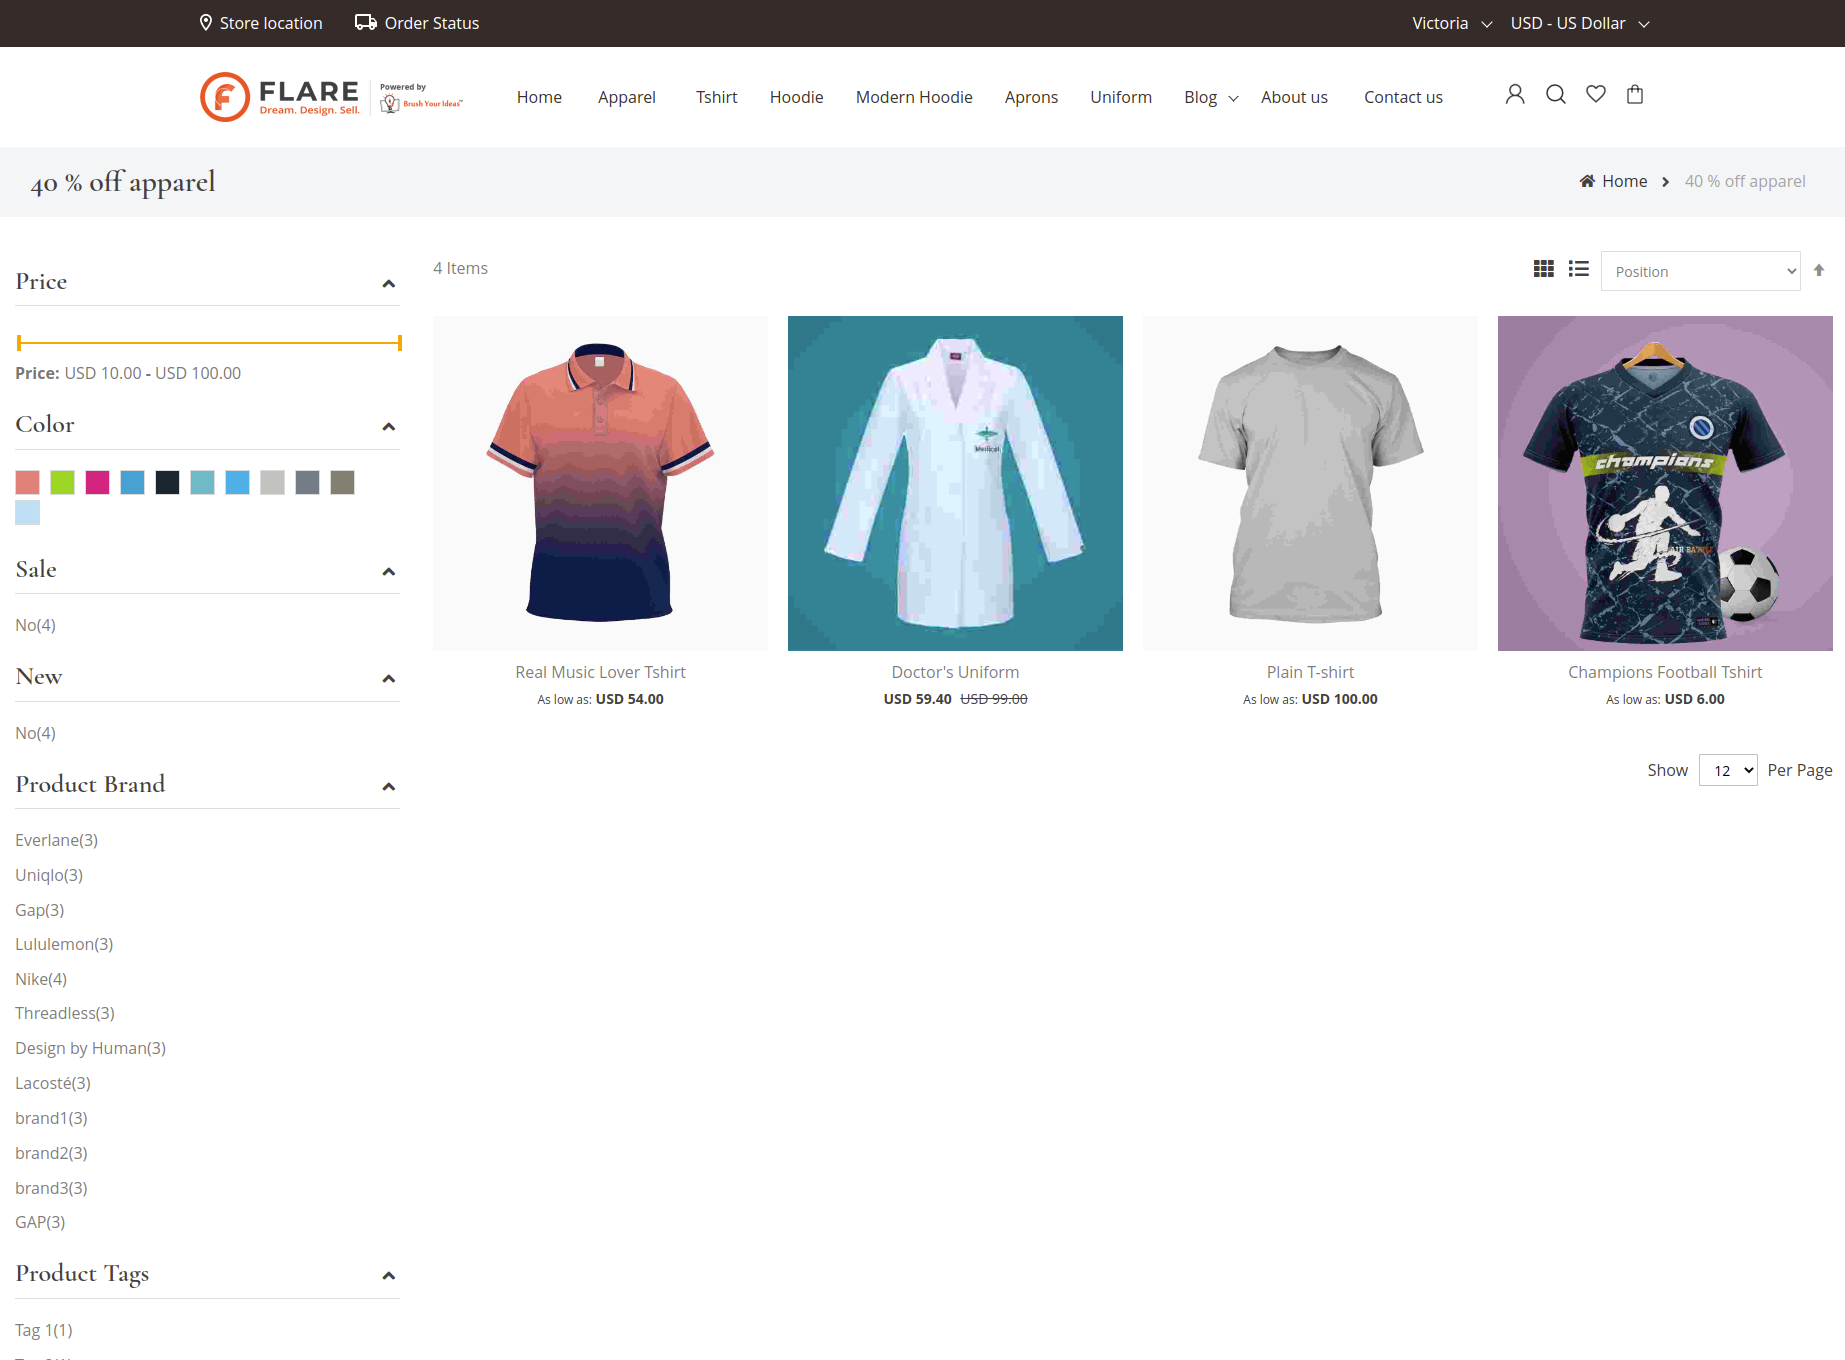
For the Product detail and listing page, the predefined layouts are provided to display the products and their details on your web store.
For that, navigate to the “Manage Page Layouts” and add a new Page layout or design the existing page of the product details and listing page.
You can edit and manage the Product listing and detail pages by keeping store specific.
Product Listing page
By clicking on the Design action of the ‘Product listing’ page, the product listing web page will open to design it.
By clicking on the Block icon from the left, you can drag & drop the layout to your web store.
Note:
- You will not get the Edit feature for the Product Listing page.
- You can’t change the header & footer for the Product Listing page.
Product Details page
By clicking on the Design action of the ‘Product details’ page, the product details web page will open to design it.
By clicking on the Block icon from the left, you can drag & drop the layout to your web store.
All the details will be fetched based on the details added from the backend for the product.
Note:
- You will not get the Edit feature for the Product Listing page.
- You can’t change the header & footer for the Product Listing page.
Contact Us Page
You can design the “Contact Us” page using predefined layouts. Navigate to “Manage Page Layouts” and add a new page or design the existing pages.
By clicking on the Design action of the ‘Contact Us’ page, the contact us web page will open to design it. [1]
By clicking on the Block icon from the left, you can drag & drop the layout. [2]
You can edit the content with the help of an editor. By clicking on any contact detail, you will get the panel from the right section. You can edit or delete that particular detail. [5]
To show the location of your company insert the Google Map link of the location on the Contact Us page under the Theme Option. [6] [7]
By clicking on any social media icon, a panel will open from the right side. You can edit or delete the social media icon or can add a new icon by clicking on the “+” icon.
Note:
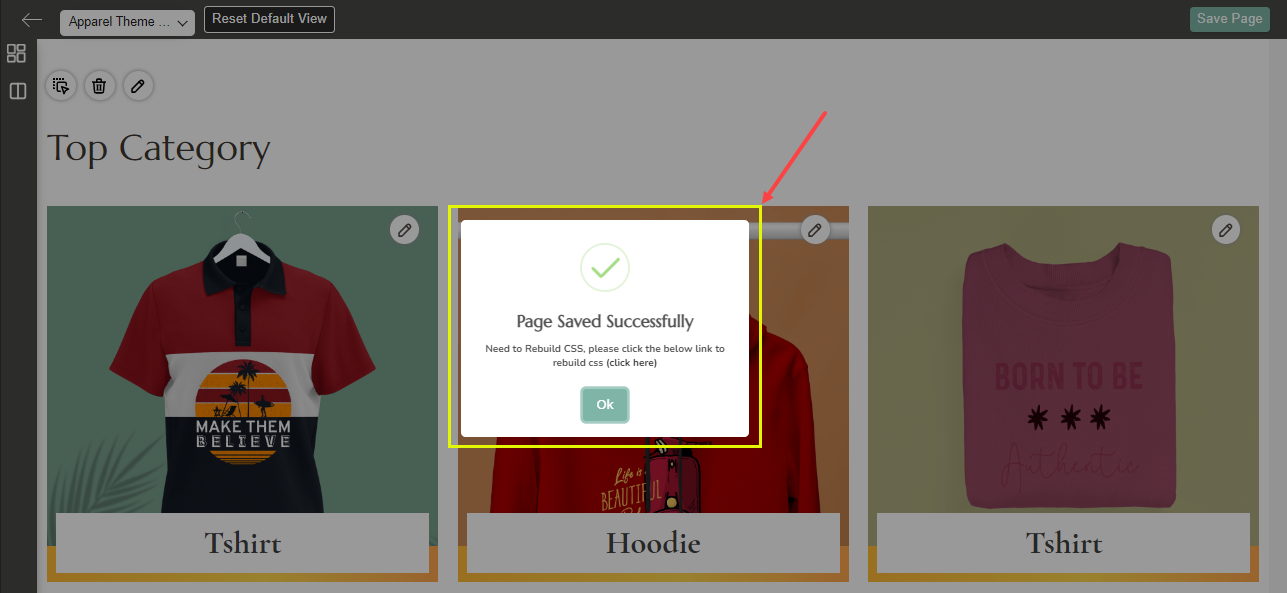
– You need to Rebuild Css whenever you are adding any snippet from the page builder. Once you save the page, you will get the pop up.
– In the Pop-up, click on the “Click Here” hyperlink and you will be navigated to the “Configurations” page in the new tab. [8]
You can also change the page layout by clicking on the drop-down. [9]
About US Page
You can design the “About Us” page using predefined layouts. Navigate to “Manage Page Layouts” and add a new page or design the existing pages.
By clicking on the Design action of the ‘About Us’ page, the About us web page will open to design it.
From the left side, there are two sections from where you can apply the theme and snippets.
There are two types of templates available to apply for the page namely Apparel Theme and Card Theme.
Based on the template you can apply any snippet for each section. You just have to drag and drop the snippets and insert the required details for the page.
Images should be as per the below dimensions based on the respective theme:
For Apparel:
| Snippet | Dimensions for Image |
| Banner | 1920 * 410 |
| Description | 950 * 650 |
| Our Team | 120 * 120 |
For Card:
| Snippet | Dimensions for Image |
| Banner | 710 * 810 |
| Description | 1920 * 550 |
| Our Team | 540 * 610 |
| Our Services | 100 * 100 |
About Us
Drag & drop the About Us snippet and it will be added to the page. [1]
You will be able to change the content of the About us snippet and change the default image by clicking on the Edit icon. [2][3]
You can perform these actions on both snippets. [4][5]
Description Section
Drag & drop the Description Section snippet to add the descriptions about your product/company. [1]
You will be able to change the content of the Description Section Snippet and change the default image by clicking on the Edit icon. [2][3]
You can perform these actions on both snippets. [4][5]
Our Team
In the Our Team section you can Add the Name, description, and images in this section. You can also duplicate, the miniature if you have added Names to each miniature of the Our Team. [1]
Once you click on the Duplicate button a duplicate record will be created at the bottom. [2]
You will also have an option to delete the Duplicate record. [3]
You can also change the image by clicking on the Edit icon and Replace button. [4][5]
Our Services
Drag & drop the Our Services Section snippet to add your services. [1]
You will be able to change the content of the Our Services Section Snippet and change the default image by clicking on the Edit icon. [2][3]
You can perform these actions on both snippets. [4][5]
Manage Brands
Brand loyalty has a great impact on customer behavior. With the trust in a brand status, customers tend to search for their favorite brand’s products in a store, regardless it is an online one or a brick and mortar.
Navigate to Theme Flare ➤ Theme Configuration ➤ Manage Brands, you will get the list of the created brands. Now click on the Add New Brand button and enter the following details to add the brands to your store.
Add New Brand
Insert these details to add a new brand.
– Brand Name: Insert the brand name.
– URL Key: Insert the URL.
– Image: Upload the brand image.
– Thumbnail: Upload the image to be displayed as the thumbnail.
– Description: Click on Show/Hide Editor to insert the widget, image, and description.
– Store View: Select the store view.
– Position: Set the position to be displayed on the frontend.
– Enable: Toggle Yes to enable the brand.
– Is Featured: Toggle Yes to feature this brand.
Add Product
Once you have added the brand information then you have to select the product you want to display in the Brand’s detail page.
Design
Now, its time to design the Brand’s detail page. Select the Layout or insert the the Layout Update XML
After adding all the details, Save the brand.
Manage Blocks
Navigate to the THEME FLARE ➤ Theme Configuration ➤ Manage Blocks, you will get the list of the already created blocks. [1]
Click on the Add New Block button and enter the following information to add the new block.
– Enable Block: Toggle Yes to enable the block for the front end.
– Block Title: Insert the title for the block.
– Identifier: Insert the Identifier text. I.e. Biztech-apparel-footer.
– Store View: Select the store view where the block is to be available.
– Description: Click on Show/Hide Editor button and Insert Widget, Image, and Variable.
After entering the details, Save the block.
Deal Management
PrintXpand-W2P Store provides the Deal Management that used to display the product offers, discounts, and attract the customers to buy the products.
Catalog Price Rule
For the “Deal Management” snippet, you must add and configure the “Catalog Price Rule” to insert the different deals and offers. For that, navigate to the Marketing ➤ Catalog Price Rule. Here you will get the listing of the Catalog Price Rule.
To add a new Catalog Price Rule, click on the Add New Rule button, and you will navigate to the Add New Rule page where you can insert the Rule name and its basic details.
You can set the timer to display in the Deal snippet on the store. For that, you need to set the Starting (From) and Ending (To) times by selecting the date and time as well.
By clicking on the edit box or calendar icon, the calendar with the timer will appear.
Select the month & year from the header.
Select the required ‘date’ to start the deal from the calendar.
Select the time to in Hour, Minutes & Seconds. To select the time, you need to move the sliders left-right.
By clicking on the Go Today button the current date & time will be set.
Now, scrolling down into the page, you can set the conditions & actions for the Deal. Under the actions, you can set the different types of discounts for this Catalog Price.
After creating a rule for the deal, you need to set and configure the Deal snippets in the store-specific page layout
Cart Price Rules
You can display more discount offers or coupon code offers into the cart page when the customers add the product(s) into the cart. For that, navigate to the Marketing ➤ Cart Price Rules. Here you will get the listing of the Cart Price Rules.
To add a new Cart Price Rule, click on the Add New Rule button and you will navigate to the Add New Rule page where you can insert the Rule name and its basic details.
You can configure the following details that will appear on the cart page:
Description: Insert the coupon-related message that will appear on the header of the cart when the customers click on the ‘details’ caption.
Coupon Code: Insert a specific code to apply the coupon.
Now, scrolling down into the page, you can set the conditions & actions for the selected rule and configure other options as per your requirement.
Once the cart price rules are configured you must enable the Deals Configuration.
Store view
Catalog Price Rule
After configuring all the details, the customers will get the deal and offers as you have designed the layouts with the contents. The customers get the discount or take the benefits of the offers as per the configuration.
After clicking on the “Shop Now” button, customers will be redirected to the Deals page.
Cart Price Rule
If you have configured the cart price rules then your customers will get the coupon code at the Cart page. By clicking on the “Details” they will get the description that you have added while configuring the Cart price rule.
Your customers can apply this coupon to avail the discount.
Ajax Cart
Ajax Cart provides a better shopping experience by allowing customers to add any product to the cart without navigating the product’s detail page. The customers can add the product to the cart from the home and category page and they will get a popup to select the different variants if any.
Store View
By clicking on the Add to Cart button of the product that the customers want to add to the cart, a popup will appear on the screen for the configurable product. Here your customers can select the variants of the products without being navigated to the Product Detail Page.
By clicking on the Add to Cart button, your product will be added to the cart.
If the product is without any variants then by clicking on the Add to Cart button, the product will be directly added to the cart.

![Theme Flare [2]](https://docs.printxpand.com/wp-content/uploads/2022/07/image003.png)
![Theme Activation [1]](https://docs.printxpand.com/wp-content/uploads/2022/11/image005-1.png)
![Error [2]](https://docs.printxpand.com/wp-content/uploads/2022/11/image007-1.png)
![Manage Themes [1]](https://docs.printxpand.com/wp-content/uploads/2022/07/image005.png)
![Store Specific Theme [2]](https://docs.printxpand.com/wp-content/uploads/2022/07/image007.png)
![Global Theme [3]](https://docs.printxpand.com/wp-content/uploads/2022/07/image009.png)
![User Agent Rules [4]](https://docs.printxpand.com/wp-content/uploads/2022/07/image011.png)
![Global Settings [5]](https://docs.printxpand.com/wp-content/uploads/2022/07/image013.png)
![Theme Installer [1]](https://docs.printxpand.com/wp-content/uploads/2022/11/image019.png)
![Themes [2]](https://docs.printxpand.com/wp-content/uploads/2022/11/image021.png)
![Success Message [3]](https://docs.printxpand.com/wp-content/uploads/2022/11/image023.png)
![Manage Pages [1]](https://docs.printxpand.com/wp-content/uploads/2022/07/image015.png)
![New Page [2]](https://docs.printxpand.com/wp-content/uploads/2022/07/image017.png)
![Content [3]](https://docs.printxpand.com/wp-content/uploads/2022/07/image019.png)
![SEO [4]](https://docs.printxpand.com/wp-content/uploads/2022/07/image021.png)
![Page in Websites [5]](https://docs.printxpand.com/wp-content/uploads/2022/07/image023.png)
![Design [6]](https://docs.printxpand.com/wp-content/uploads/2022/07/image025.png)
![Custom Design Update [7]](https://docs.printxpand.com/wp-content/uploads/2022/07/image027.png)
![Settings [1]](https://docs.printxpand.com/wp-content/uploads/2022/11/image039.png)
![General Settings [2]](https://docs.printxpand.com/wp-content/uploads/2022/11/image041.png)
![Instances [3]](https://docs.printxpand.com/wp-content/uploads/2022/11/image043.png)
![Selectors [3]](https://docs.printxpand.com/wp-content/uploads/2022/11/image045.png)
![Design [5]](https://docs.printxpand.com/wp-content/uploads/2022/11/image047.png)
![Design [6]](https://docs.printxpand.com/wp-content/uploads/2022/11/image049.png)
![Theme Options [1]](https://docs.printxpand.com/wp-content/uploads/2022/07/image029.png)
![Share [2]](https://docs.printxpand.com/wp-content/uploads/2022/07/image031.png)
![Copy Source Link [3]](https://docs.printxpand.com/wp-content/uploads/2022/07/image033.png)
![Slider configuration [4]](https://docs.printxpand.com/wp-content/uploads/2022/07/image035.png)
![Instagram Feed Configuration [5]](https://docs.printxpand.com/wp-content/uploads/2022/07/image037.png)
![Custom CSS [6]](https://docs.printxpand.com/wp-content/uploads/2022/07/image039.png)
![Social Sharing [7]](https://docs.printxpand.com/wp-content/uploads/2022/07/image041.png)
![Frontend Option [1]](https://docs.printxpand.com/wp-content/uploads/2022/07/image065-2.png)
![Theme Color Settings [2]](https://docs.printxpand.com/wp-content/uploads/2022/07/image067-2.png)
![Theme Font Settings [3]](https://docs.printxpand.com/wp-content/uploads/2022/07/image053.png)
![Theme Primary Font [4]](https://docs.printxpand.com/wp-content/uploads/2022/07/image055.png)
![Rebuild CSS [5]](https://docs.printxpand.com/wp-content/uploads/2022/07/image073-2.png)
![Color Variables [1]](https://docs.printxpand.com/wp-content/uploads/2022/07/image059.png)
![Header Settings [2]](https://docs.printxpand.com/wp-content/uploads/2022/07/image061.png)




![Manage Posts [1]](https://docs.printxpand.com/wp-content/uploads/2022/07/image244-1.png)
![Post Information [2]](https://docs.printxpand.com/wp-content/uploads/2022/07/image246.png)


![Enable Tags [1]](https://docs.printxpand.com/wp-content/uploads/2022/07/image254.png)
![Add New Tags [2]](https://docs.printxpand.com/wp-content/uploads/2022/07/image256.png)
![Enable Topics [1]](https://docs.printxpand.com/wp-content/uploads/2022/07/image258.png)
![Add New Topics [2]](https://docs.printxpand.com/wp-content/uploads/2022/07/image260.png)



![Aheadworks Blog [Magento 1]](https://docs.printxpand.com/wp-content/uploads/2022/07/image274.png)
![Aheadworks Blog [Magento 2]](https://docs.printxpand.com/wp-content/uploads/2022/07/image276.png)
![Manage Slider [1]](https://docs.printxpand.com/wp-content/uploads/2022/07/image101-2.png)
![Slider List [2]](https://docs.printxpand.com/wp-content/uploads/2022/07/image069.png)
![Add New Slide [3]](https://docs.printxpand.com/wp-content/uploads/2022/07/image071.png)
![Configuration [4]](https://docs.printxpand.com/wp-content/uploads/2022/07/image073.png)
![Manage Testimonials [1]](https://docs.printxpand.com/wp-content/uploads/2022/07/image109-2.png)
![Testimonial List [2]](https://docs.printxpand.com/wp-content/uploads/2022/07/image077.png)

![Templates [1]](https://docs.printxpand.com/wp-content/uploads/2022/07/image117-2.png)
![Blocks [2]](https://docs.printxpand.com/wp-content/uploads/2022/07/image119-2.png)

![Header Snippets [1]](https://docs.printxpand.com/wp-content/uploads/2022/07/image089.png)
![Snippet - 1 [2]](https://docs.printxpand.com/wp-content/uploads/2022/07/image091.png)
![Snippet - 2 [3]](https://docs.printxpand.com/wp-content/uploads/2022/07/image093.png)
![Edit Header [4]](https://docs.printxpand.com/wp-content/uploads/2022/07/image095.png)
![Header [5]](https://docs.printxpand.com/wp-content/uploads/2022/07/image097.png)
![Banner Snippet [1]](https://docs.printxpand.com/wp-content/uploads/2022/07/image099.png)


![Edit Banner [4]](https://docs.printxpand.com/wp-content/uploads/2022/07/image105-e1669704970602.png)
![Add/Delete Banner [5]](https://docs.printxpand.com/wp-content/uploads/2022/07/image107-e1669705024968.png)
![Slider Master [6]](https://docs.printxpand.com/wp-content/uploads/2022/07/image109-e1669705049518.png)
![Top Category [1]](https://docs.printxpand.com/wp-content/uploads/2022/07/image145-1.png)
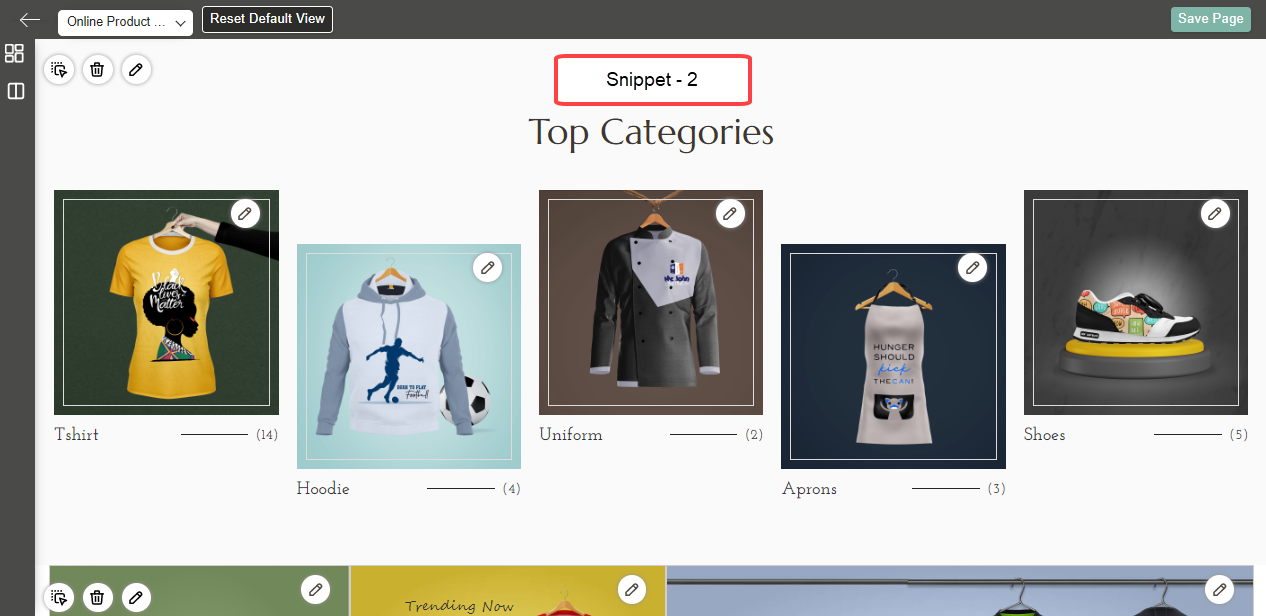
![Edit Top Category [4]](https://docs.printxpand.com/wp-content/uploads/2022/07/image117.png)
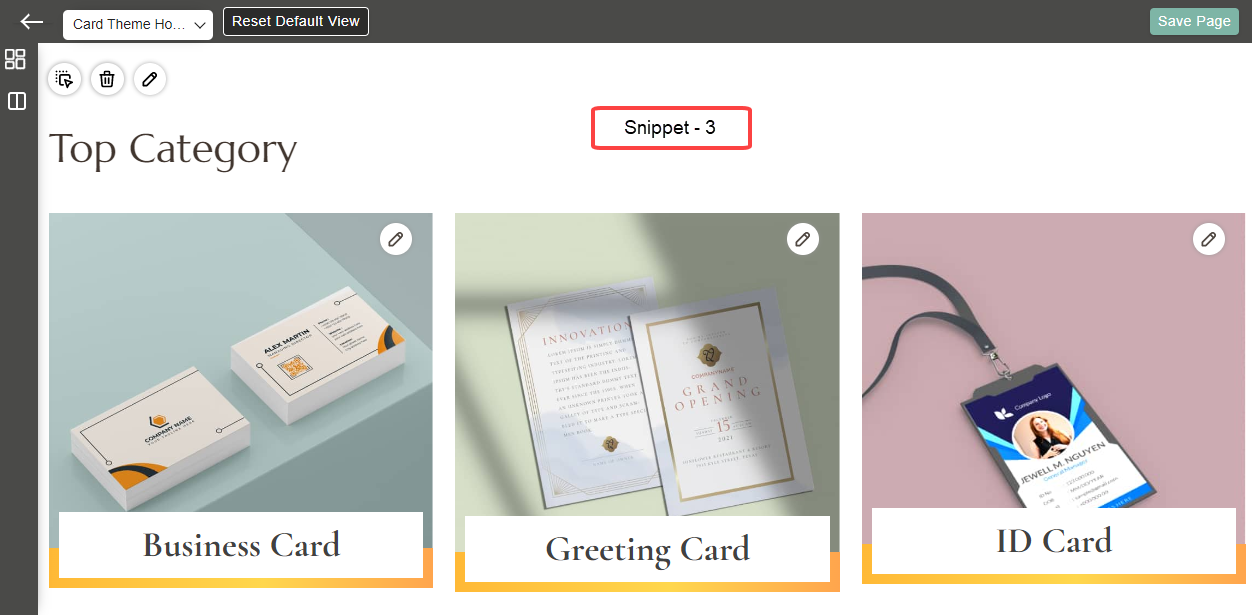
![Top Category Snippets [1]](https://docs.printxpand.com/wp-content/uploads/2022/07/image155-1.png)

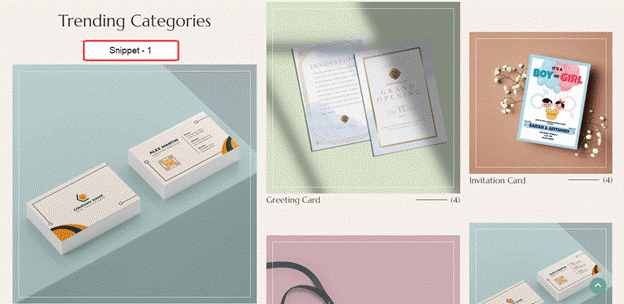

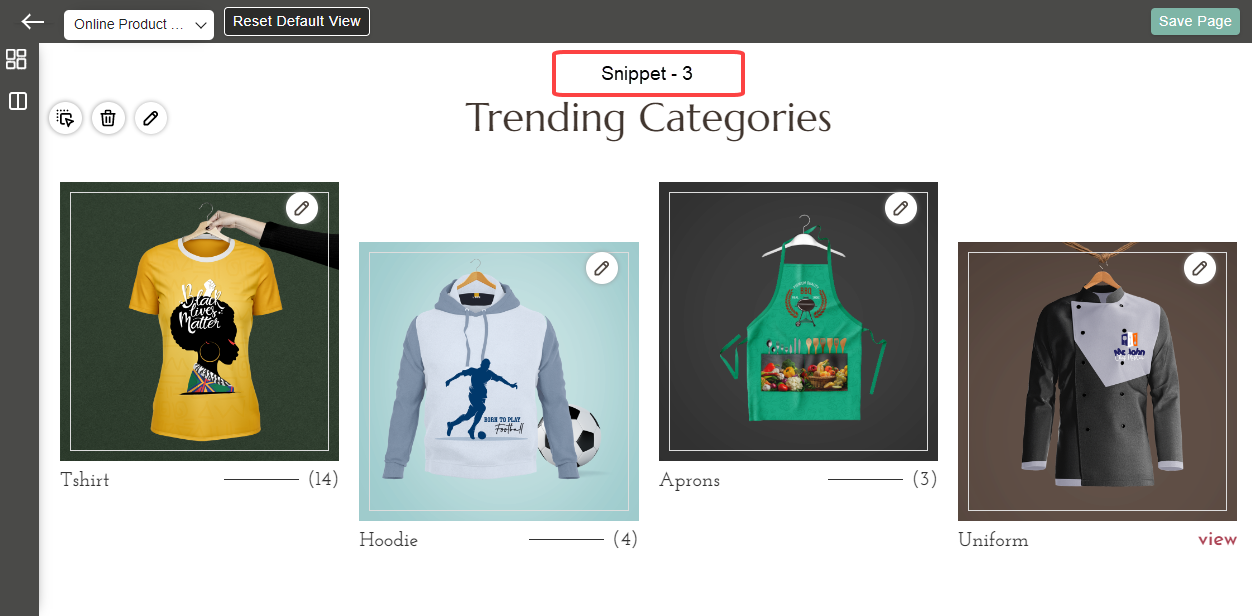
![Featured Product Snippets [1]](https://docs.printxpand.com/wp-content/uploads/2022/07/image165-1.png)
![Select Category Icon [4]](https://docs.printxpand.com/wp-content/uploads/2022/07/image171-1.png)
![Edit Snippet - 2 [6]](https://docs.printxpand.com/wp-content/uploads/2022/07/image175-1.png)




![Blogs Snippet [1]](https://docs.printxpand.com/wp-content/uploads/2022/07/image197-1.png)



![Blogs Snippet [1]](https://docs.printxpand.com/wp-content/uploads/2022/07/image207-1.png)


![Edit Blog Snippet [4]](https://docs.printxpand.com/wp-content/uploads/2022/07/image156.png)


![Brands Snippet [1]](https://docs.printxpand.com/wp-content/uploads/2022/07/image225-1.png)

![Footer Snippets [1]](https://docs.printxpand.com/wp-content/uploads/2022/07/image168.png)


![Add New Link [4]](https://docs.printxpand.com/wp-content/uploads/2022/07/image174.png)

![Add Icon [6]](https://docs.printxpand.com/wp-content/uploads/2022/07/image178.png)
![Edit/Delete Icon [7]](https://docs.printxpand.com/wp-content/uploads/2022/07/image180.png)


![Product Listing & Detail Page [1]](https://docs.printxpand.com/wp-content/uploads/2022/07/image186.png)
![Product Listing Page Snippets [2]](https://docs.printxpand.com/wp-content/uploads/2022/07/image188.png)


![Contact Us Page [1]](https://docs.printxpand.com/wp-content/uploads/2022/07/image200.png)



![Design [1]](https://docs.printxpand.com/wp-content/uploads/2023/02/image001.png)
![Left Panel [2]](https://docs.printxpand.com/wp-content/uploads/2023/02/image003.png)
![Templates [3]](https://docs.printxpand.com/wp-content/uploads/2023/02/image005.png)
![Snippets [4]](https://docs.printxpand.com/wp-content/uploads/2023/02/image007.png)
![About Us Snippets [1]](https://docs.printxpand.com/wp-content/uploads/2023/02/image009.png)
![Edit Image [2]](https://docs.printxpand.com/wp-content/uploads/2023/02/image011.png)
![Text Editor [3]](https://docs.printxpand.com/wp-content/uploads/2023/02/image013.png)


![Description Section [1]](https://docs.printxpand.com/wp-content/uploads/2023/02/image019.png)
![Edit Image [2]](https://docs.printxpand.com/wp-content/uploads/2023/02/image021.png)
![Text Editor [3]](https://docs.printxpand.com/wp-content/uploads/2023/02/image023.png)


![Our Team [1]](https://docs.printxpand.com/wp-content/uploads/2023/02/image029.png)
![Duplicate [2]](https://docs.printxpand.com/wp-content/uploads/2023/02/image031.png)
![Delete [3]](https://docs.printxpand.com/wp-content/uploads/2023/02/image033.png)
![Edit Mode [4]](https://docs.printxpand.com/wp-content/uploads/2023/02/image035.png)
![Our Team [5]](https://docs.printxpand.com/wp-content/uploads/2023/02/image037.png)
![Our Services [1]](https://docs.printxpand.com/wp-content/uploads/2023/02/image001-1.png)
![Edit Image [2]](https://docs.printxpand.com/wp-content/uploads/2023/02/image003-1.png)
![Text Editor [3]](https://docs.printxpand.com/wp-content/uploads/2023/02/image005-1.png)
![Snippet - 1 [4]](https://docs.printxpand.com/wp-content/uploads/2023/02/image007-1.png)
![Snippet - 5 [5]](https://docs.printxpand.com/wp-content/uploads/2023/02/image009-1.png)


![Product [2]](https://docs.printxpand.com/wp-content/uploads/2022/07/image283.png)
![Design [3]](https://docs.printxpand.com/wp-content/uploads/2022/07/image285.png)
![Manage Blocks [1]](https://docs.printxpand.com/wp-content/uploads/2022/07/image287.png)




Social Sharing
Enable: Select “Yes” to enable the social buttons on the blog page.
Addthis.com PubId: In the PubId field, insert ID for Share buttons that get from https://addthis.com.