Manage Printing Method
To add and manage multiple methods of printing, go to Product Designer → Manage Printing Methods. [1]
As you click on “Manage Printing Methods”, you will get the list of Printing Methods along with details like ID, Printing Methods Name, Printing Description, Status and Actions.[2]
You can add a new ‘Printing Method’ by clicking on the “Add Printing Method” button. It will navigate you to the ‘Add Printing Method’ page. [3]
Now, add the following details:
– Printing Method: Enter the name of the printing method. This name will be displayed on the storefront.
– Description: Enter a description for the printing method. This description is for internal reference only and will not be displayed on the storefront.
– Minimum Product Quantity: Specify the minimum product quantity required to use this printing method.
– Base Price: Enter the base price for the printing method.
– Name (Color Options): Specify the label for the color options that will be displayed on the storefront.
– Name (Size Options): Specify the label for the size options that will be displayed on the storefront.
– Color Palette: Select Yes to enable the color palette. This allows users to access the full color picker in the tool.
– Select Unit: Select the unit used to calculate the area size for area-based printing methods.
– Status: Select Enable to activate the printing method.
– Maximum Colors: Enter the maximum number of colors allowed for this printing method. Pricing will only work if the corresponding color values are added to the pricing table, even when a maximum color value is defined.
![Manage Printing Methods [1]](https://docs.printxpand.com/wp-content/uploads/2026/07/Manage-Printing-Method-1.png "Manage Printing Methods")
![Manage Printing Methods [2]](https://docs.printxpand.com/wp-content/uploads/2026/07/Manage-Printing-Method-2.png "Manage Printing Methods")
![Add Printing Method Details [3]](https://docs.printxpand.com/wp-content/uploads/2026/07/Manage-Printing-Method-3.png "Add Printing Method Details")
Printing Cost
The printing cost of a product design may vary depending on the Printing Method Execution configured for the selected printing method. Admin can create 3 types of pricing combination: Flat, Color Counter and Area-Wise.
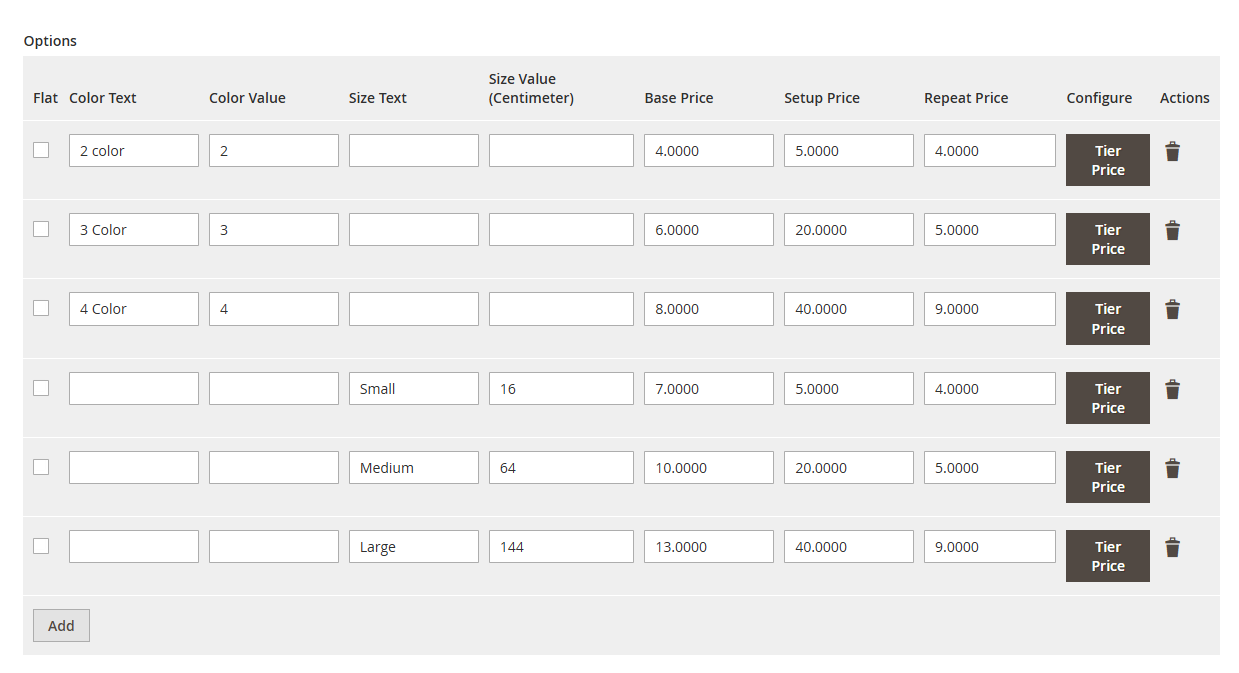
To configure pricing, scroll down to the Options section and enter the following details: [4]
– Flat: Select the Flat Color option to apply a flat printing price. Once flat pricing is enabled, the admin cannot add other pricing options.
– Color Text: Enter the label for the color option. This label will be displayed on the Product Detail Page and in the Designer Tool.
– Color Value: Enter the color value used to calculate color-based pricing.
– Size Text: Enter the label for the size-based printing option. This label will be displayed on the Product Detail Page and in the Designer Tool.
– Size Value: Enter the size value for the size option. The unit will be based on the selection configured above.
– Base Price: Enter the base price for the configured option.
– Setup Price: Enter the setup price for the printing method option. This is a one-time charge, it will not be multiple Qyt.
– Repeat Price: Enter the repeat price. This price will apply when the user repeats the same printing method configuration.
– Tier Price: Use tier pricing to configure quantity-based pricing for the selected option. Enter the following details to configure tier pricing: [5]
– Quantity From: Enter the starting quantity from which the tier price will apply.
– Quantity To: Enter the ending quantity up to which the tier price will apply.
– Setup Charges: Enter the setup charges for the tier price.
– Repeat Setup: Enter the repeat setup price for the tier price.
– Printing Price: Enter the printing price for the tier option.
– The admin can add multiple tier price rows for a single printing option.
After completing all configurations, click the Save button to add the printing method.
Note : The admin can configure a printing method either color-wise or size-wise. Both options cannot be configured separately at the same time like these shown in image below or in the same rows as well.
For a single printing method, both area and color configurations cannot be applied together. The method should be configured using either area-based pricing or color-based pricing.
![Pricing Configuration [4]](https://docs.printxpand.com/wp-content/uploads/2026/07/Printing-Cost-1.png "Pricing Configuration")
![Tier Pricing Configuration [5]](https://docs.printxpand.com/wp-content/uploads/2026/07/Printing-Cost-2.png "Tier Pricing Configuration")
Global Printing Method
In the Global Printing Method configuration, the admin can assign a single printing method to multiple locations.
To configure this, select Global as the Printing Method Type. Then, go to the Printing Methods section and select one or more printing methods as required. [1]
![Global Printing Method [1]](https://docs.printxpand.com/wp-content/uploads/2026/07/Global-Printing-Method-PLC-1.png "Global Printing Method")
Location Wise Method
For the Location Printing Method, select Location Wise as the printing type. Then, configure the printing methods for each location as required.
The admin can select multiple printing methods for a single location.[2]
Now that the printing method has been set up for the product, let’s see how it works in the front store. The configured printing options will be available for customers when they start customizing the product.
![Location Wise Printing Method [2]](https://docs.printxpand.com/wp-content/uploads/2026/07/Location-Wise-Method-1.png "Location Wise Printing Method")
Global Printing Method
On the Product Design page, when the product is configured with the Global Printing Method, the customer can select a design area and choose a printing method.
In the Designer Tool, only the locations that have been selected will be available for customization.[1]
On the Design Tool, the customer will be redirected with the same printing method and design location selected on the Product Detail Page (PDP). The customer can change the printing method from the Product tab within the design tool.[2]
To view the details of the printing method, click View Details. This will open a detailed pop-up containing the pricing, color, and size information.[3]
The price will be calculated based on the selected printing method and options.[4]
![Global Printing Method [1]](https://docs.printxpand.com/wp-content/uploads/2026/07/Global-Printing-Method-FV-1.png "Global Printing Method")
![Printing Method [2]](https://docs.printxpand.com/wp-content/uploads/2026/07/Global-Printing-Method-FV-2.png "Printing Method")
![Details Pop-up [3]](https://docs.printxpand.com/wp-content/uploads/2026/07/Global-Printing-Method-FV-3.png "Details Pop-up")
![Price Breakdown [4]](https://docs.printxpand.com/wp-content/uploads/2026/07/Global-Printing-Method-FV-4.png "Price Breakdown")
Location Wise Printing method
With the Location-wise Printing Method, the user can assign a specific printing method to each design location, along with the corresponding color and size options. In the Designer Tool, only the locations that have been selected will be available for customization.[1]
Note : In the Designer tool for both printing methods the Raster Image will be considered as one color.
![Location wise Printing Method [1]](https://docs.printxpand.com/wp-content/uploads/2026/07/Location-Wise-Printing-Method-1.png "Location wise Printing Method")