Admin
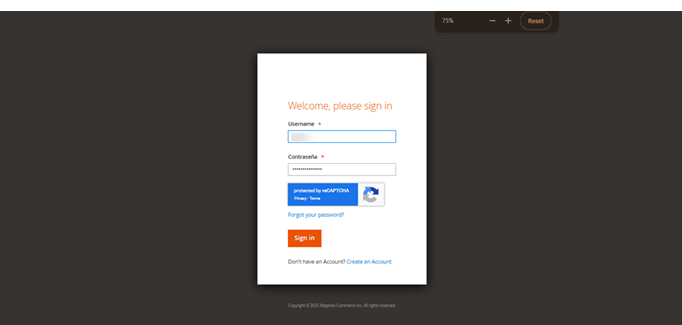
Log in to the admin account by entering the respective username and password. [1]
Dashboard
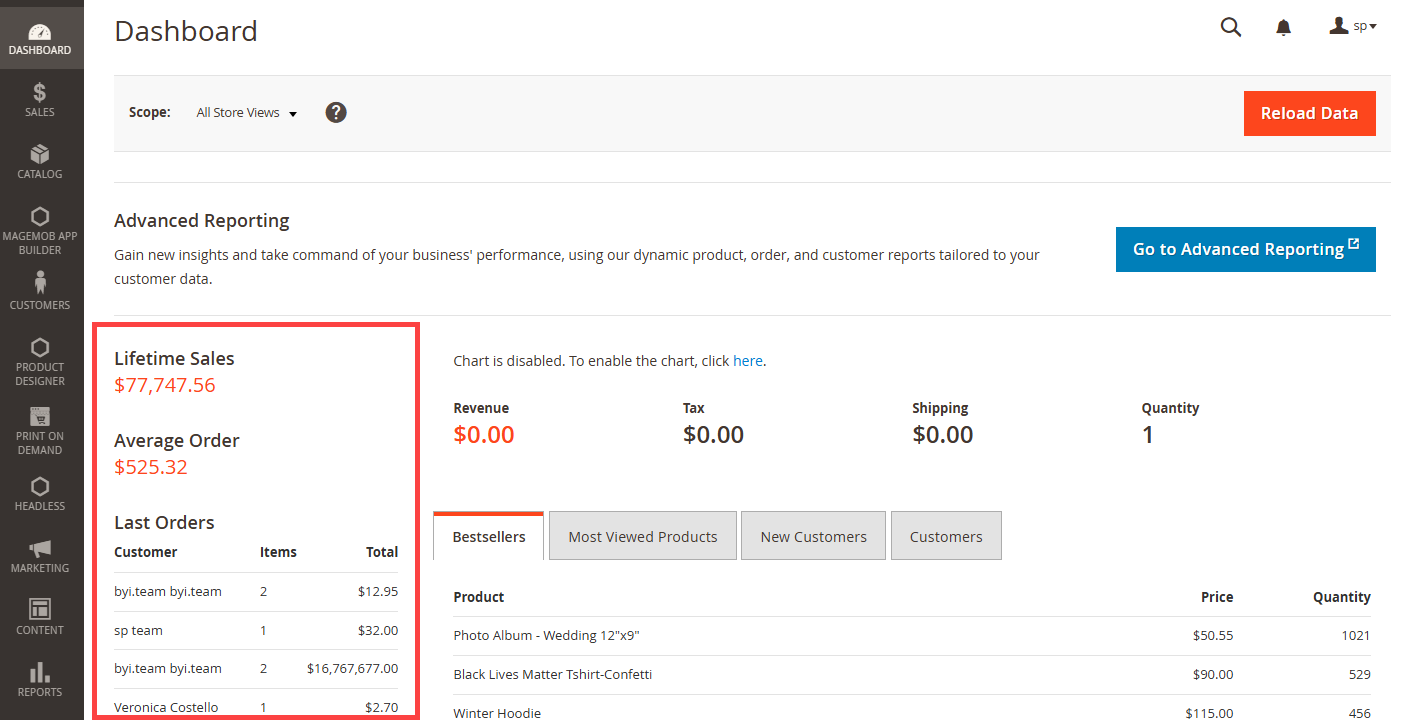
Once logged into their account they will be landing on Dashboard; it consists of admin data. Admin can analyze Lifetime Sales, Average Orders, Last orders. [1]
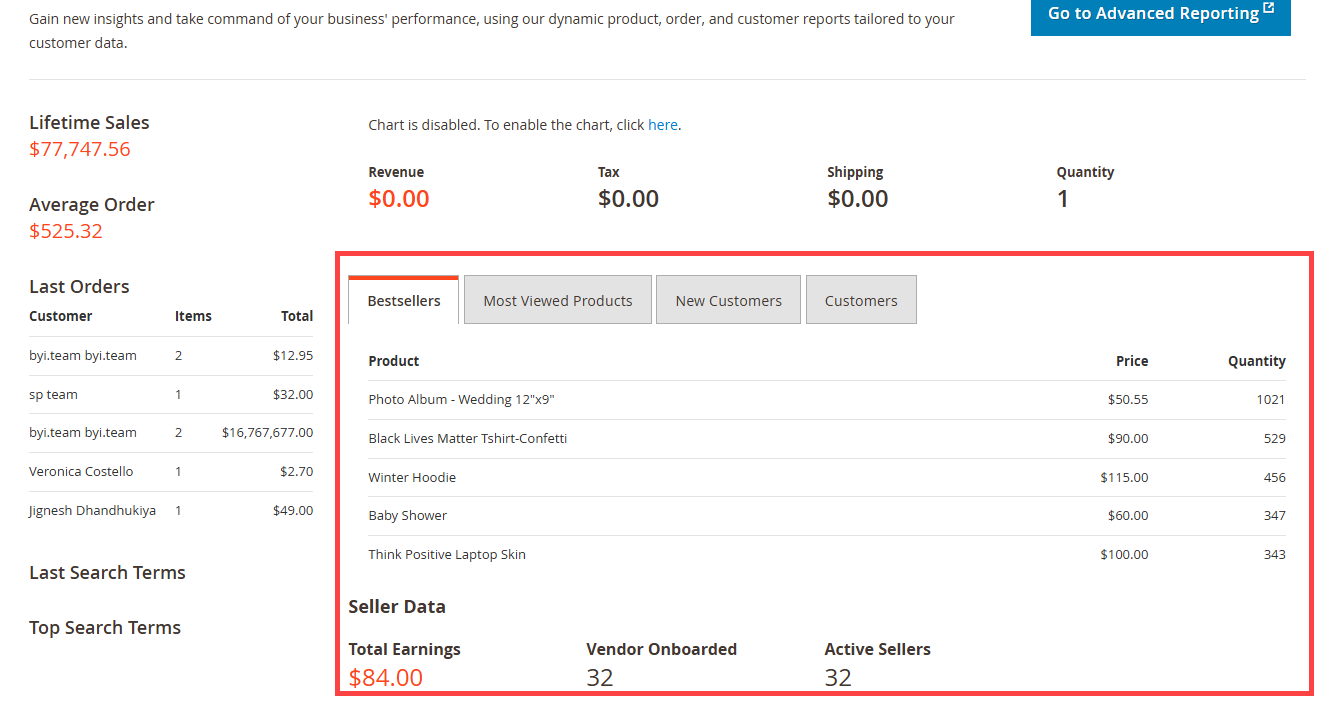
Bestseller Products section, which lists all the bestselling products along with the Price and the quantities that have been sold. Along with Most Viewed product, New Customers, Customers. Under this Admin can track Seller Data.[2]
Configuration
All configurations can be accessed via the Stores > Configuration path. [1]
General Configuration
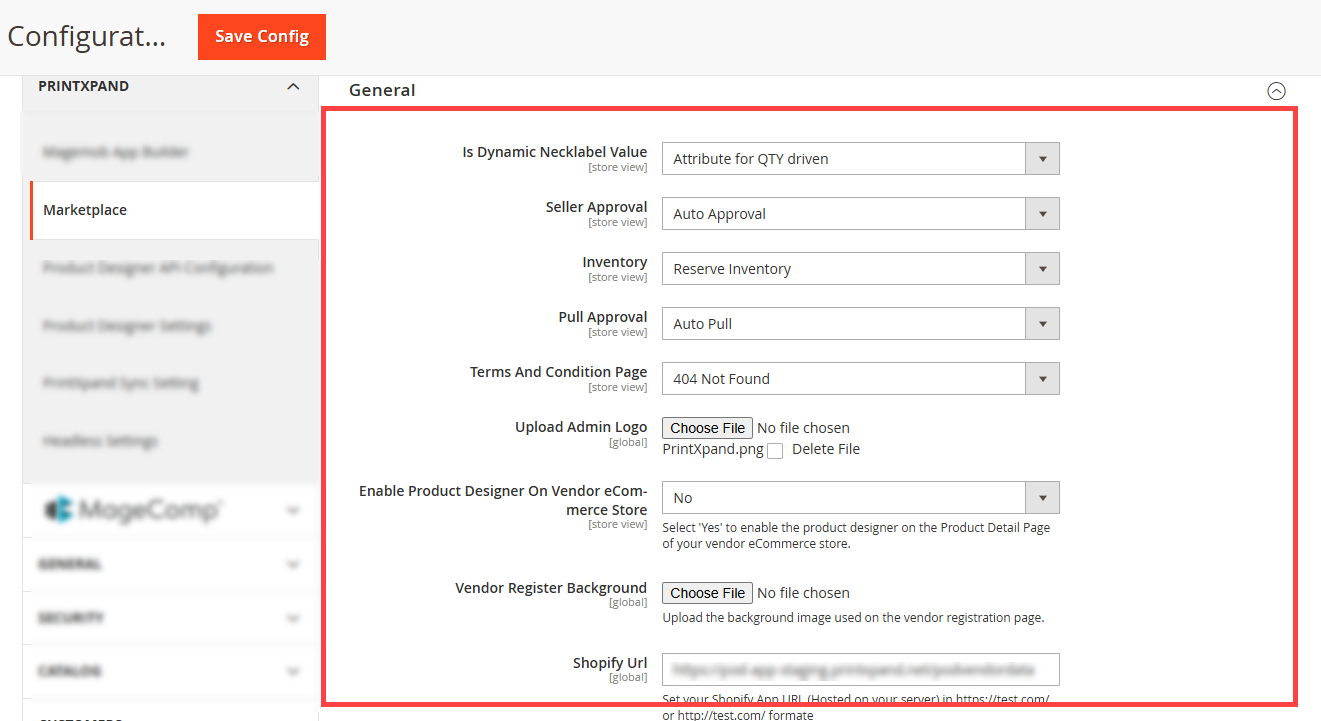
The General Configuration section allows you to define global settings such as seller approvals, inventory management, and URL setups. [2]
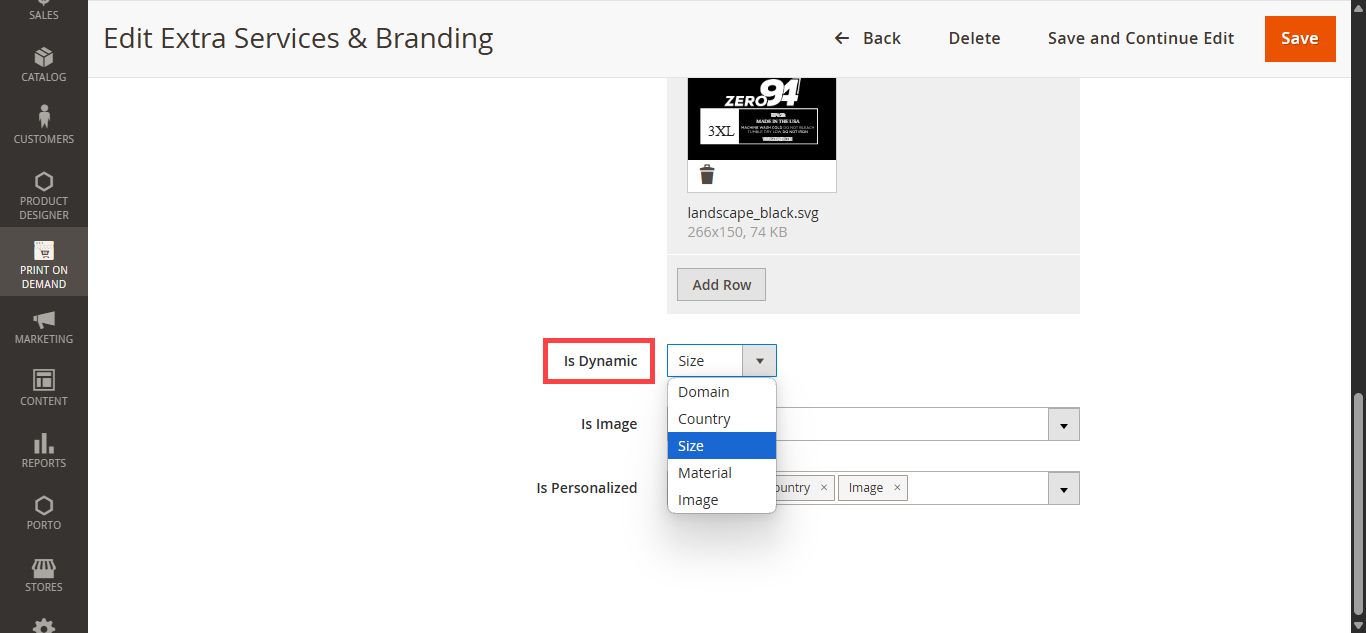
Is Dynamic Necklabel: Select the value that acts as dynamic in the necklabel.
Seller Approval
– Auto Approval: Automatically approve sellers upon registration for a seamless onboarding experience.
– Manual Approval: Require admin approval to maintain control over seller registrations.
Inventory
– Reserve Inventory: Hold back inventory for pending orders to prevent overselling.
– Live Inventory: Enable real-time inventory updates for accurate stock management.
Pull Approval
Terms And Condition Page: Select the page where the seller will be redirected when click on the Terms and Conditions link.
Upload Admin Logo: Upload the admin logo visible on the platform.
Enable Product Designer On Vendor eCommerce Store : Select ‘Yes’ to enable the product designer on the Product Detail Page of your vendor eCommerce store.
Vendor Register Background : Upload the background image used on the vendor registration page.
Shopify Url: Enter the Shopify setup URL in the format: https://example.com/ or http://example.com/ to integrate your Shopify store.
Deletion Threshold: Enter the deletion threshold value for Artwork and templates that are disabled or marked as deleted by the administrator will be automatically removed after a specified number of days.
Template Deletion Notice Message: Enter the notice message if any of a seller’s templates are marked for deletion by admin. Admin can add Name and Deletion Date parameters in the message.
Artwork Deletion Notices Message: Enter the notice message if any of a seller’s Artworks are marked for deletion by admin. Admin can add Name and Deletion Date parameters in the message.
Brand Url Prefix: Define a unique brand-specific URL prefix to differentiate your store.
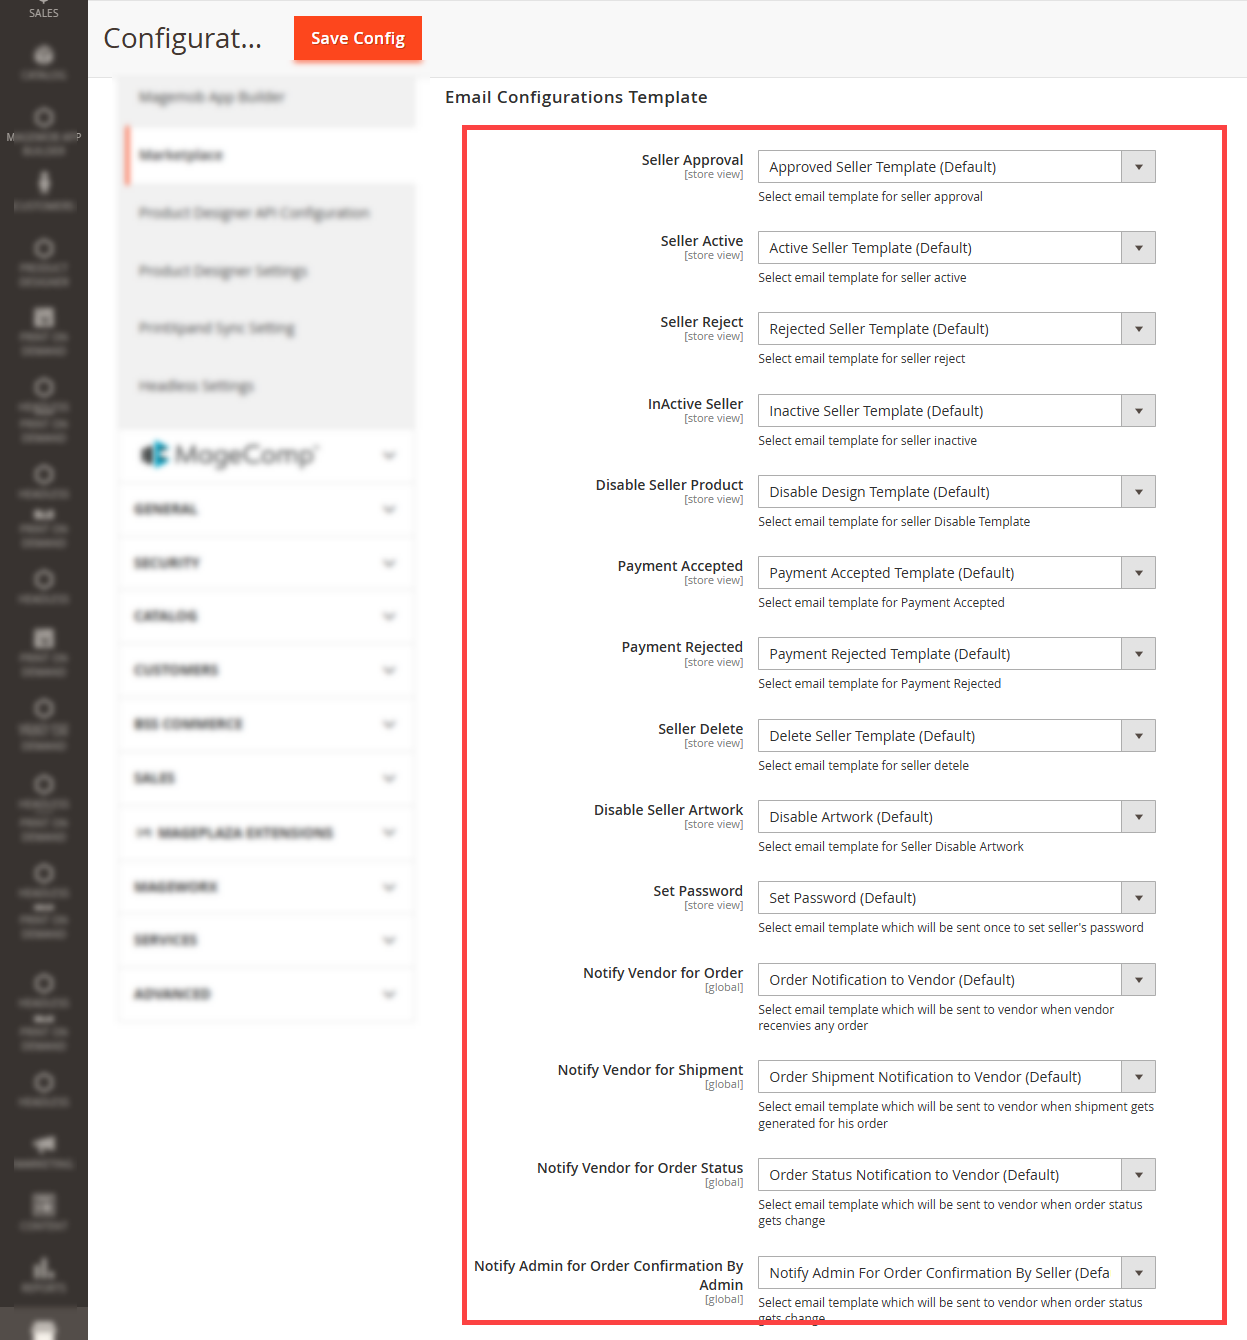
Email Configurations Template
This section lets you customize email templates for various seller and Reseller interactions. Use these templates to streamline communication and maintain a professional tone. [3]
Seller Approval
– Approved Seller Template (Default): Notify sellers of their successful approval.
– New Approved Template: Alternative template for seller approvals.
– Approve Template: General approval template.
– Approve payment request: Notify sellers about payment request approvals.
– Reject payment request: Notify sellers about payment request rejections.
Note: Select email template for seller approval: Choose a suitable template to match your branding for seller approval notifications.
Seller Active
– Active Seller Template (Default): Notify sellers when their accounts become active.
– New Approved Template: Alternative active seller template.
– Approve Template: General approval template for active status.
– Approve Payment Request: Notify sellers about active status related to payment approvals.
– Reject Payment Request: Notify sellers about payment request rejections related to active status.
Note: Ensure selected templates align with your communication goals.
Seller Reject
– Rejected Seller Template (Default): Notify sellers about rejection.
– New Approved Template: Alternative template for rejections.
– Approve Template: General approval template for rejections.
– Approve Payment Request: Notify sellers about rejection related to payment requests.
– Reject Payment Request: Notify sellers about other rejection scenarios.
Note: Choose templates that clearly communicate rejection reasons.
Other Email Configurations
– InActive Seller: Notify sellers when their accounts are deactivated.
– Disable Seller Product: Inform sellers about product deactivation.
– Payment Accepted/Rejected: Notify sellers regarding payment approvals or rejections.
– Seller Delete: Notify seller when account is deleted.
– Disable Seller Artwork: Notify sellers when their artwork is disabled.
– Set Password: Email for sellers to set up their account password.
– Notify Vendor for Order: Notify vendors when they receive new orders.
– Notify Vendor for Shipment: Inform vendors about shipment generation for their orders.
– Notify Vendor for Order Status: Update vendors on order status changes.
Notify Admin for Order Confirmation By Admin: Update Admins on Order status changes.
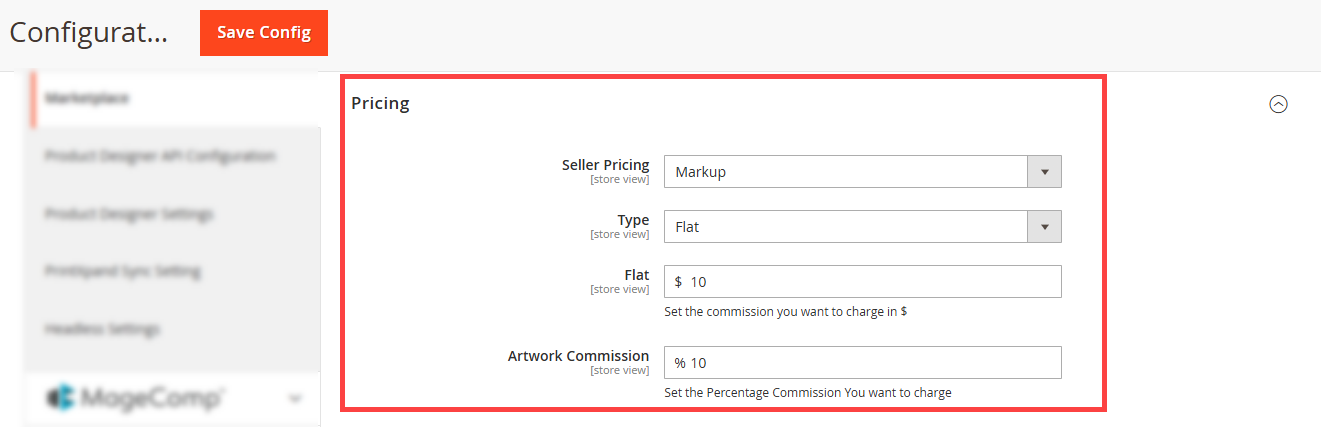
Pricing Configuration
Pricing Configuration allows you to define how commissions and markups are applied to sellers and artworks. These settings ensure accurate pricing and revenue management. [4]
Seller Pricing
– Markup/Commission Type
Flat: Charge a fixed amount for each transaction.
Percentage: Charge a percentage of the transaction value.
Flat/Percentage: Choose between fixed or percentage-based commissions based on your business needs.
Artwork Commission
– Specify the percentage commission for artworks created by sellers.
Note: Enter values in the respective text boxes for accurate calculation.
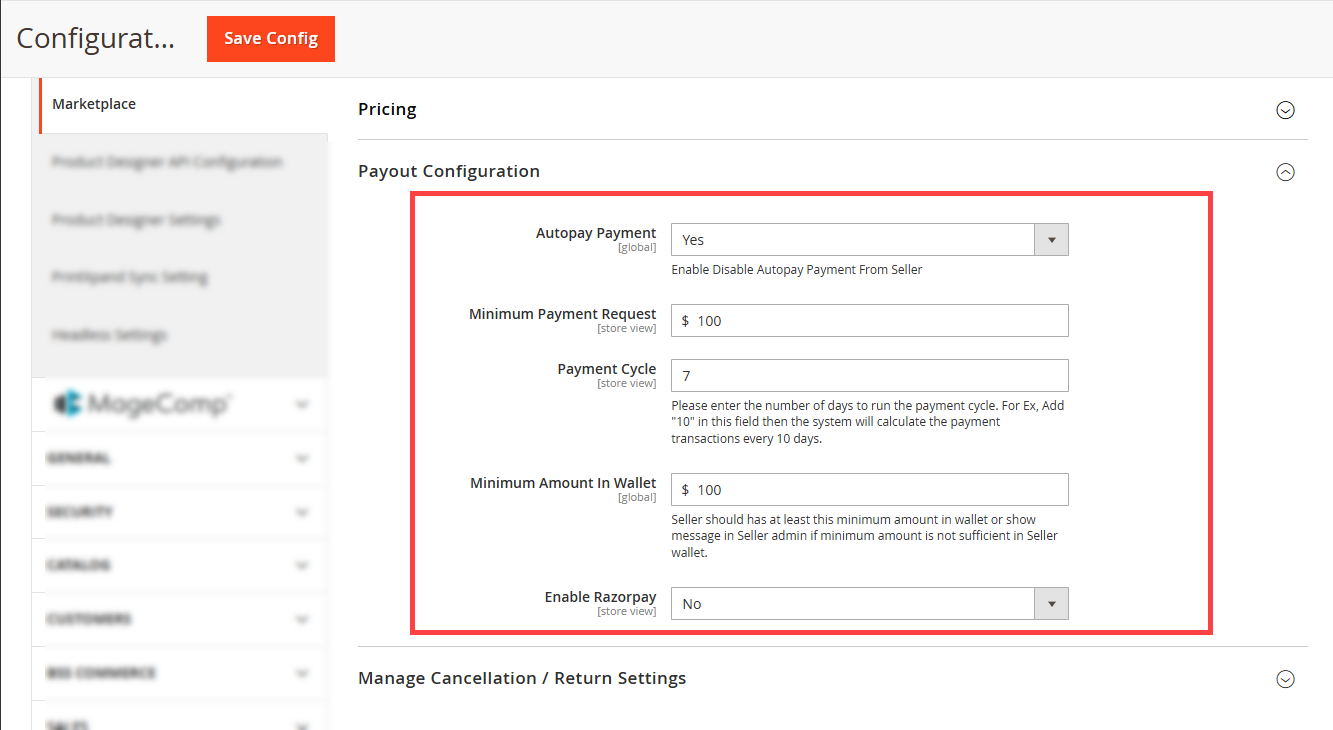
Payout Configuration
Payout Configuration manages seller payments, wallet settings, and payout cycles. These settings ensure smooth financial operations. [5]
Autopay Payment
– Enable or disable autopayments for sellers to automate or control payout processes.
Note: Enable/Disable Autopay Payment From Seller
Wallet and Payment Settings
– Minimum Amount in Wallet: Specify the minimum amount a seller must maintain in their wallet for eligibility.
– Minimum Payment Request: Define the minimum payout amount sellers can request.
– Payment Cycle: Set the frequency of payouts (e.g. 5 days, 10 days).
Razorpay Integration
– Enable Razorpay: Choose Yes or No to enable Razorpay payment integration.
– Razorpay Key ID: Enter the unique Razorpay Key ID for your account.
Razorpay Secret Key: Enter the Razorpay Secret Key for secure transactions.
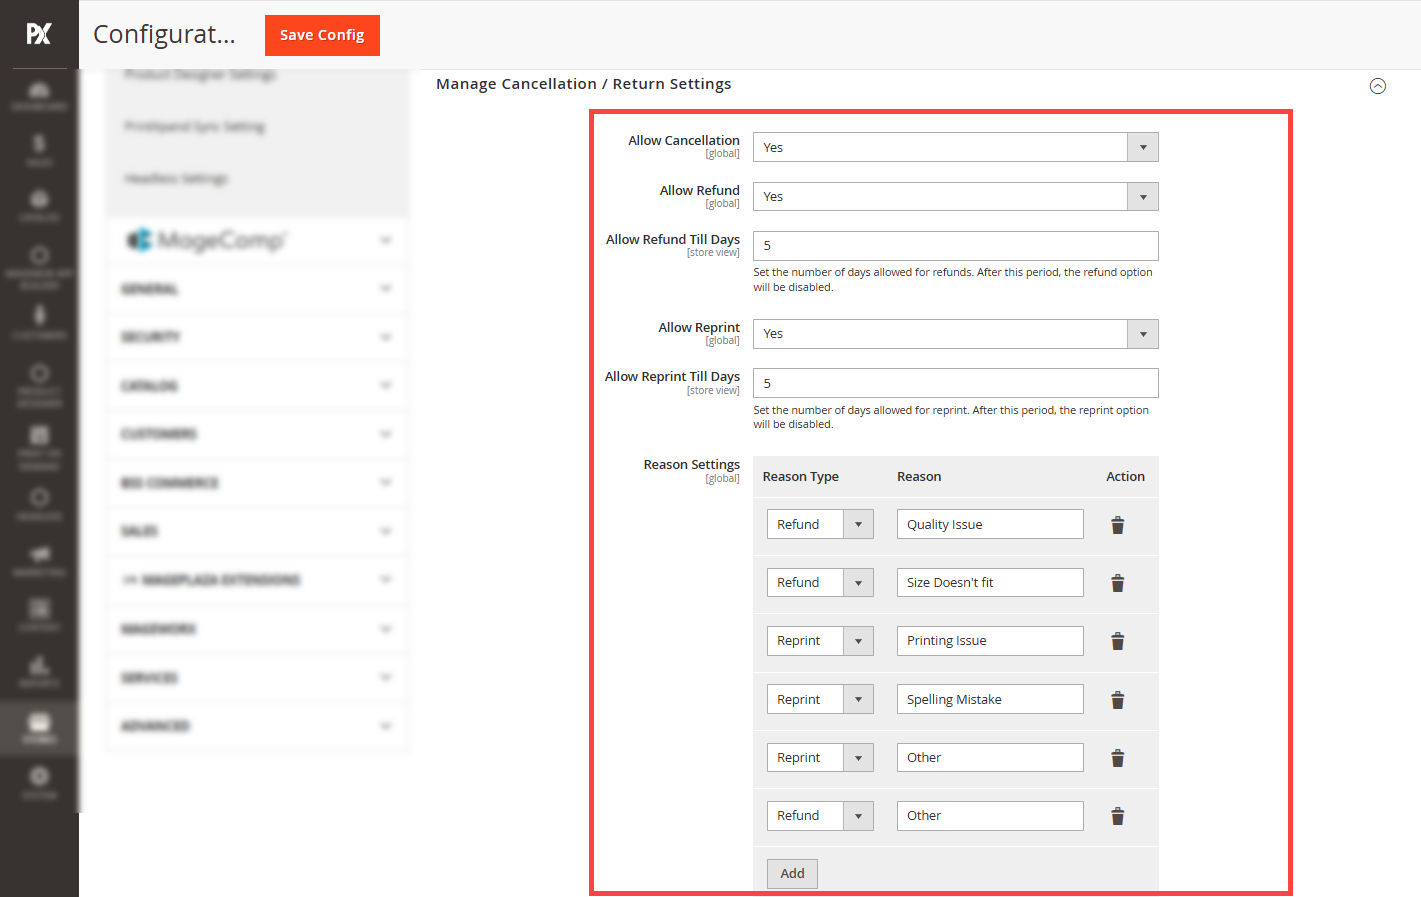
Manage Cancellation / Return Settings
Cancellation and Return Settings allow admins to efficiently manage order cancellations and product returns within the system. These settings help streamline the process, ensuring clear policies and a smoother experience for both customers and staff. [6]
Allow Cancellation: Enable this option to permit users to cancel their orders.
Allow Refund: Set to “Yes” to allow customers to request refunds for eligible orders.
Allow Refund Till Days: Define the number of days within which a refund can be requested; after this period, the refund option will no longer be available.
Allow Reprint: Enable this option to allow users to request a reprint.
Allow Reprint Till Days: Specify the number of days during which reprints are permitted; after this timeframe, the option will be disabled.
Reason Settings: Configure and manage reasons for both refund and reprint requests.
Refund
Reprint
![Store Configuration [1]](https://docs.printxpand.com/wp-content/uploads/2026/05/Store-Configuration-1.png "Store Configuration [1]")
Products
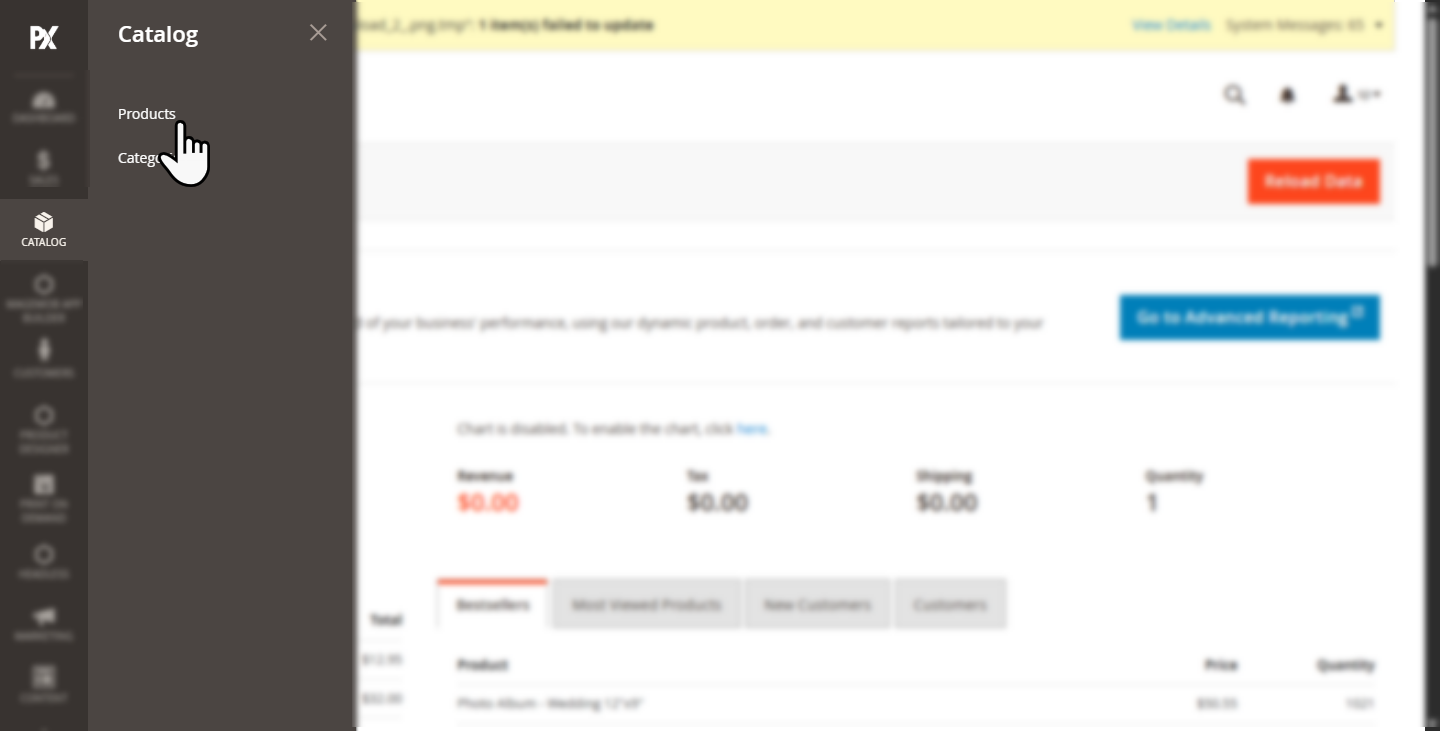
Through Catalog -> Products, you will be able to access the product listing page. [1]
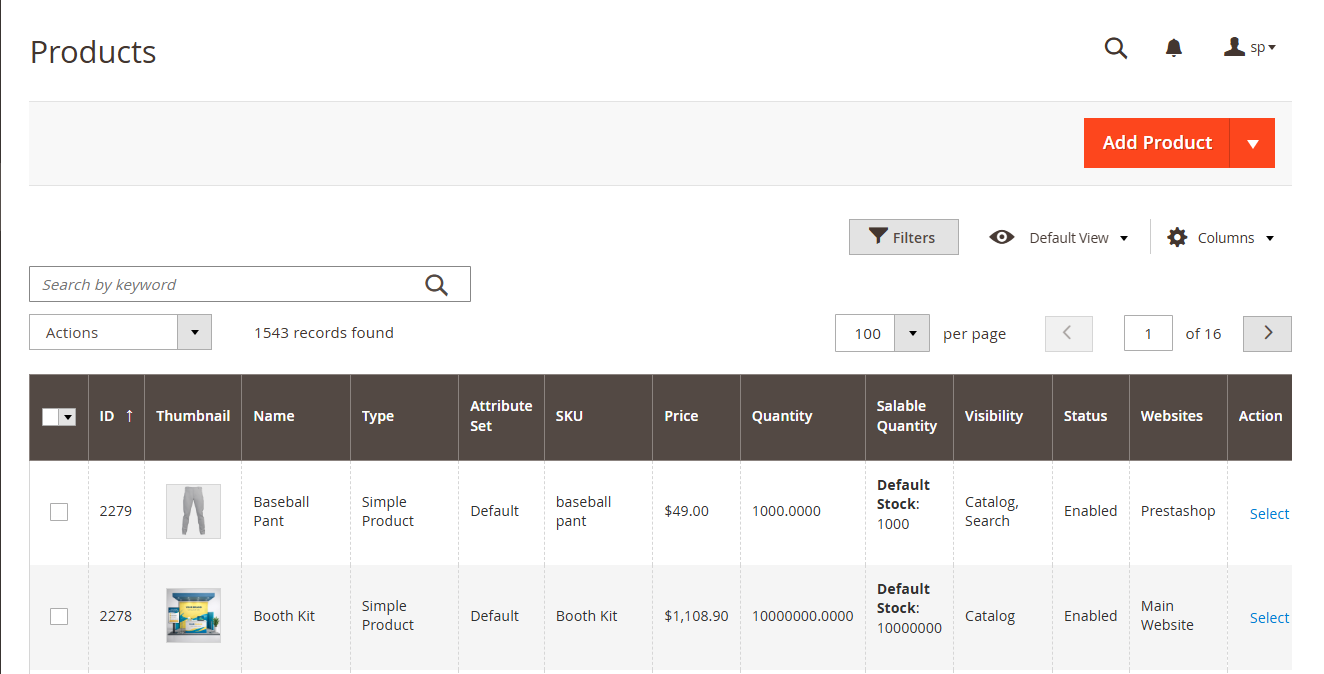
The grid would showcase all the products along with all the respective products. [2]
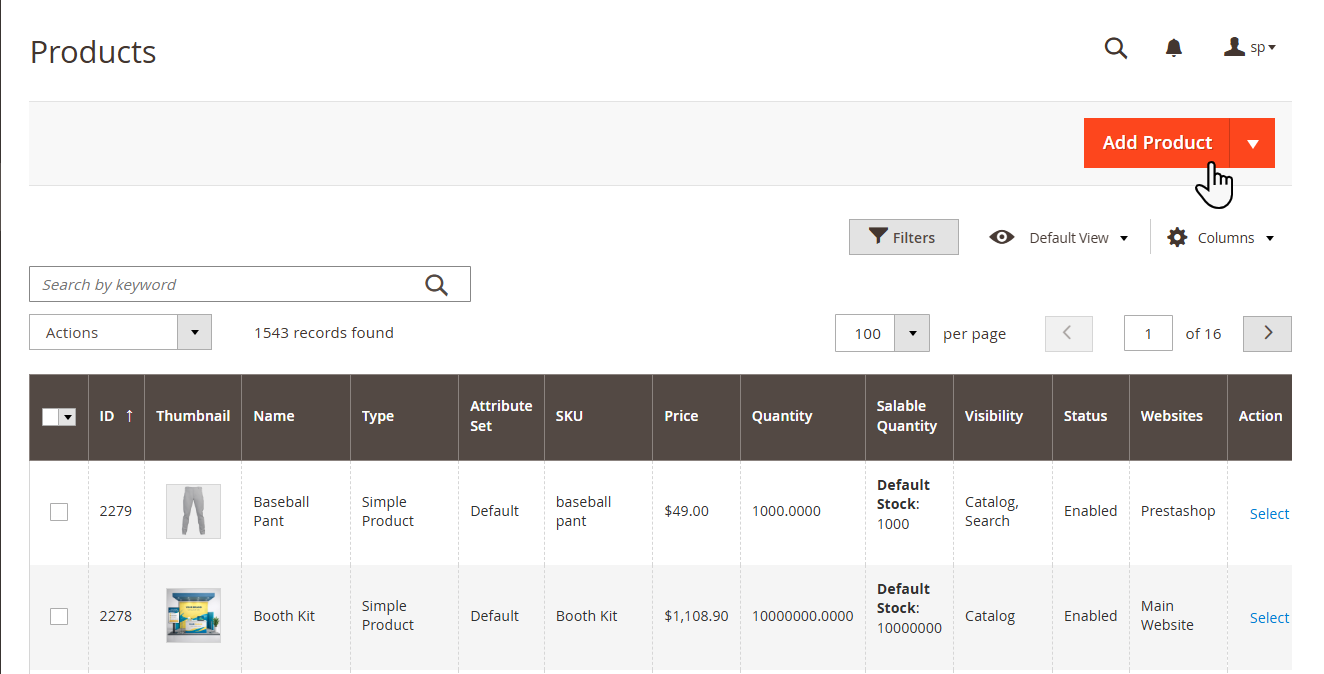
You can proceed to add a product by clicking on the “Add Product” button.[3]
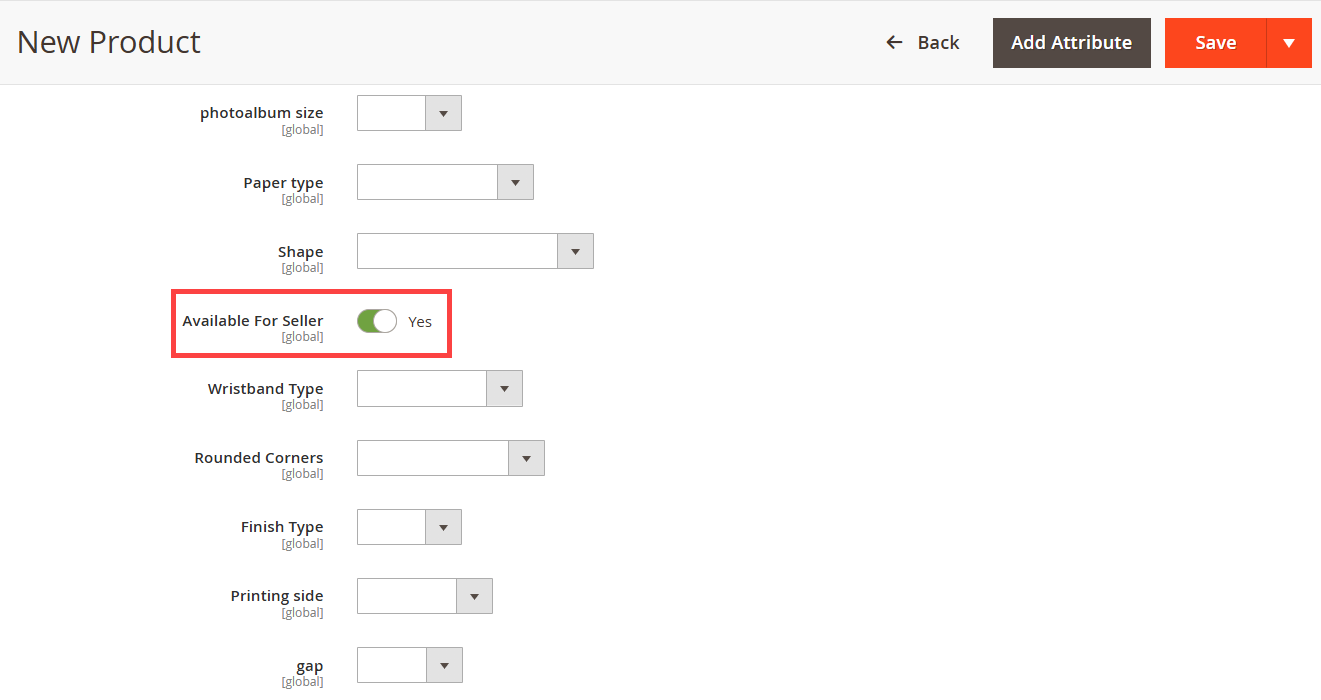
Available For Seller
A switcher named Available for Seller has been added in the Product Creation page through which users can enable/disable the product for sellers visibility. [4]
Manage Sellers
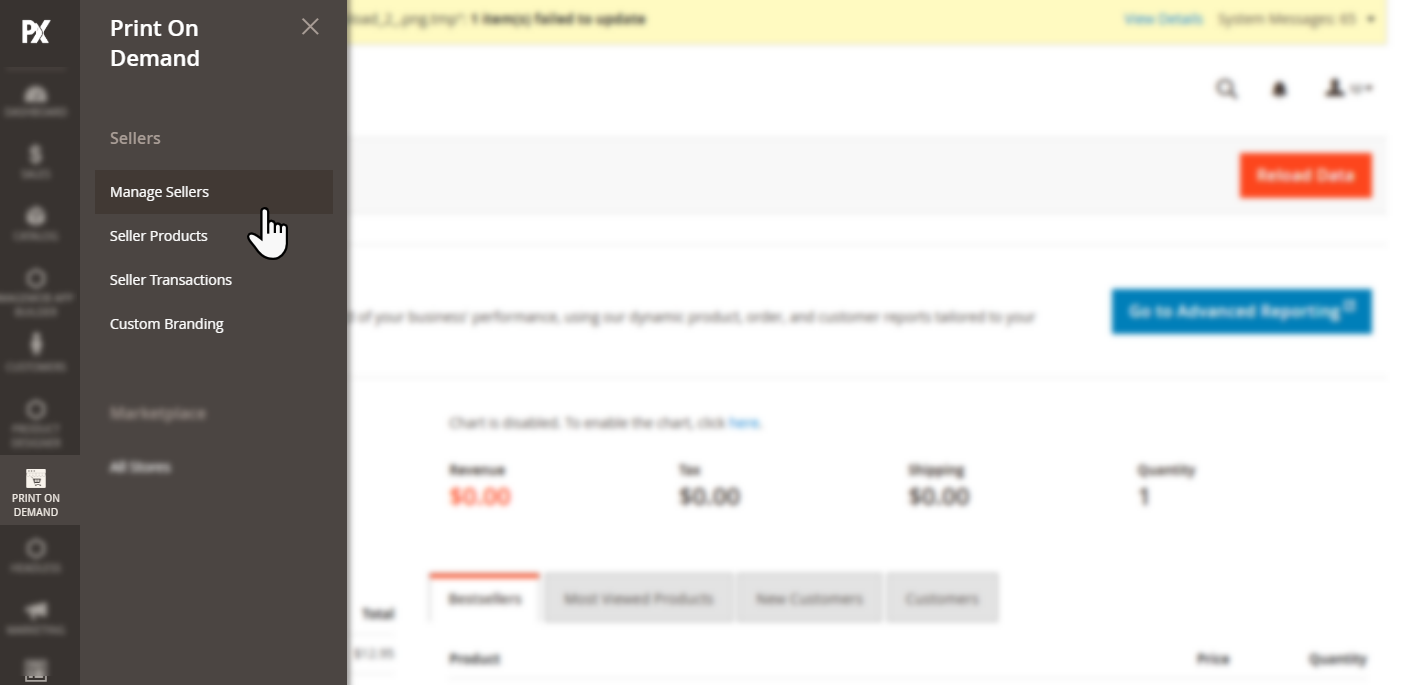
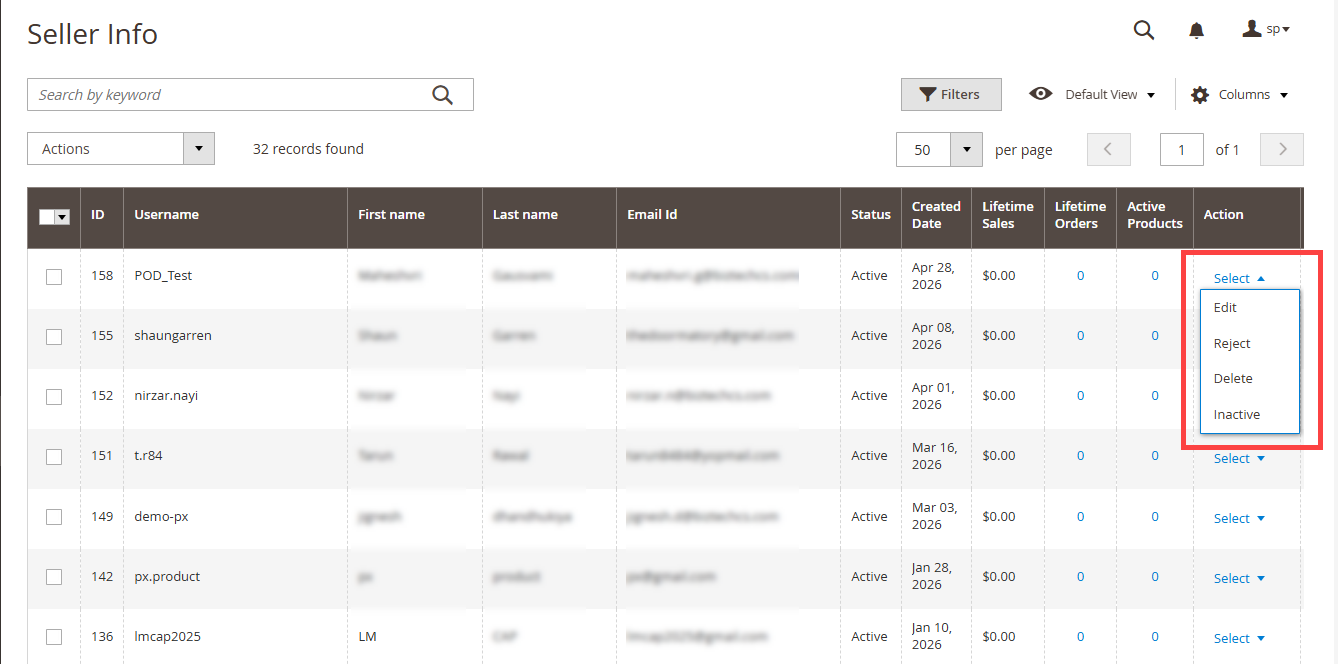
To navigate towards a list of all the registered sellers direct to Print On Demand -> Sellers -> Manage Sellers. [1]
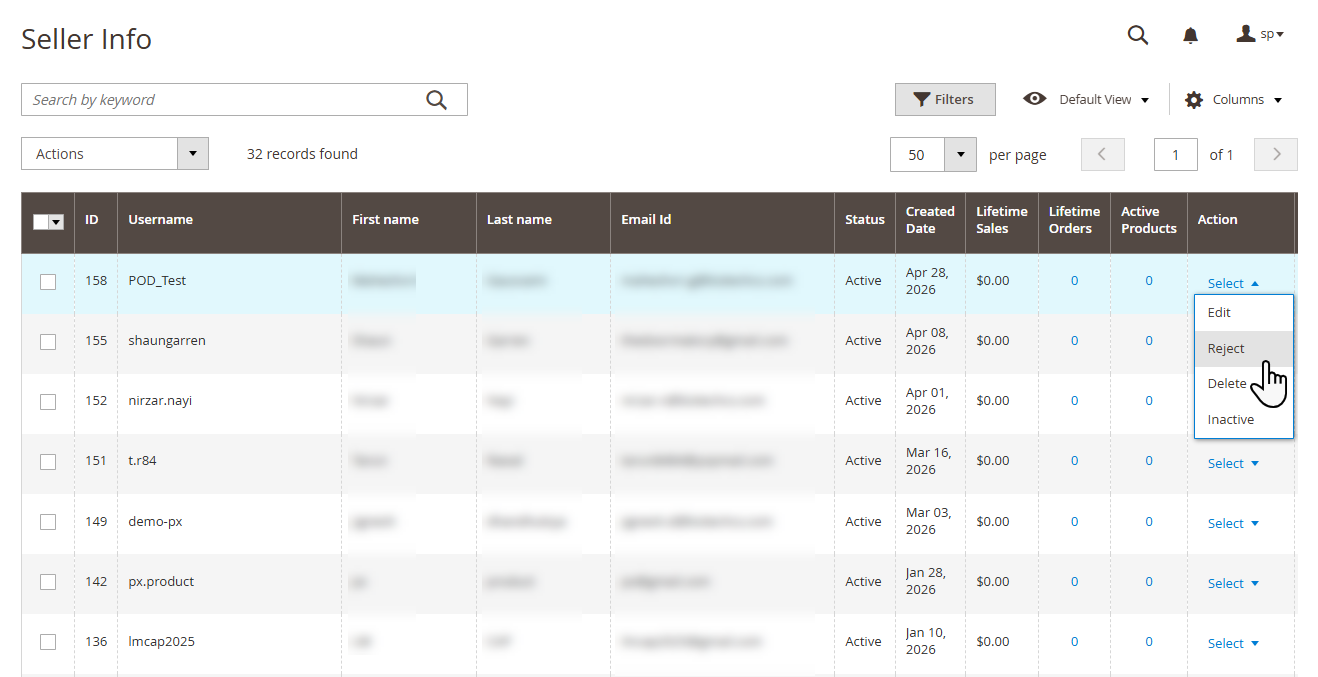
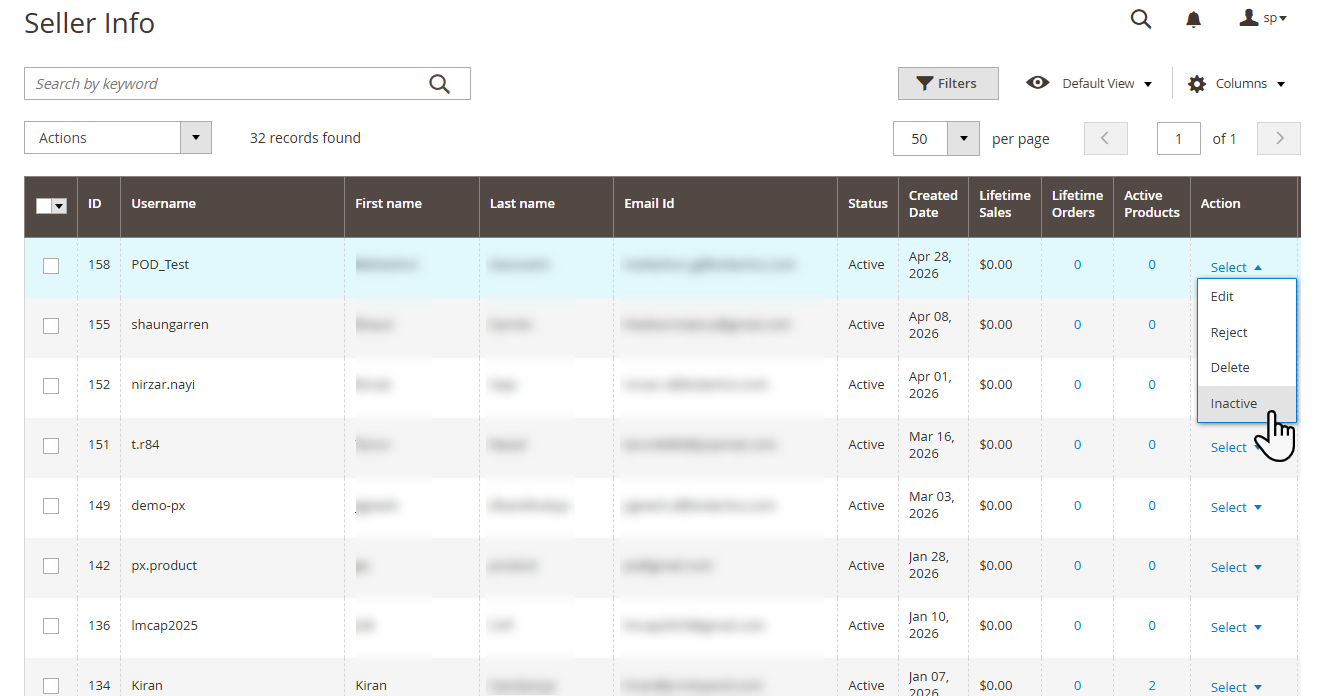
The Select drop down menu consists of three options – Edit, Reject Delete and Inactive. [2]
Edit Seller Details
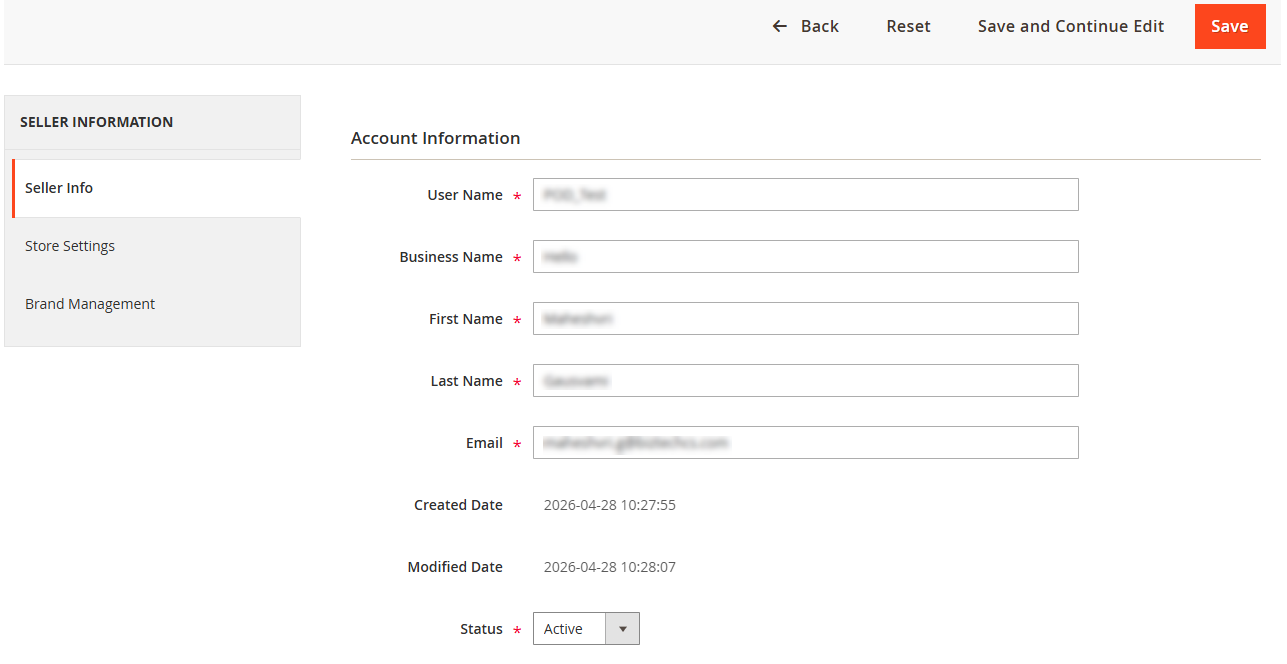
Clicking on the Edit button will direct you to the seller details page.
This section contains all the details of the reseller such as User Name, Business Name, First Name, Last Name, Email, Created Date, Modified Date and Status. The admin can make changes to all these fields except Created and Modified date fields; the latter field will be updated as per the changes made. [1]
Store Settings
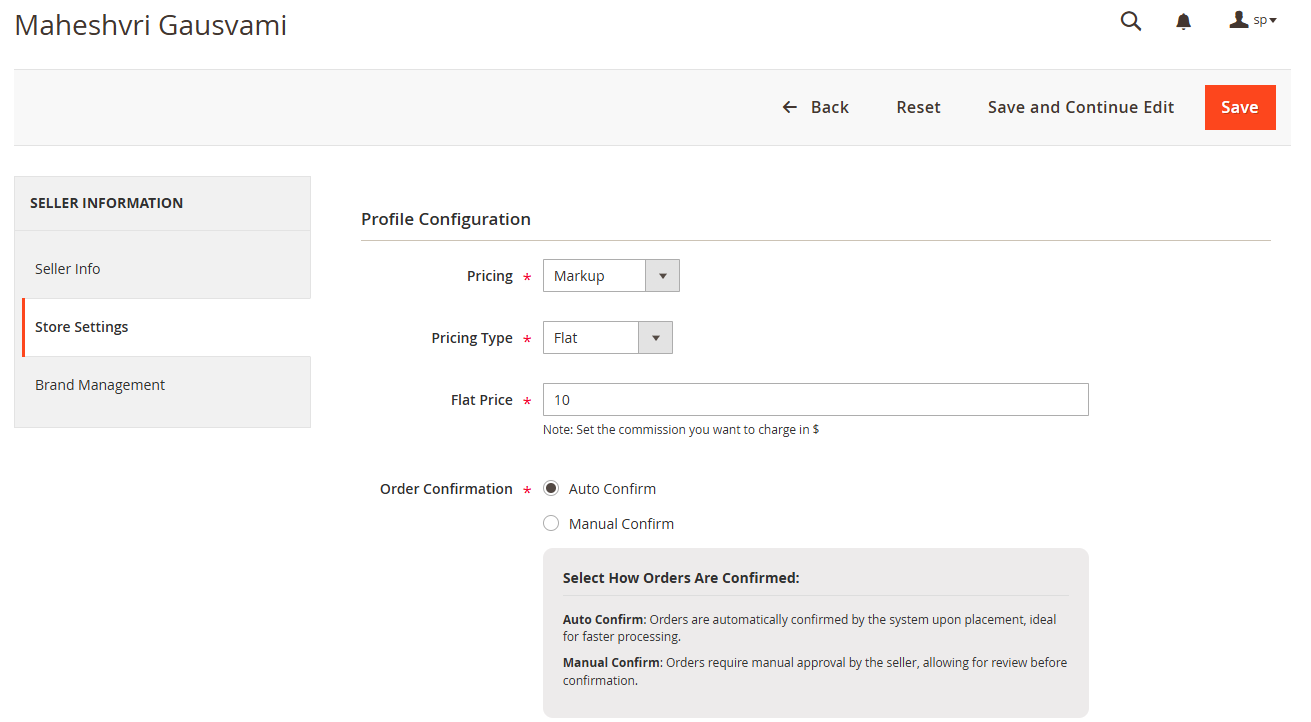
The pricing whether it would be Markup or Commission would be set by the admin and as per that, the fields here would be non-editable respectively.
The set pricing would be mentioned in the Pricing field. Now if Markup pricing is displayed (this option would be selected from the admin side) then in the Pricing Type field there would be options such as : Percentage and Flat.
The proceeding field would be either Percentage Price or Flat Price based on the Pricing Type selection.
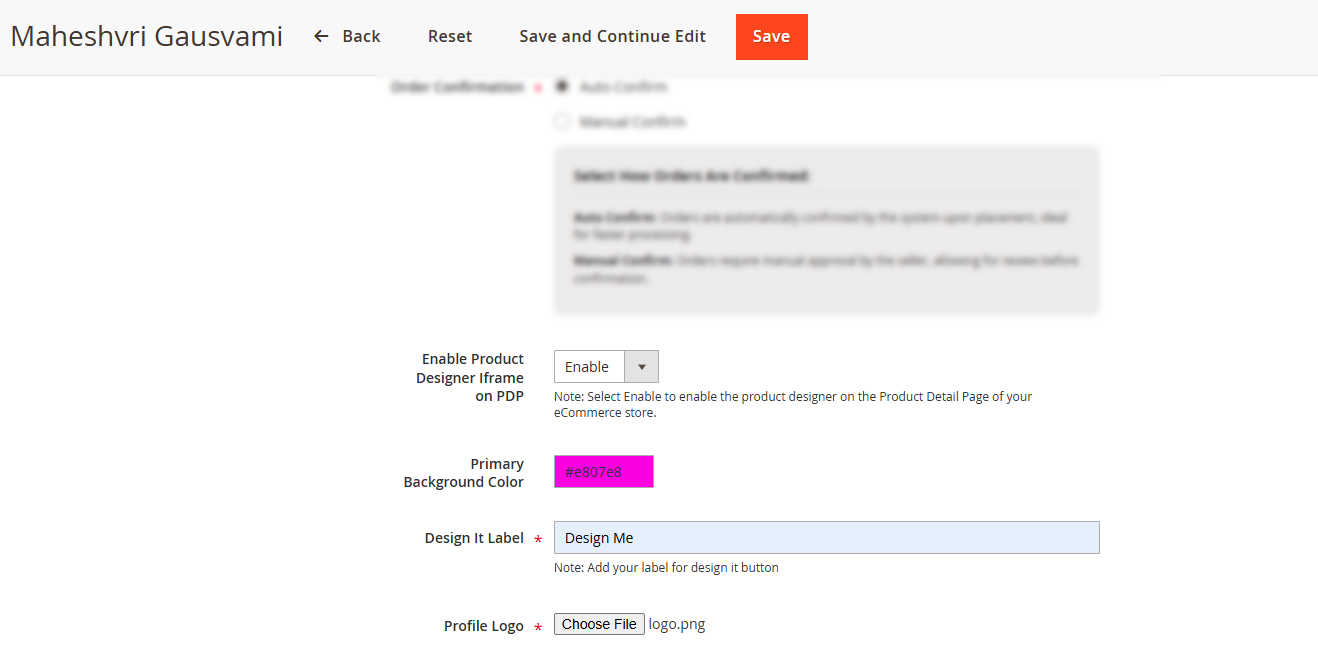
The Order Conformation method contains two options Auto Confirm and Manual Confirm. In the Auto Confirm orders are automatically confirmed by the system upon placement, ideal for faster processing and passed to admin. On other hand in the Manual Confirm orders require manual approval by the seller, allowing for review before confirmation. [2]
Additionally, the admin can enable the Product Designer iframe on the Product Detail Page (PDP) for the eCommerce store. They can set the primary background color, define the label for the “Design It” button (which will be visible to sellers customers), and upload the store profile logo. [3]
Brand Management
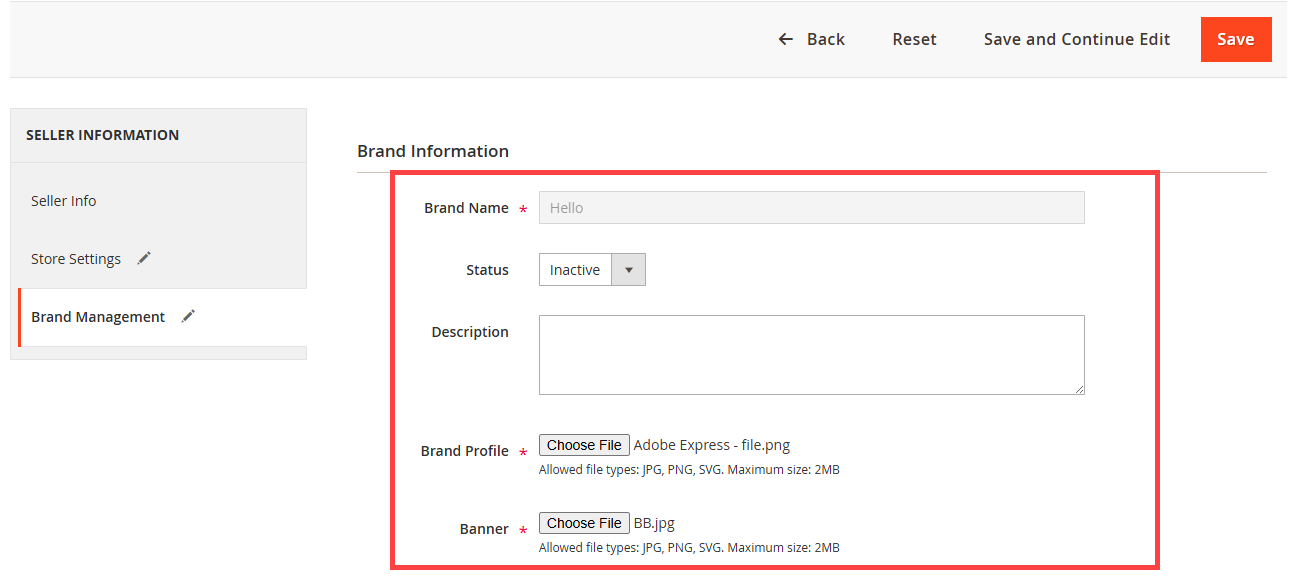
Details about the seller’s brand should be entered in this section. The following fields are displayed here: [4]
– Brand Name: Once the seller enters the Brand Name during the account creation, it cannot be changed. Here, the name is in read-only format. [4]
– Status: Activate the brand through here.[4]
– Description: The brand description can be written here. [4]
– Brand Profile: The profile image of the seller’s brand has to be uploaded.[4]
– Banner: Upload a banner to depict the brand. [4]
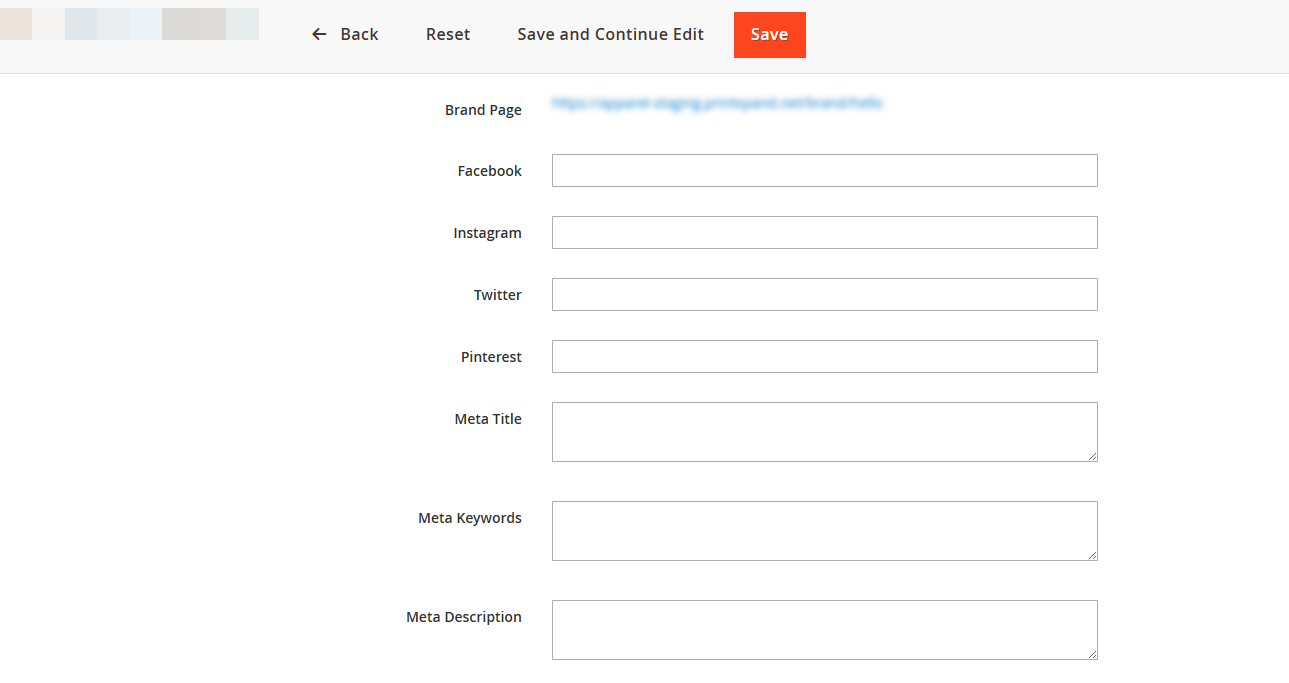
– Brand Page: The url of the brand page when clicked upon, the seller would be directed to that particular page. [5]
– Facebook: Facebook url of the brand. [5]
– Instagram: Instagram url of the brand. [5]
– Twitter: Twitter url of the brand. [5]
– Pinterest: Pinterest url of the brand. [5]
– Meta Title, Meta Keywords and Meta Descriptions : The meta title, meta keywords and the meta description respective to the brand should be entered in these fields. [5]
Once all the changes have been made, proceed to Save the configurations.
Approve/Reject a Seller
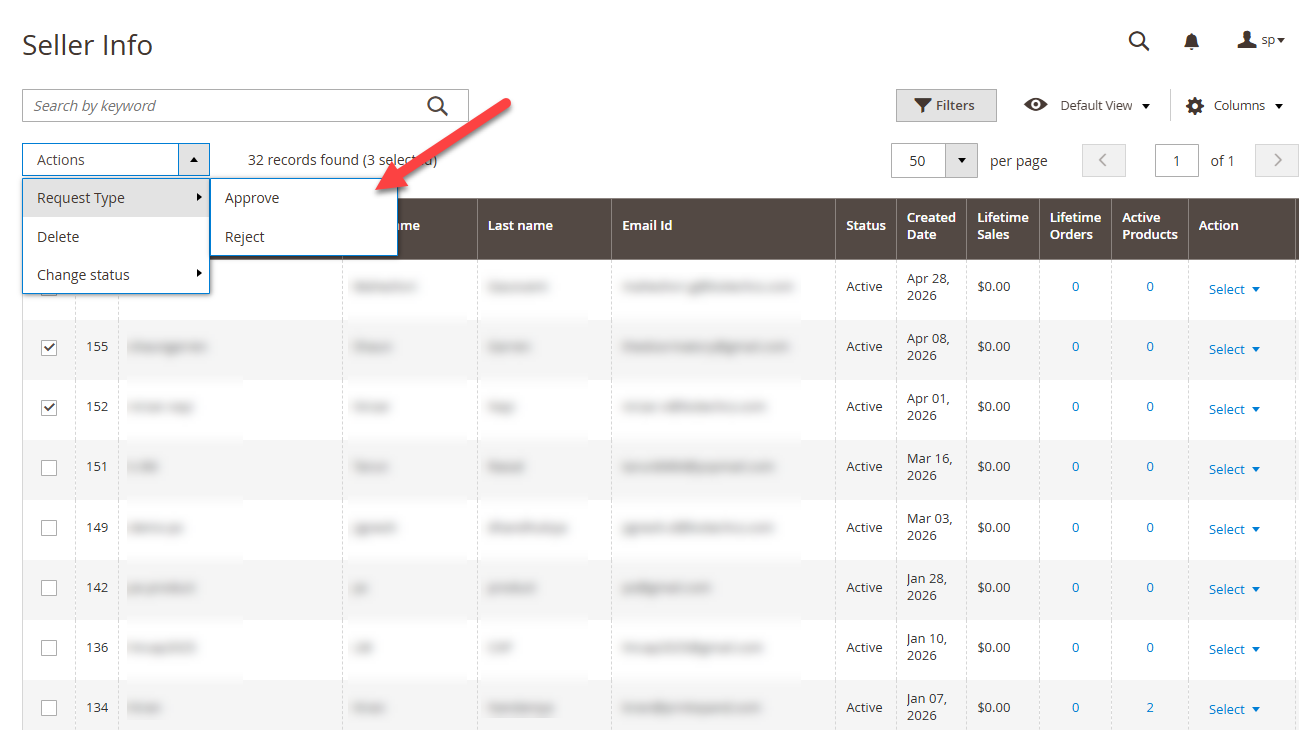
You can reject a particular seller by navigating to the Action column’s Select drop down menu. There’s a Reject/Approve depending upon the seller. When clicked a pop-up appears, proceed with Ok in order to reject that particular seller. [1]
Now to approve or reject in bulk, select the respective sellers and then direct towards the Actions drop down menu. In the Request Type option, there are further options – Approve and Reject.
Through these options, you can approve and reject multiple resellers. [2]
Active/Inactive a seller
Inactive an activated seller or vice versa, by navigating to the Select drop down in the Action column where the respective option is displayed. A pop-up appears confirming the action, proceed with Ok. [1]
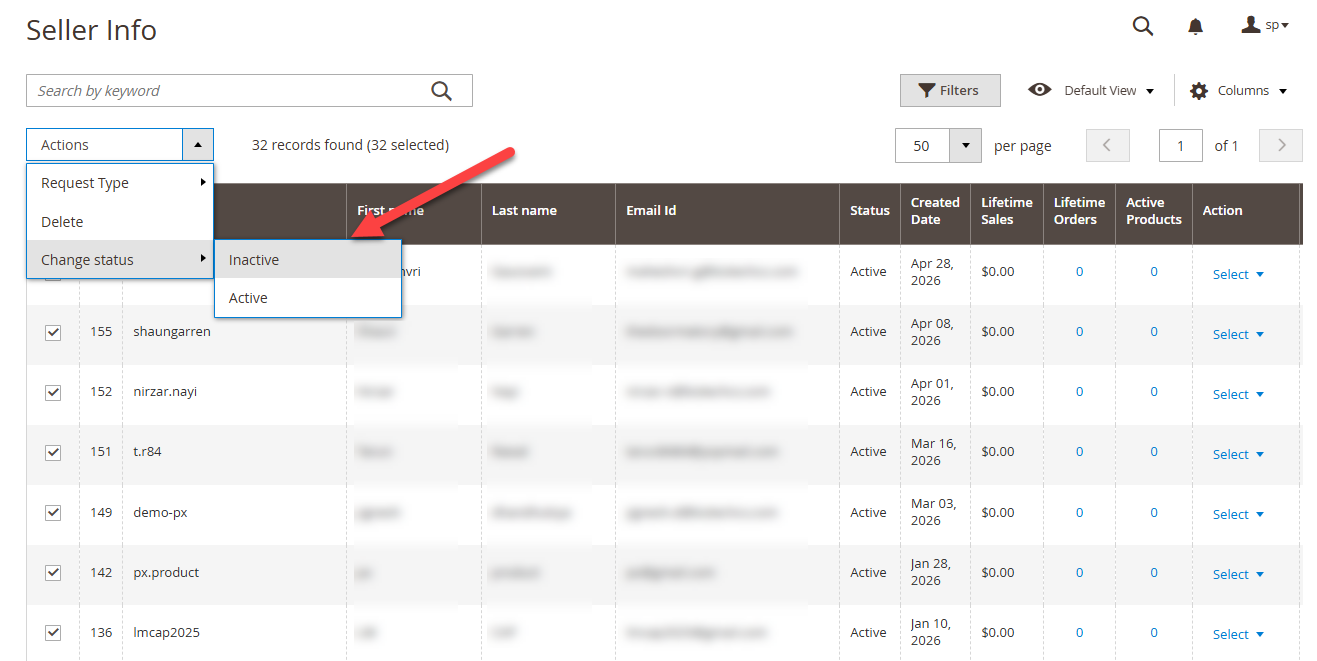
To Active/Inactive multiple sellers, firstly select the respective sellers and then direct towards the Action drop down menu and click on the Change Status option. Here there are options like Inactive and Active; select accordingly.
Lifetime Orders & Sales Revenue and Active Products
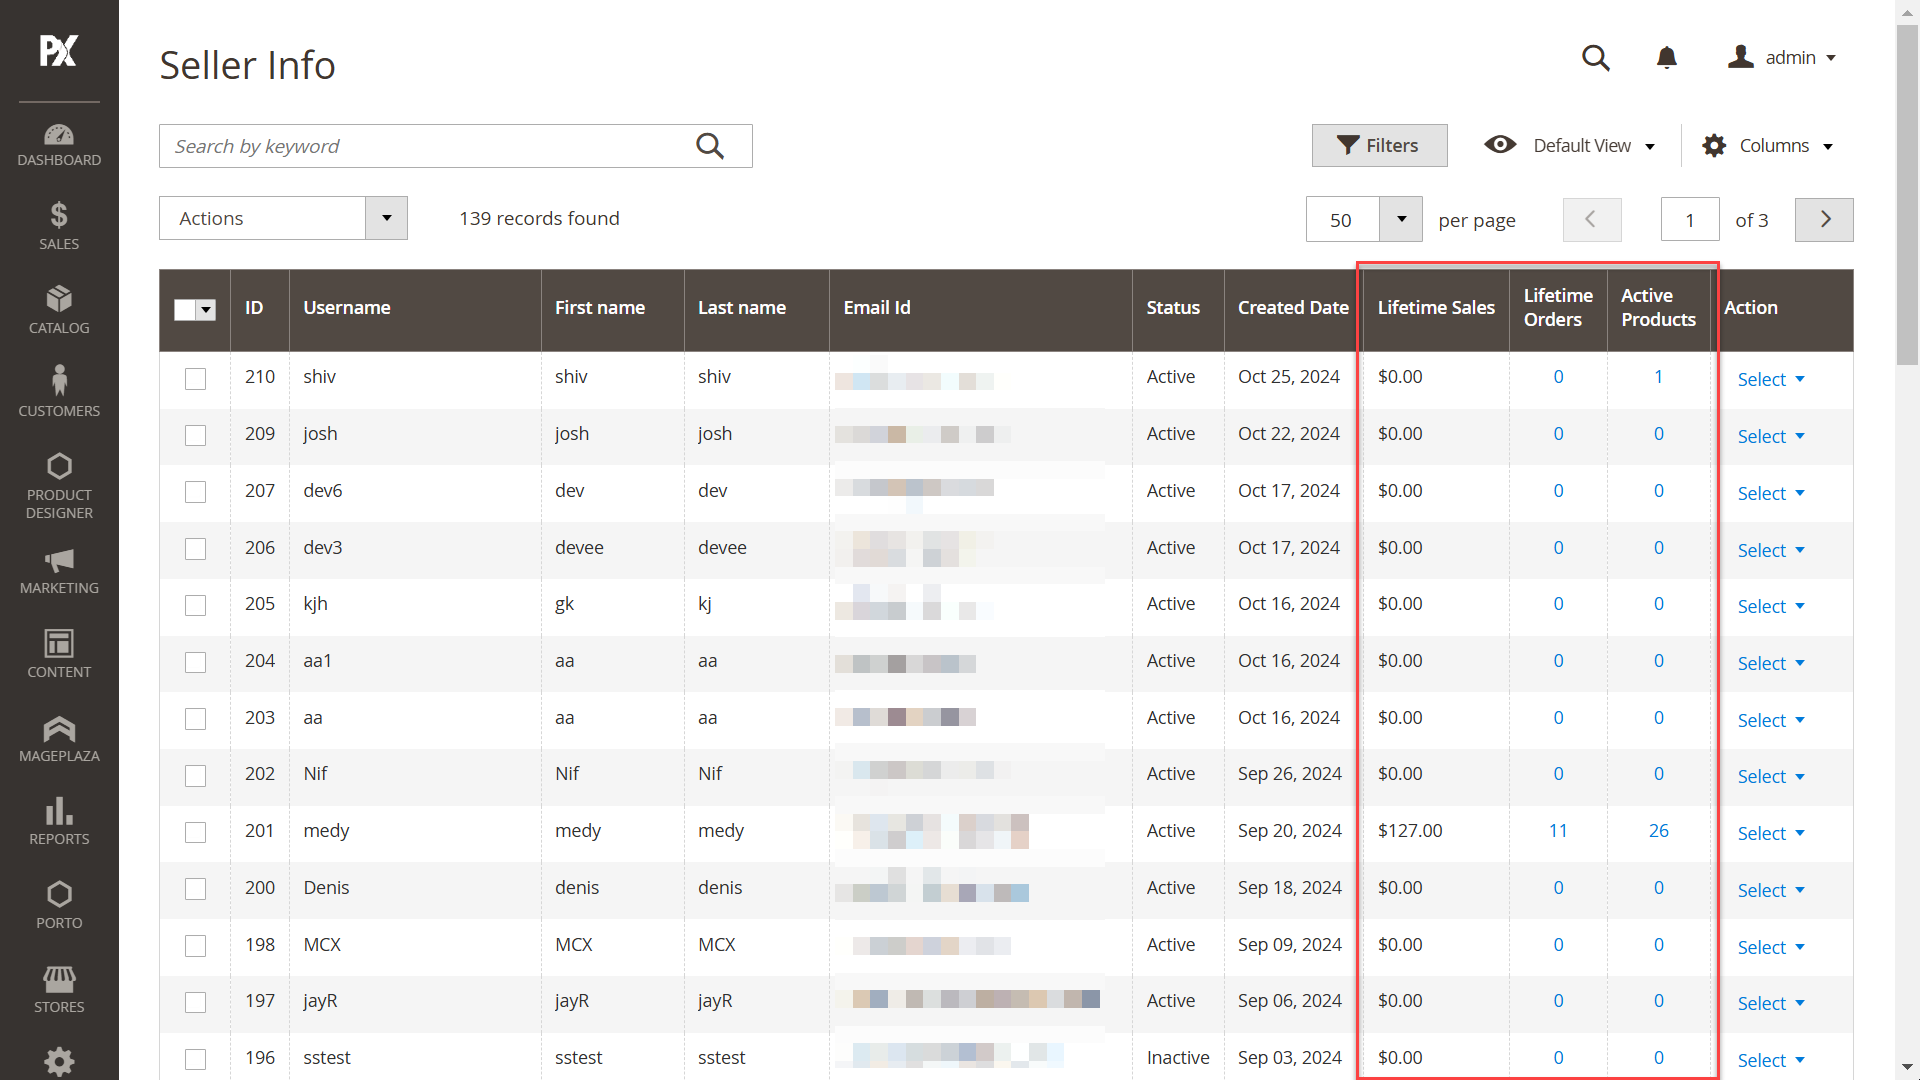
There’re three columns added in the Seller Info page named Lifetime Orders, Lifetime Sales and Active Products.[1]
Seller Products
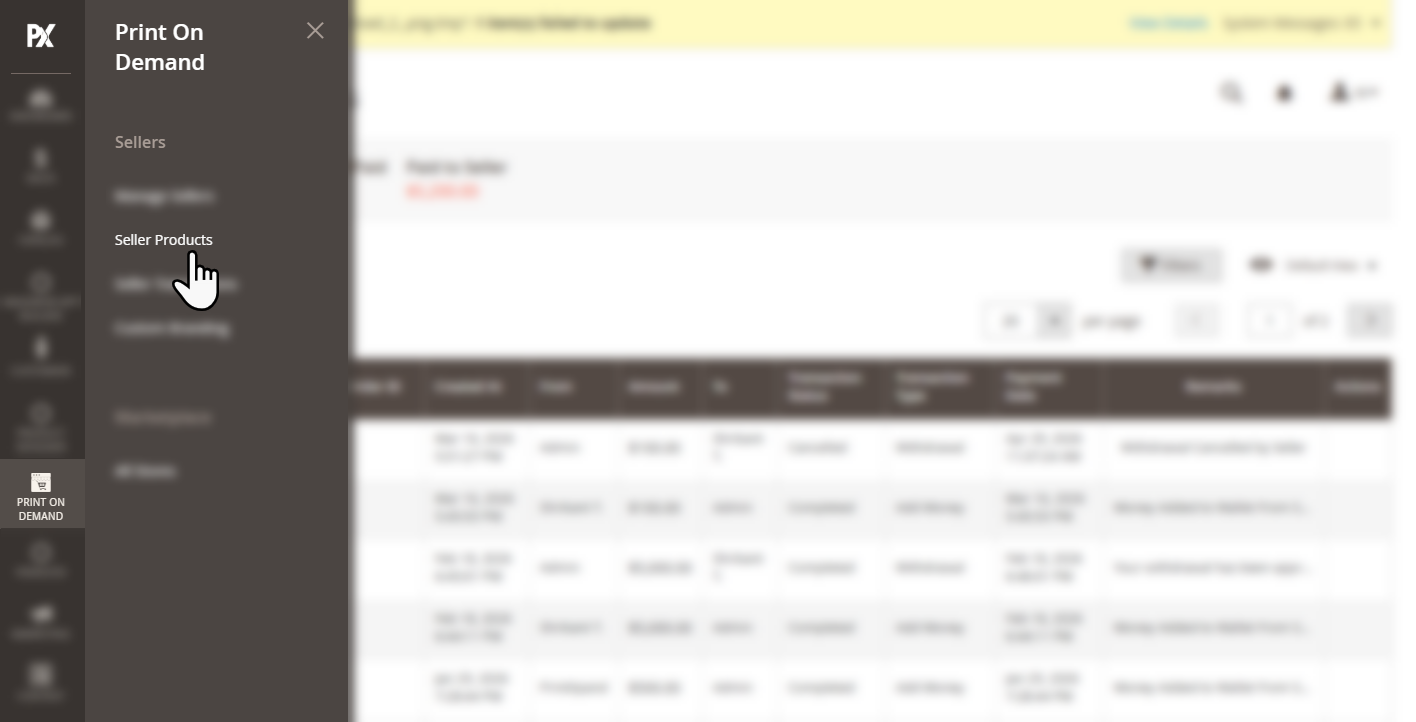
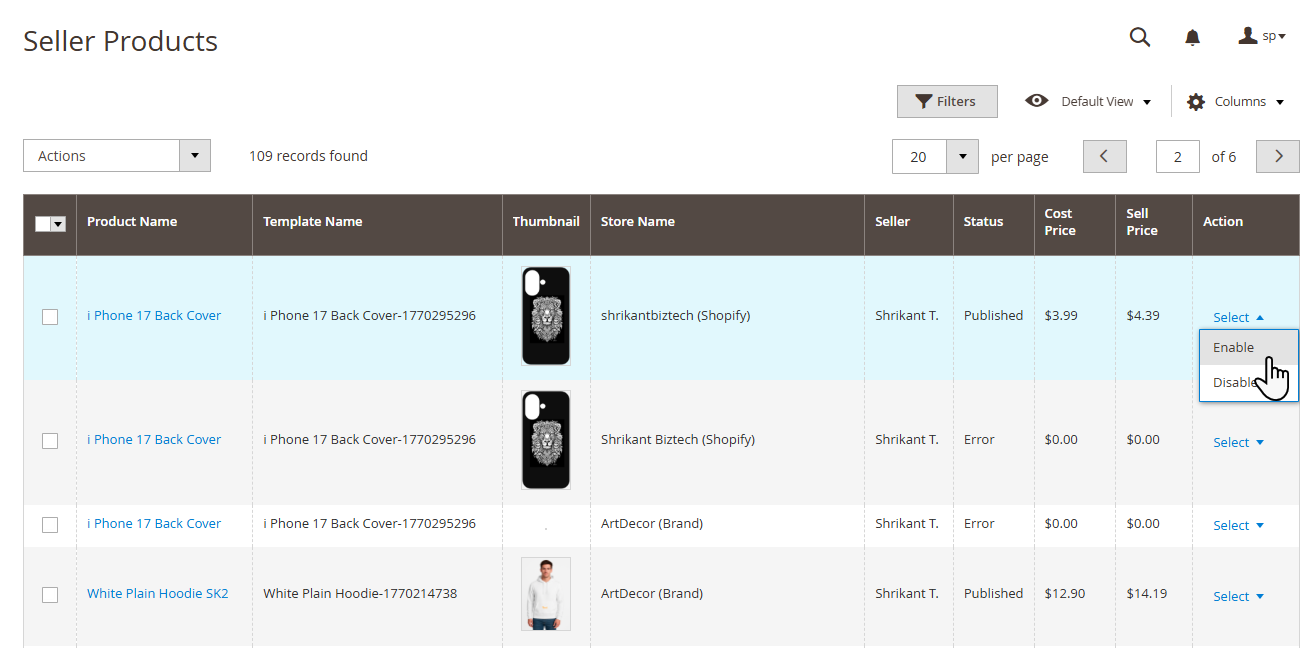
Now if you need to view all the products that have been published on a seller store, navigate to the Print On Demand -> Seller Products section. [1]
You can enable or disable the published product by directing towards the Select drop down menu. [2]
Orders
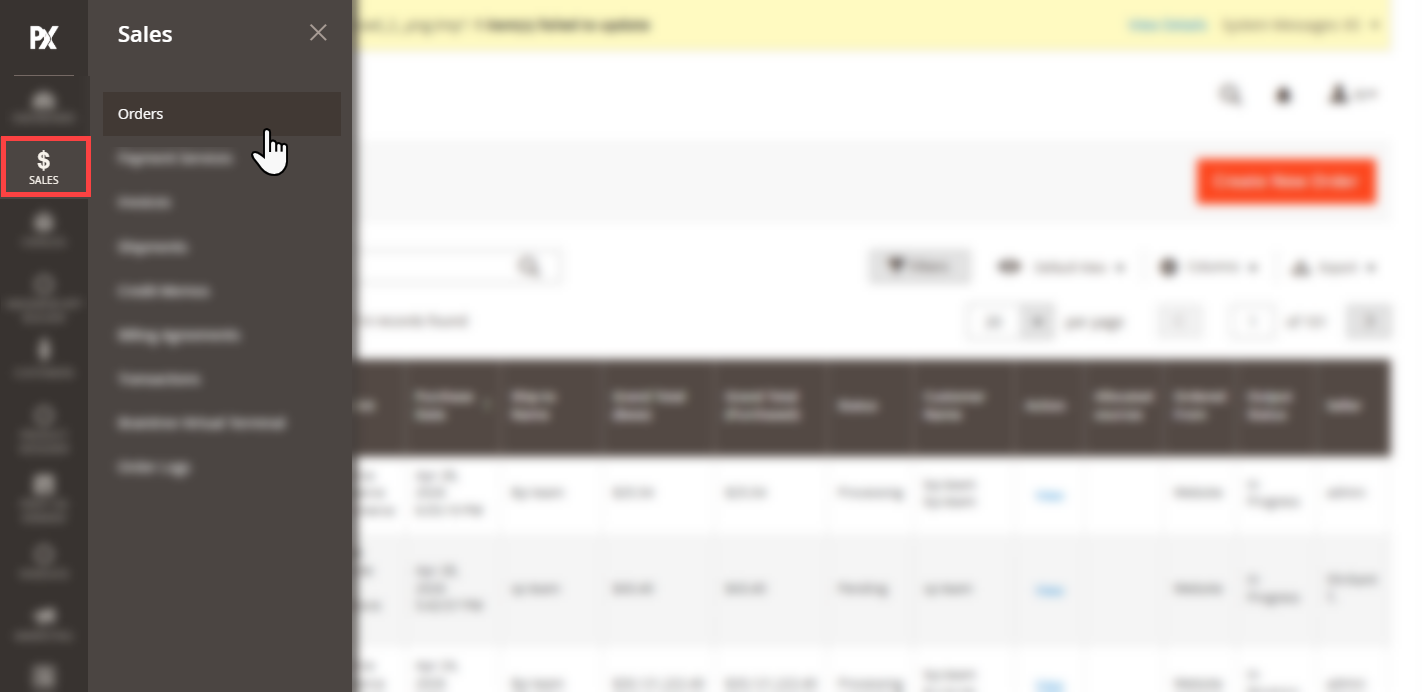
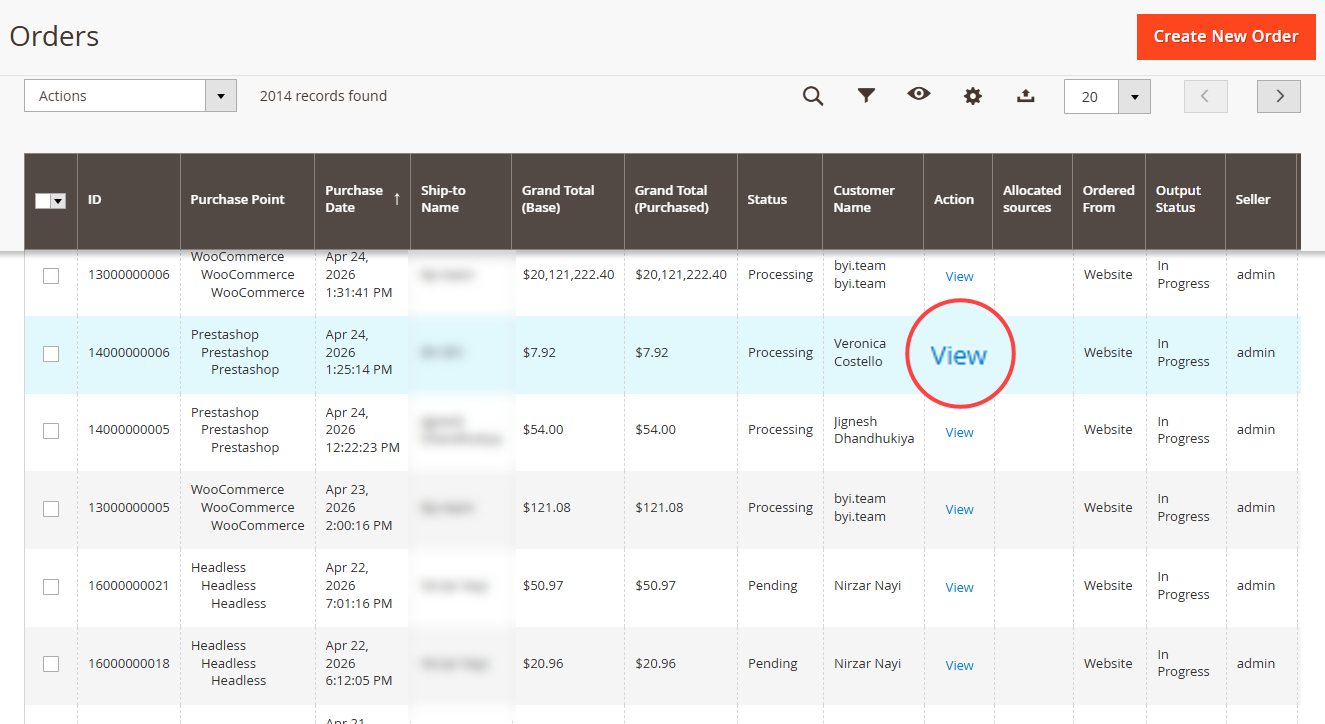
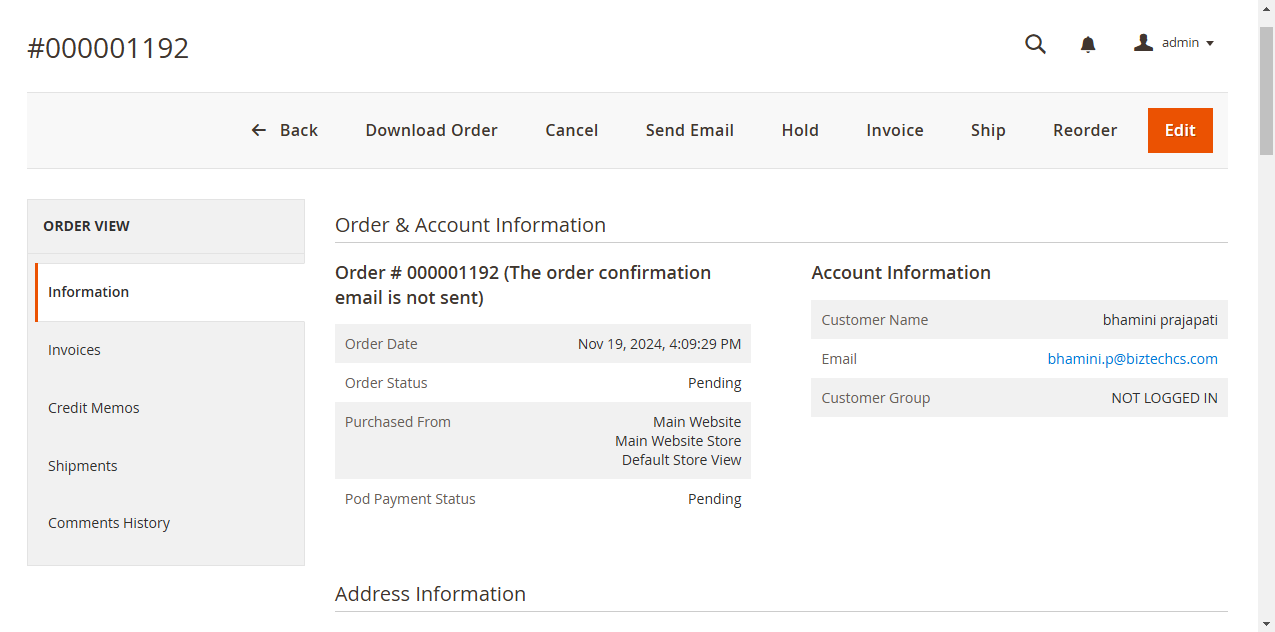
Navigate towards the orders listing by directing towards the Sales -> Orders. [1]
The View button directs the admin to the order details page. [2]
Here, in the Order Details page they would be able to perform the actions such as Download, Cancel, Send Email, Hold, Invoice, Ship and Order.[3]
Seller Transactions
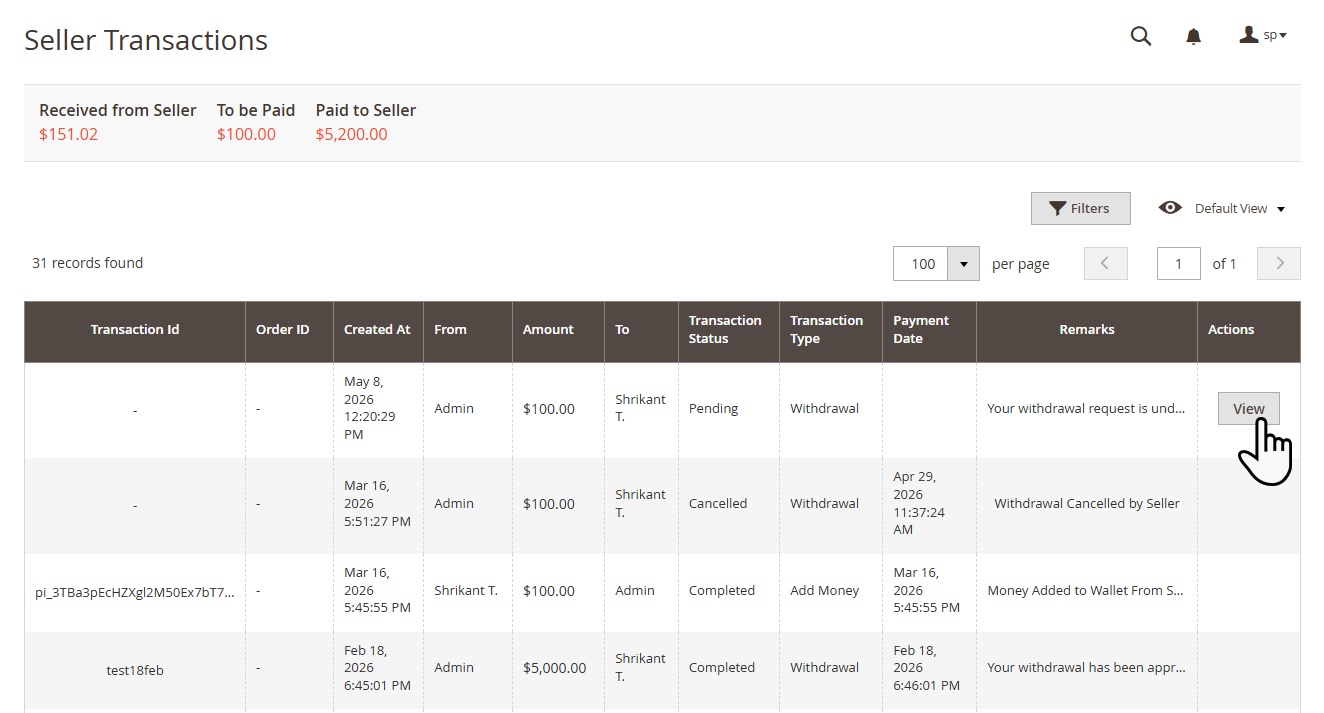
You can direct towards the seller transactions by navigating to the Print On Demand -> Seller Transactions. [1]
This grid in this section contains all the transactions that have been made. On the top section, there is Received from Seller, To be Paid and Paid to Seller in the former the amount that has been received from the seller is shown and in the latter, the amount that has been paid to the seller is displayed. [2]
Payout Request Approve/Reject Flow
Admin can click on the View button to view the pending payout request. [1]
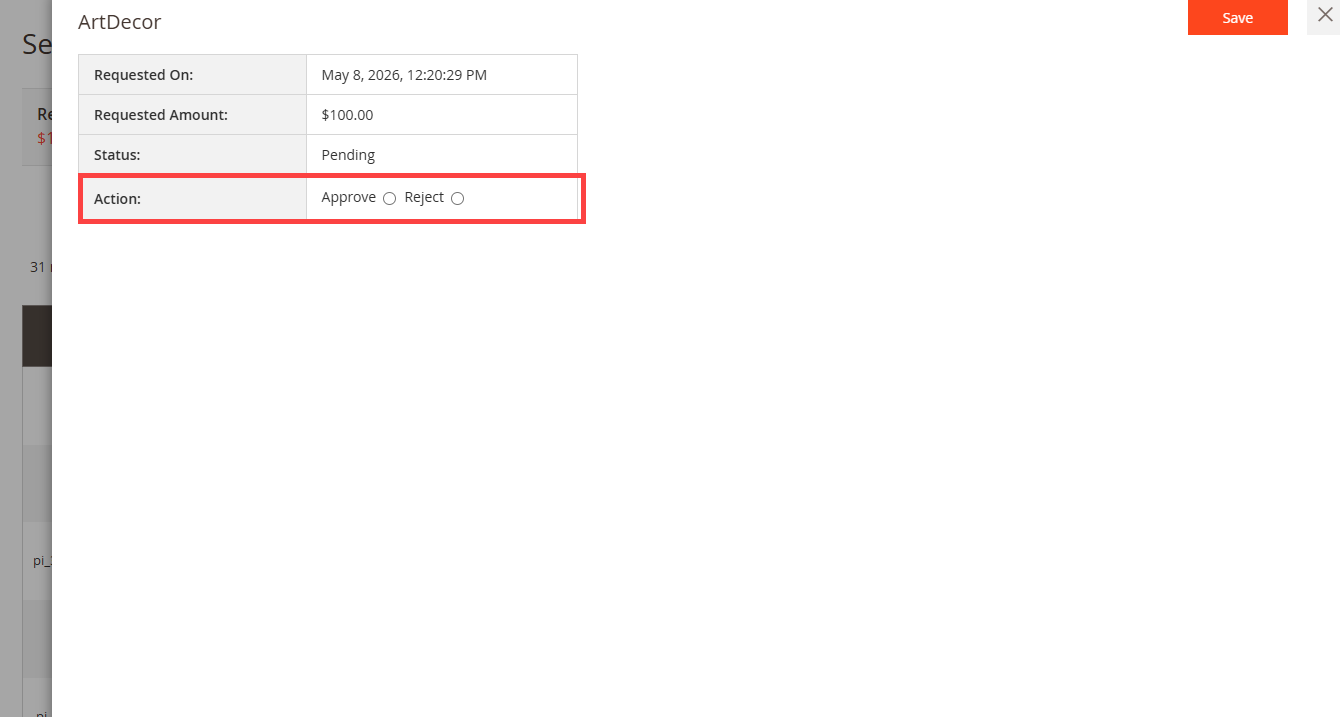
Admin can click on the Approve or Reject button in the following shown screen.[2]
Note: Admin needs to manage transactions offline.
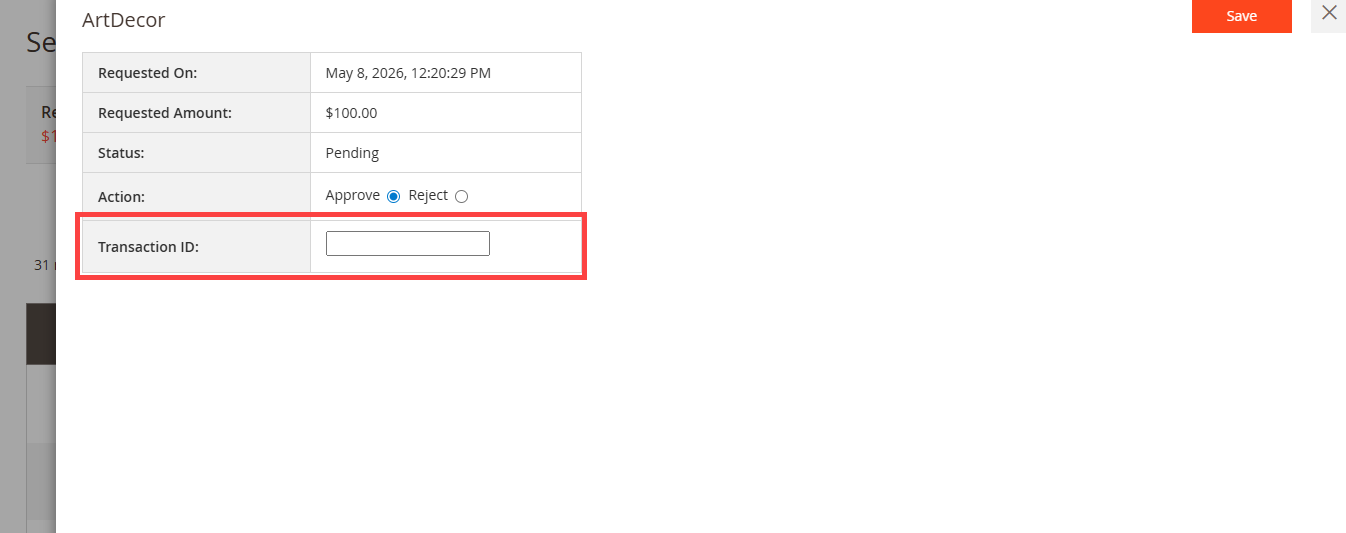
If the admin user selects the Approve button, a transaction ID text box will appear and the admin can fill up the transaction ID of the offline transaction for the tracking purpose and save it. [3]
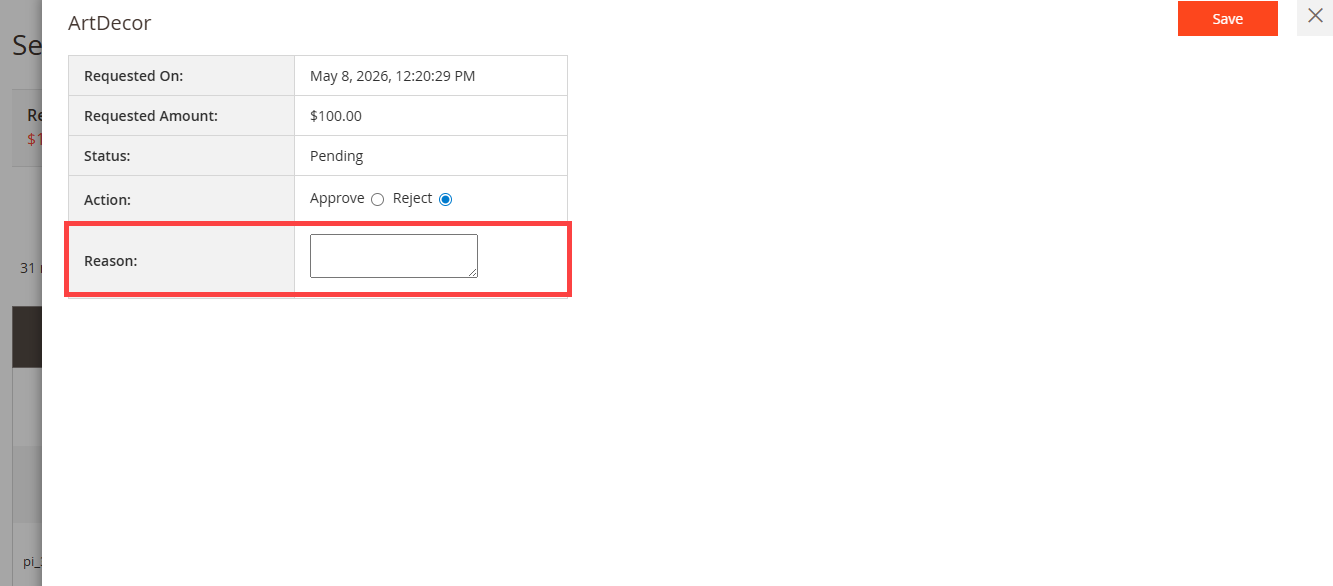
If the admin chooses to reject the payout request and selects the Reject radio button, the Reason text box will appear as shown and the admin can put up the reason for rejection and save it. [4]
Manage Templates
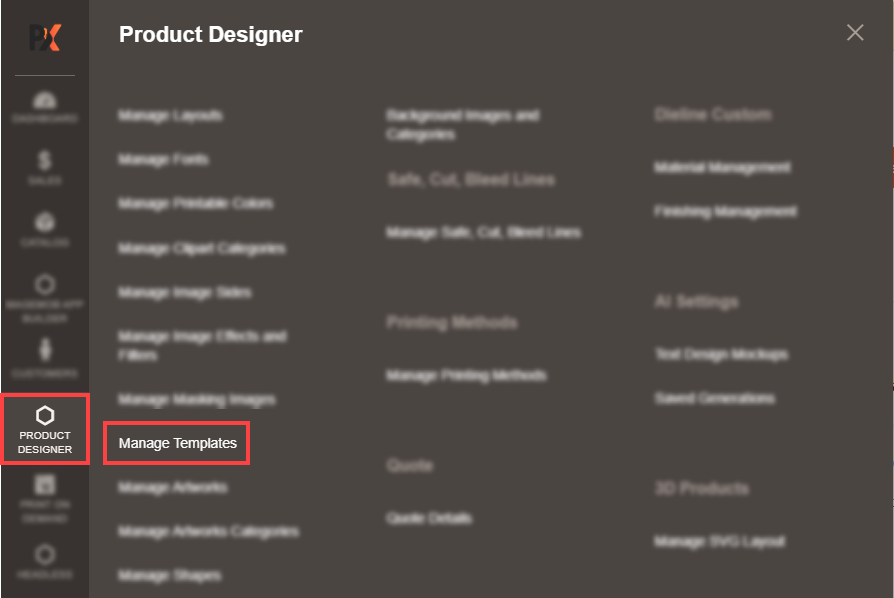
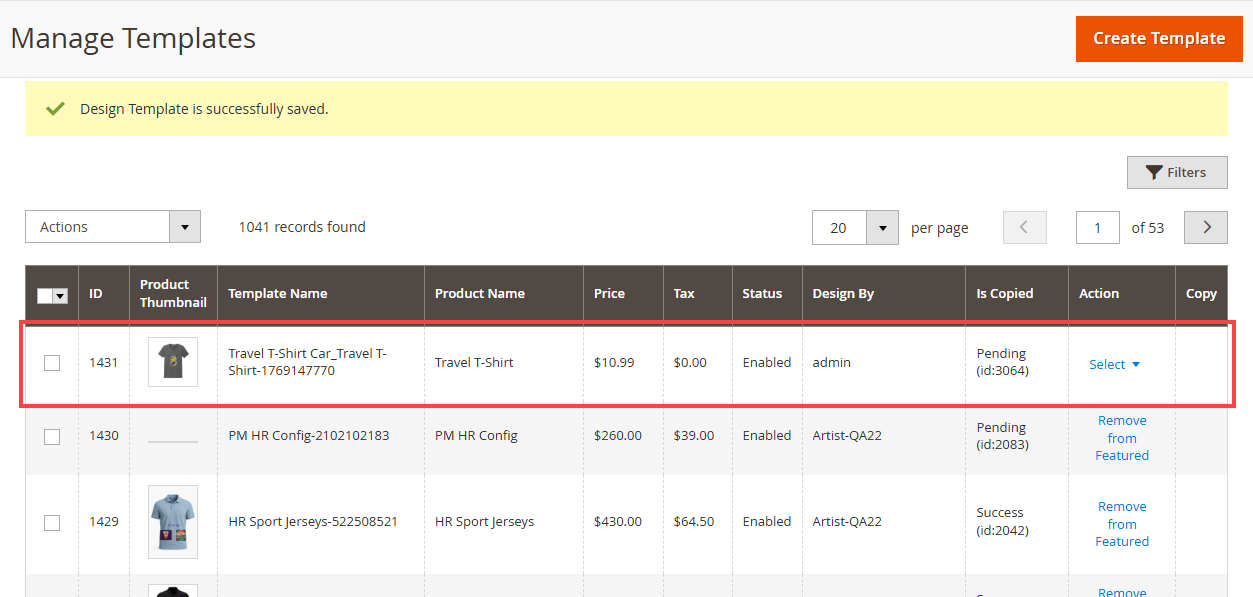
Now, go to the Product Designer → Manage Templates to create and manage the templates for the specific products. [1]
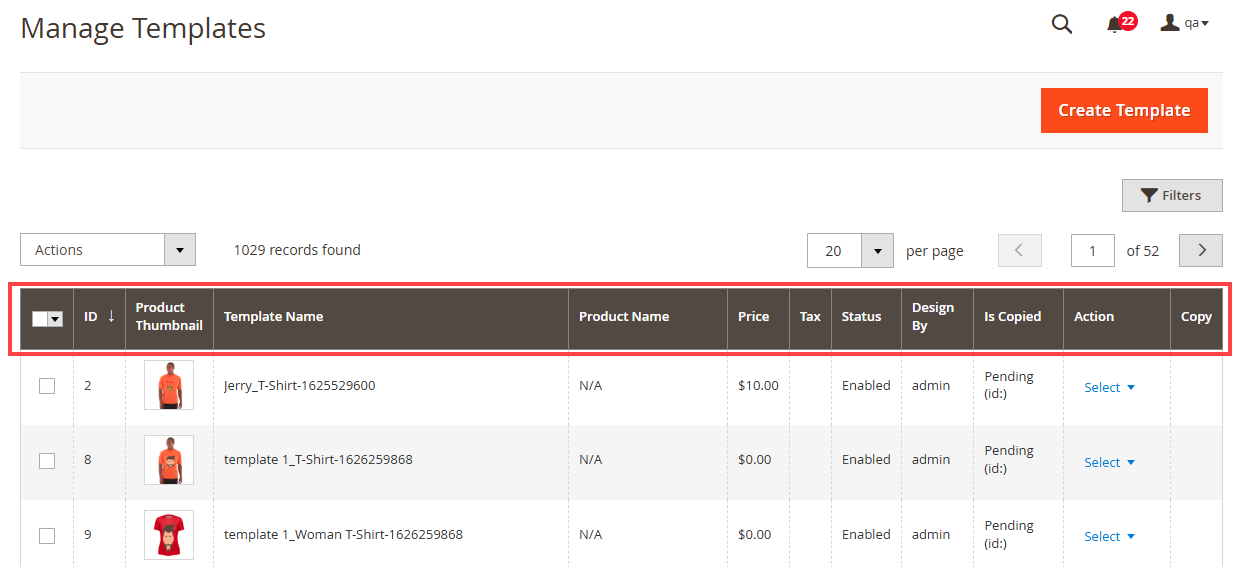
You will see the list of the templates by navigating to the “Manage Templates” page. You will see the detail in grid views like ID, Template Name, Product Name, Price, Template Thumbnail (template image), Store View, Visible on Front, and Action. The Design By column consists of the reseller name. [2]
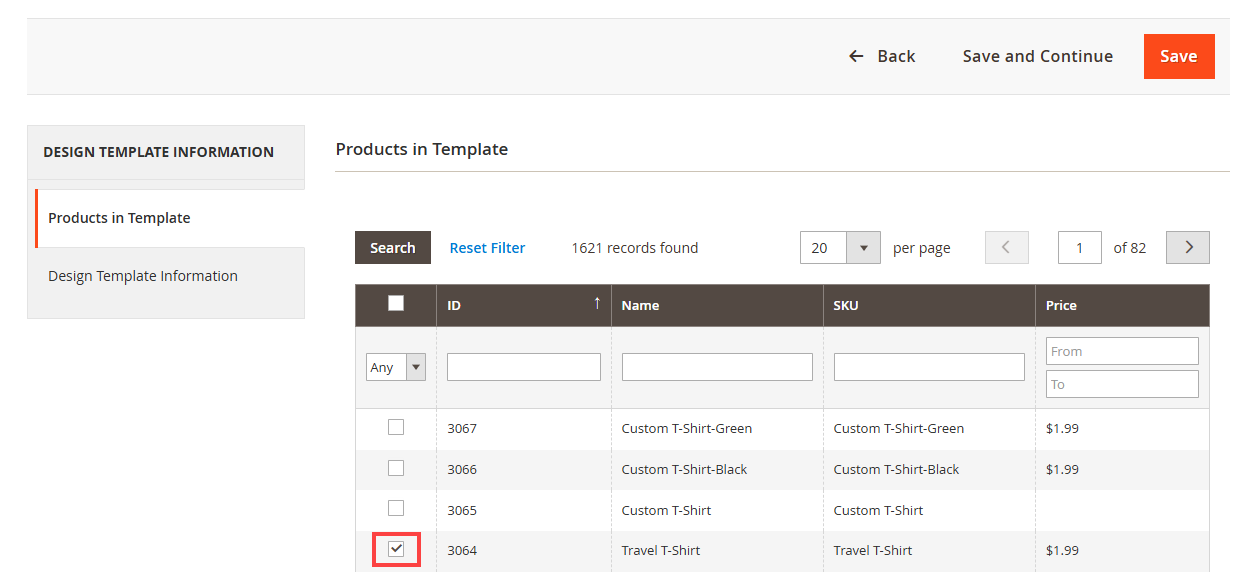
To add a new “Design Template”, click on the Create Template button. You will navigate to the “Add Design Templates” page. You need to select the product from the product list. [3]
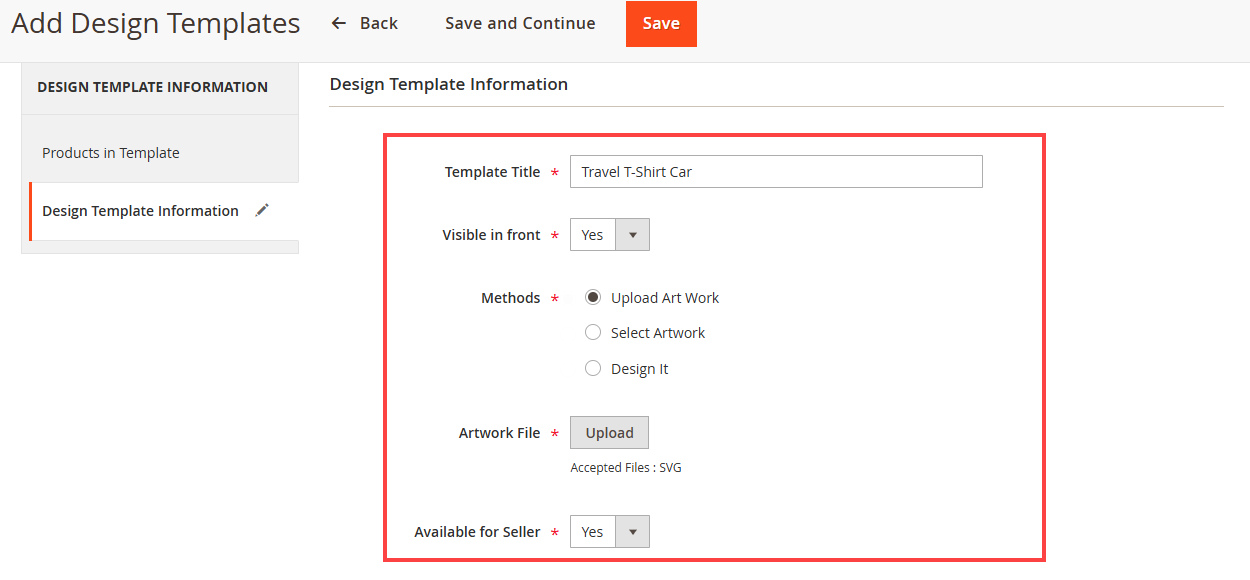
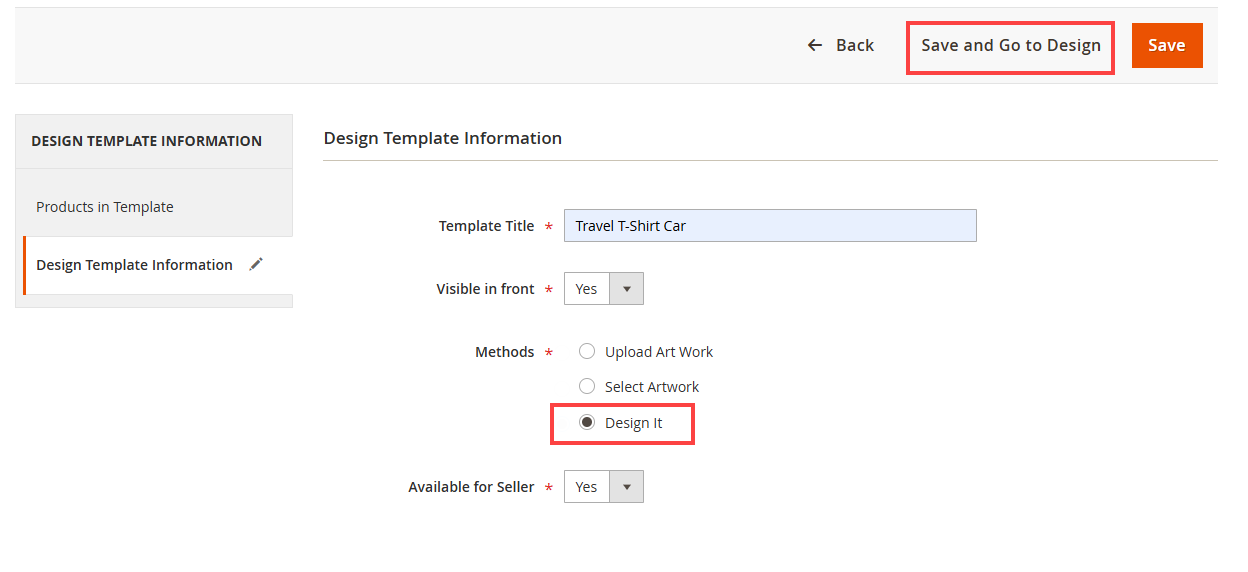
After selecting the product, click on the “Design Templates Information” option to insert the Template’s information. You need to insert the following information of the template: [3]
Template Name: Insert the relevant name of the template that will be displayed on the storefront.
Visible in front: Enable this option to make the template visible in the storefront.
Methods: You will get three methods to create and manage the template for the product.
-
- – Upload Artwork
- – Select Artwork
- – Design It
Available for Seller : Make the templates for your seller. This template will be visible to the seller store.
Upload Artwork
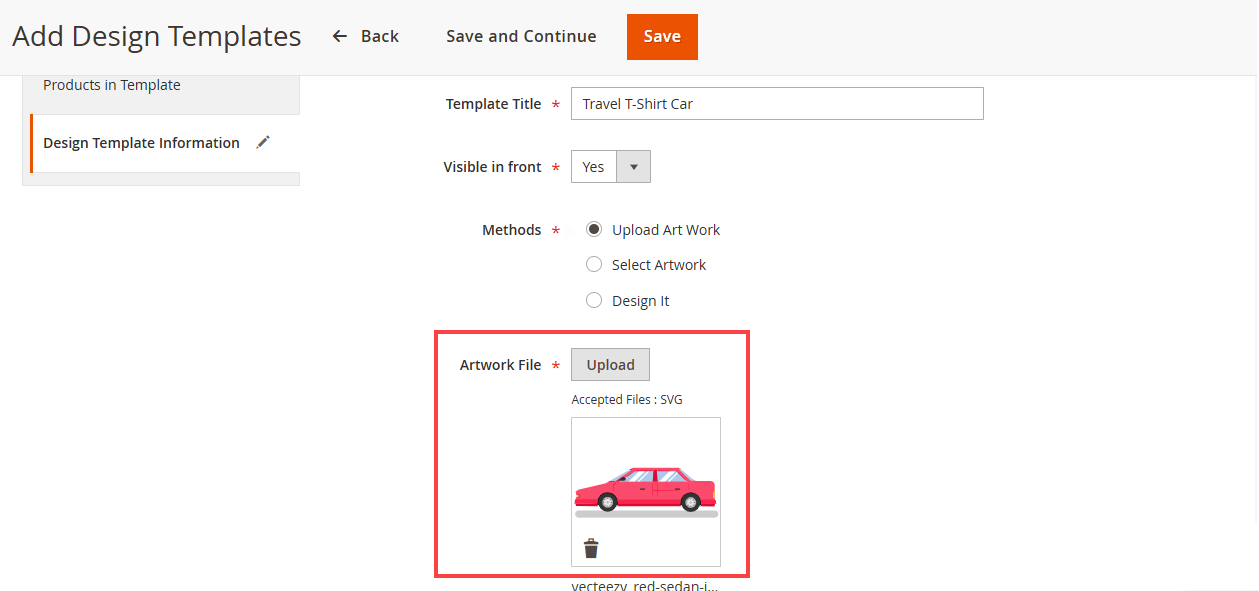
To upload a ready-made artwork (SVG file) you have to choose the Upload Artwork option. [1]
Click on Save once you have uploaded the file.
NOTE: The price of the template will be 0, if the admin designs that artwork then the decoration price will be added and displayed in the grid.
Choose Artwork
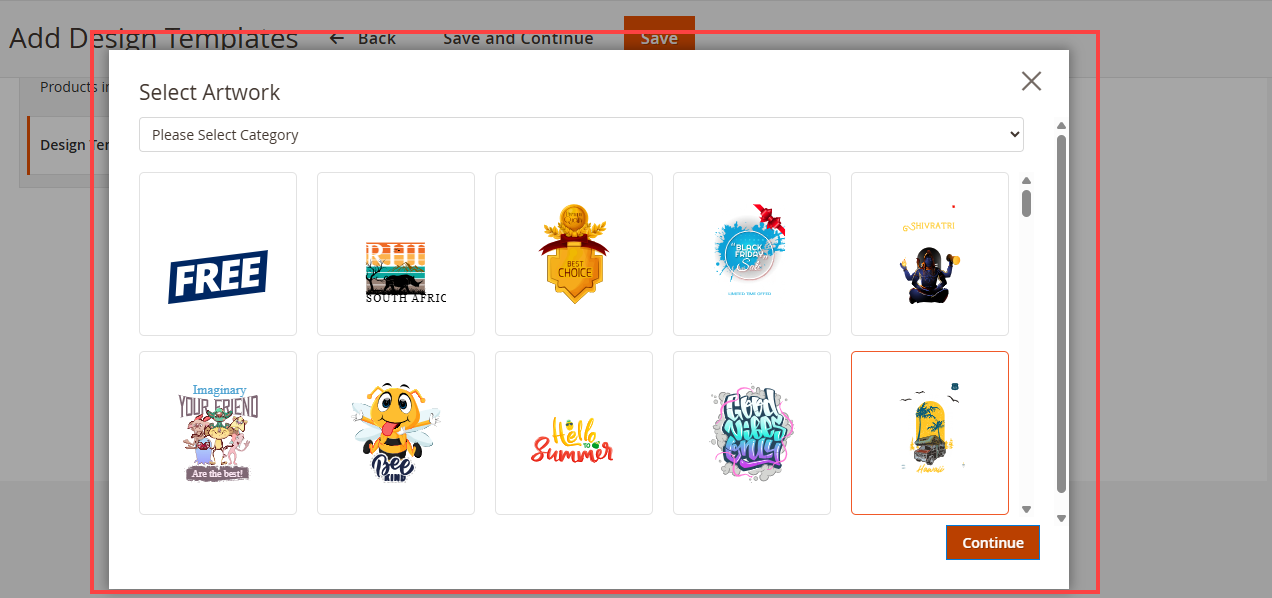
You can choose the existing artworks that are created under the “Product Designer → Manage Artwork”. By clicking on the Choose Artwork method, the “Select Artwork” popup will appear. [2]
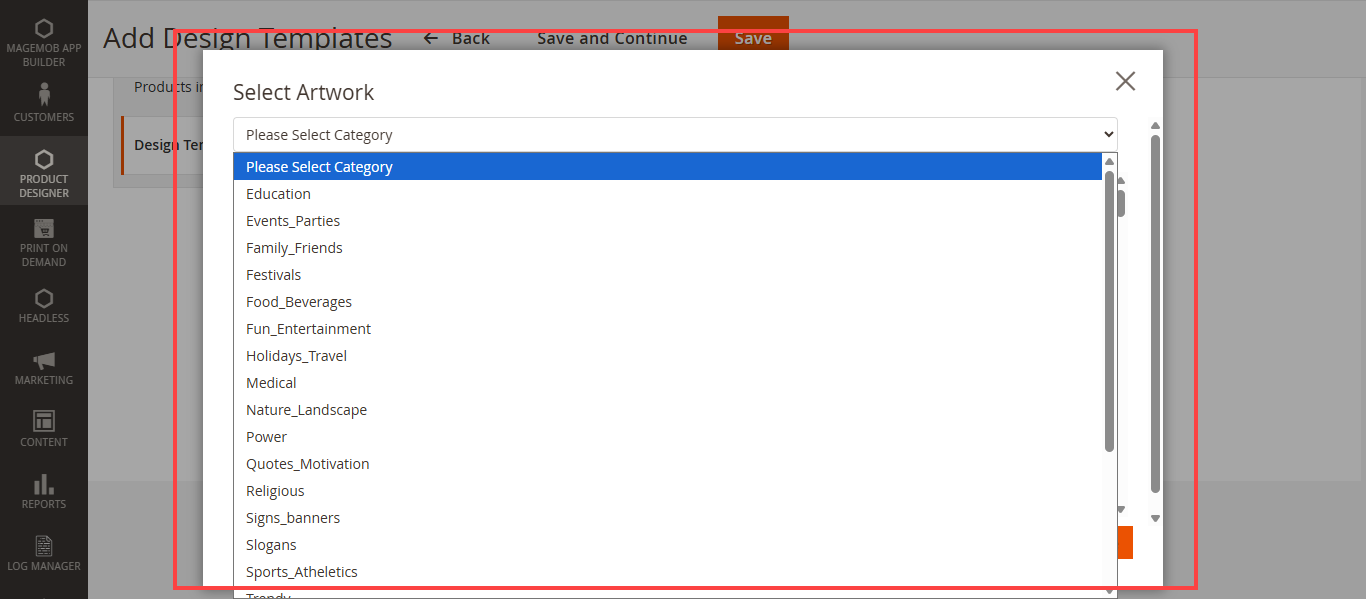
You can also filter the Artwork by selecting the “Category”. By clicking on the “Please Select Category” drop-down selection, you will get the list of the artwork categories. You need to select the artwork and save the Template. [2]
Artwork selected will be used as a template and admin will be redirected to the template listing page. [3]
NOTE: Price of the template will be the price which is added at the time of creating artwork.
Create Template using Designer Tool
To create a template using the designer tool, click on the Design It option and then click on the Save and Go to Design button. [1]
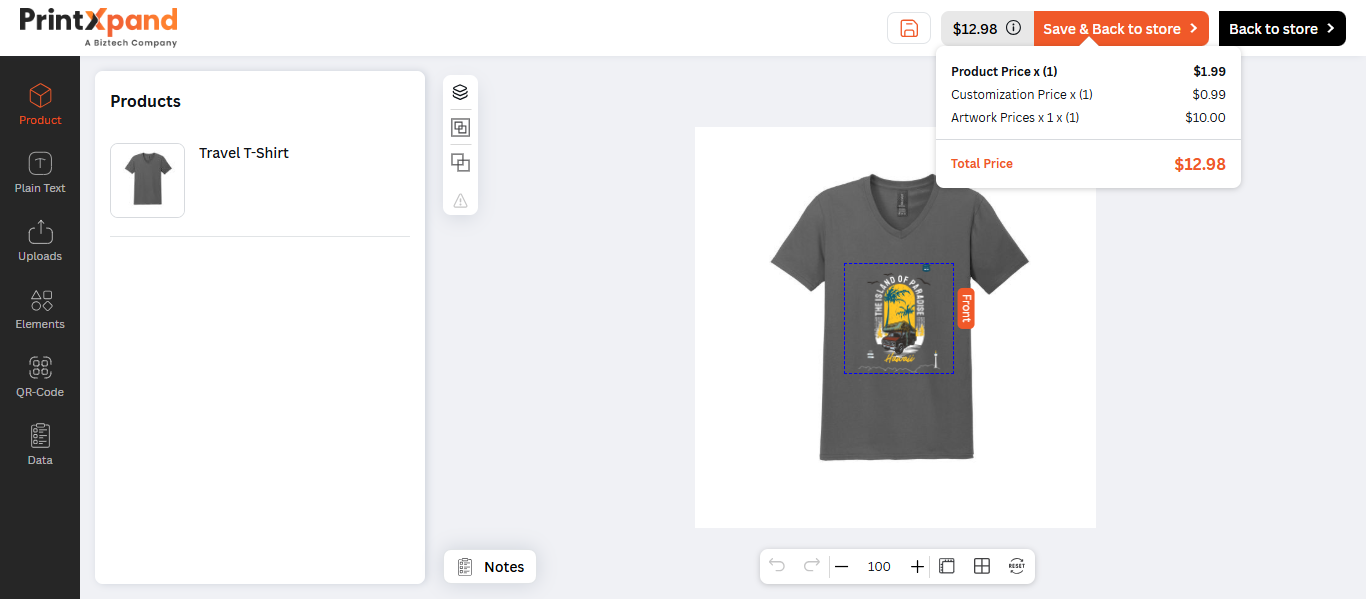
The template will be saved and you will be redirected to the “Product Designer tool” page to create a design.
Admin users or product designers for the online store will have free hands to design the template for the specific product. Similarly, if the product has another side, you can design for another side as well.
After adding any decorations, final pricing will be displayed on the top right side of the page, that price will be considered as template final price. [2]
By clicking on the ‘Save & Back to store’ icon, the template will be saved with the created design.
It could take a few minutes to appear in the Templates record. Now, navigate to the Manage templates listing page, you will get the newly added template.
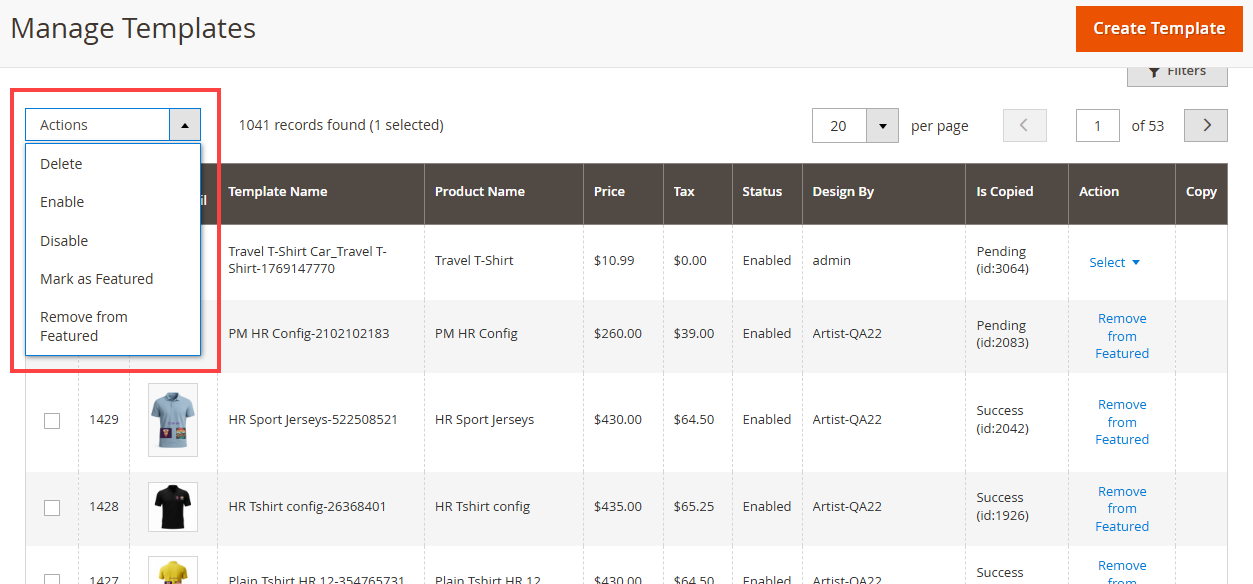
In the Actions drop down menu you will be able to see following options which you can perform by selecting the templates by clicking on the respective checkboxes : [3]
-
- – Delete : This option will delete all the selected templates.
-
- – Enable : By selecting the templates you will be able to enable all the selected templates.
-
- – Disable : By selecting Disable you will be able to disable all the selected templates.
-
- – Mark As Featured: Set the template as the Featured template.
-
- – Remove from Featured : By selecting Remove from Featured you will be able to remove the template from featured templates.
Now, you will get the three Action options by clicking on the “Select” drop-down option: Edit, Copy, and Design
-
- – Design: You can redesign the template by clicking on the “Design” option.
-
- – Delete : This option will delete all the selected templates.
-
- – Copy: You can copy the existing template.
-
- – Enable : By selecting the templates you will be able to enable all the selected templates.
-
- – Disable : By selecting Disable you will be able to disable all the selected templates.
-
- – Mark As Featured: Set the template as the Featured template.
-
- – Remove from Featured : By selecting Remove from Featured you will be able to remove the template from featured templates.
Copy:
You can copy the existing template and create the template for the new product using the same template design. By clicking on the “Copy” option, you will get the Product Selection popup to select the product.
Once the product is selected, click on the Continue button to copy the template.
It will take a few seconds to copy the template for the selected product and to get listed in the “Manage Templates”. You will see the template design (thumbnail) after a few minutes.
Custom Branding
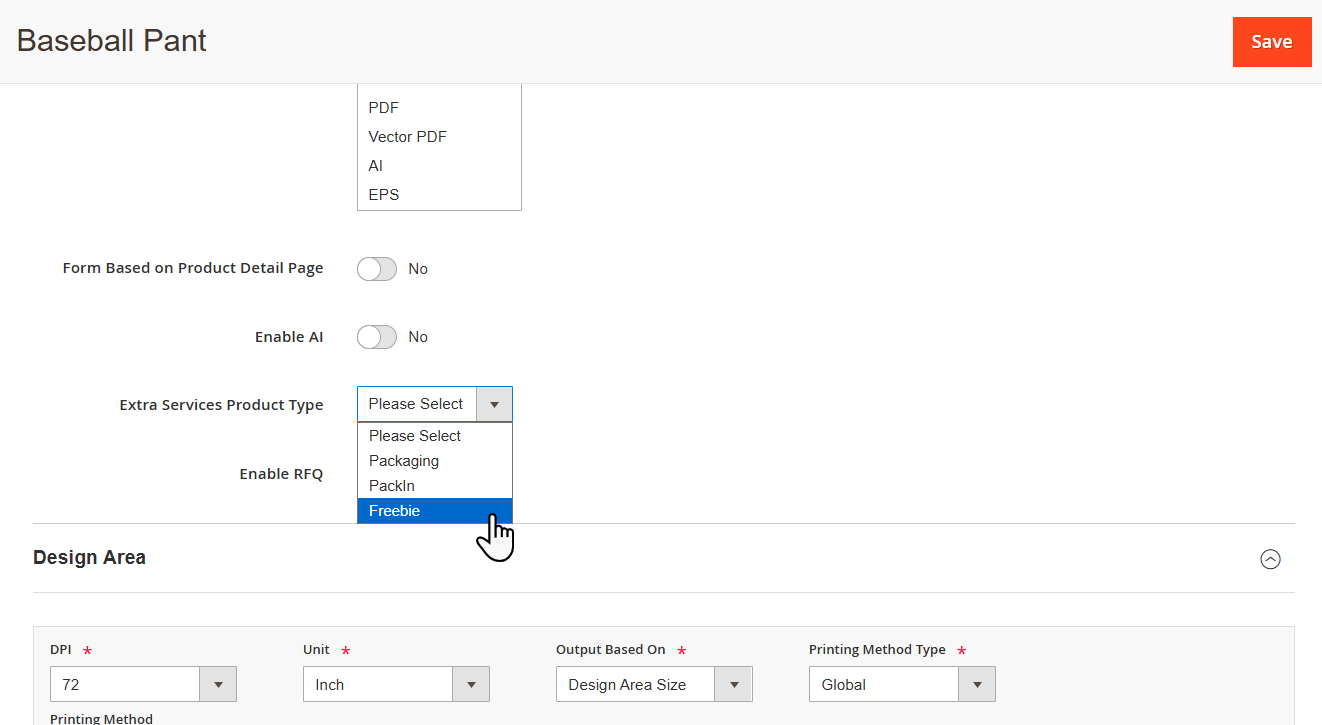
Custom Branding is only applicable to Simple Products. To assign a service, the admin must navigate to Product > Simple Product > Designer Setting > Extra Services Product Type , and then assign the desired product service. [1]
The admin must assign these services to control which products include branding extra services options. This helps in managing production accurately, applying the correct charges, and delivering a personalized experience.
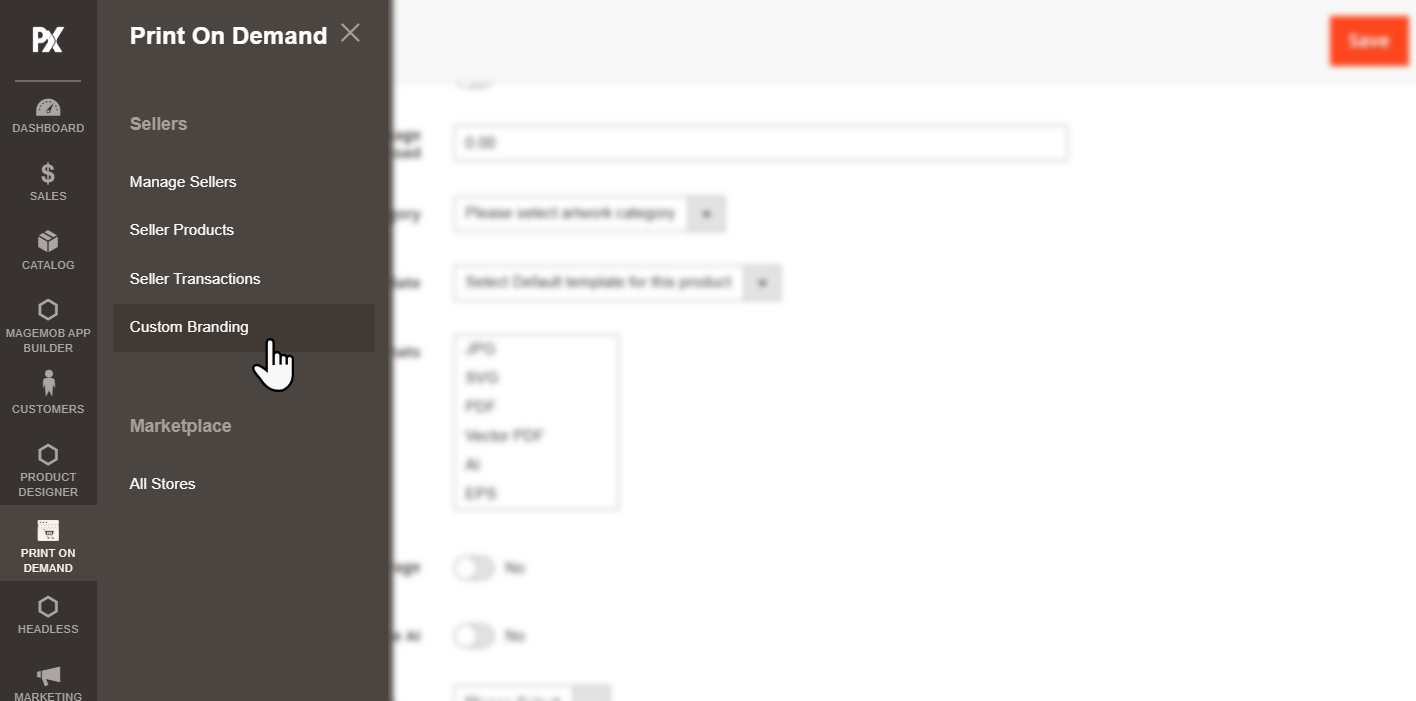
Now direct towards the Mange Extra Service & Branding by navigating to the Print On Demand -> Custom Branding. To manage branding Services. [2]
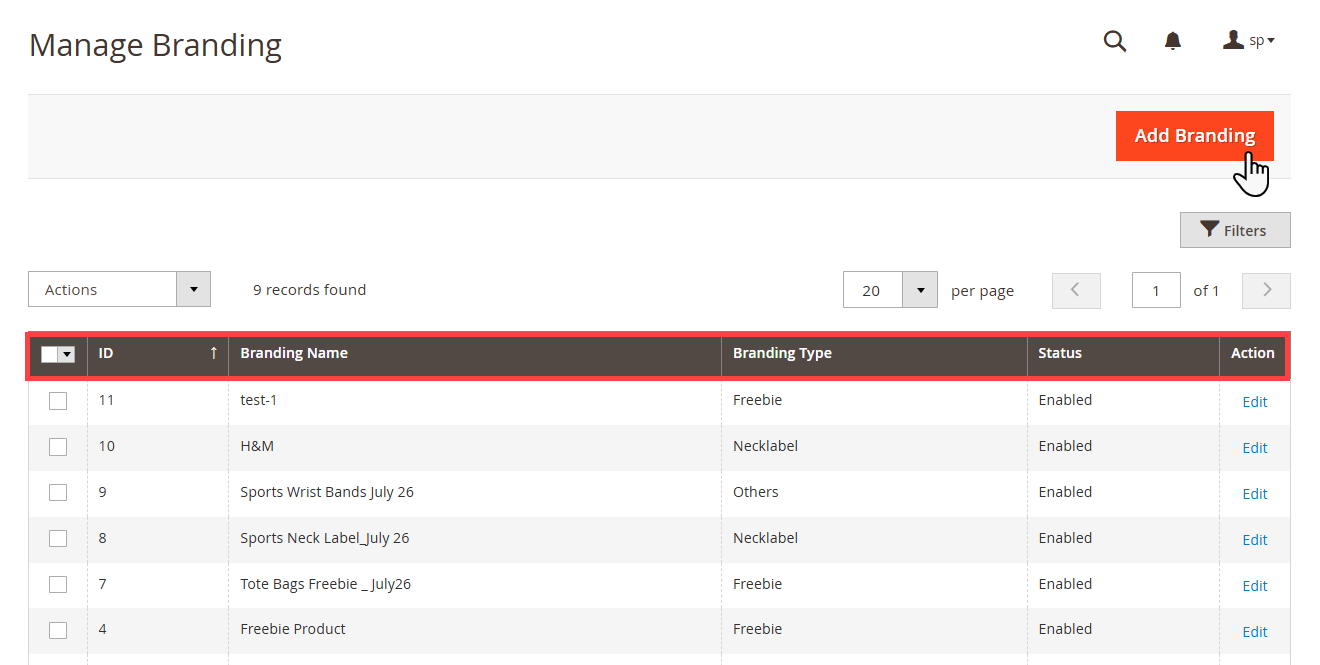
This section lists all the extra and branding services. The admin can add a new service by clicking the “Add Branding” button. The grid displays the ID, Service Name, Service Type, Status, and Actions for each listed service. [3]
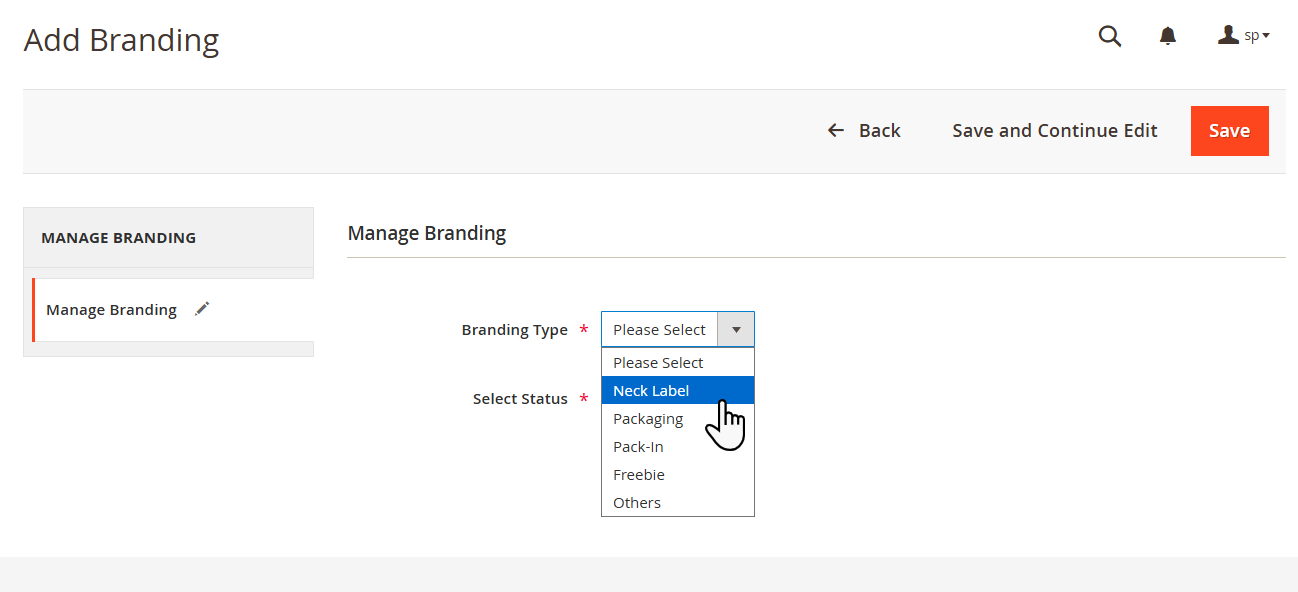
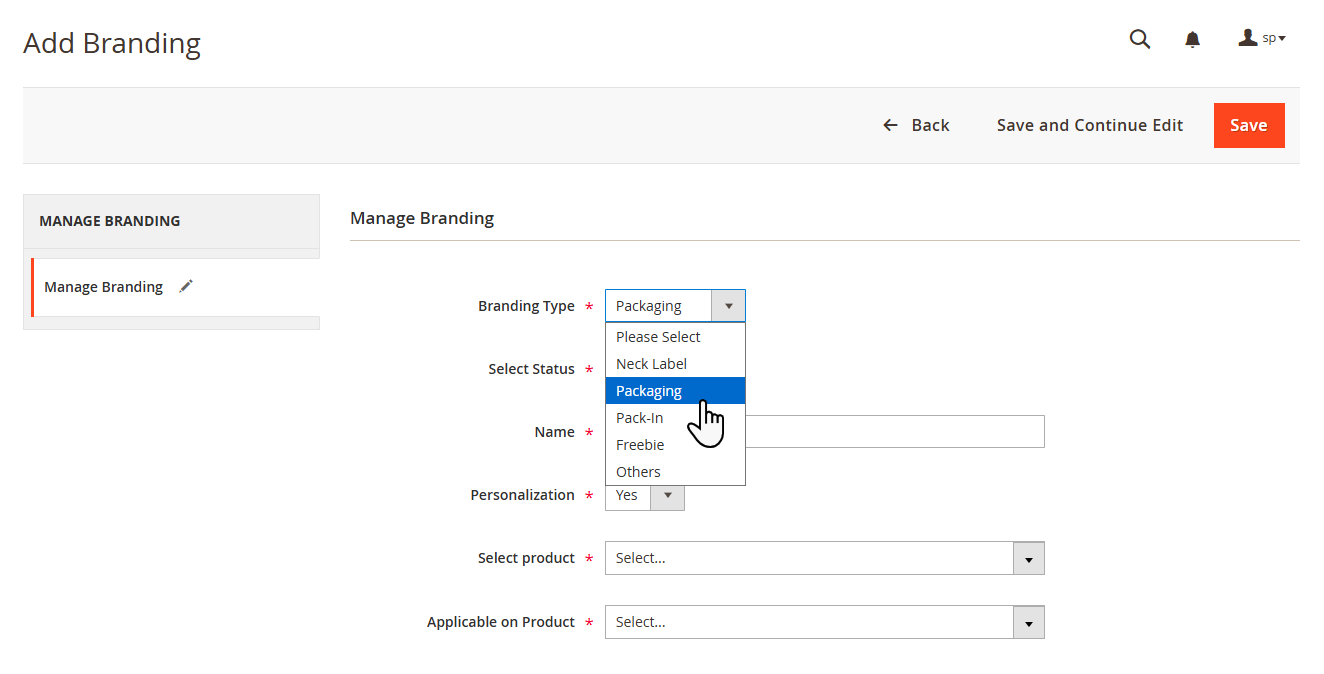
In this 5 types of Brandings available:
-
- – Neck Labels
-
- – Packaging
-
- – Pack In
-
- – Freebie
-
- – Other
Neck Label
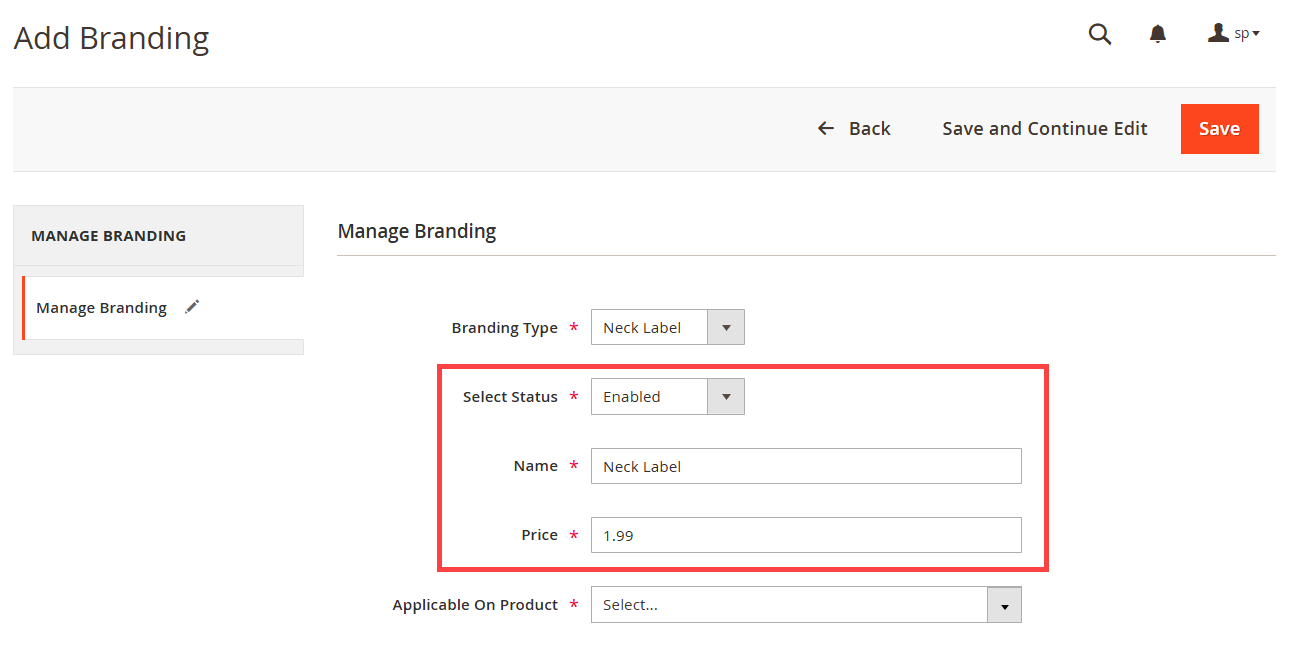
On the Add Branding page admin select Service type Neck label From “ Branding Type” drop down. [1]
Admin can set Status, Name and Price from Following Options. [2]
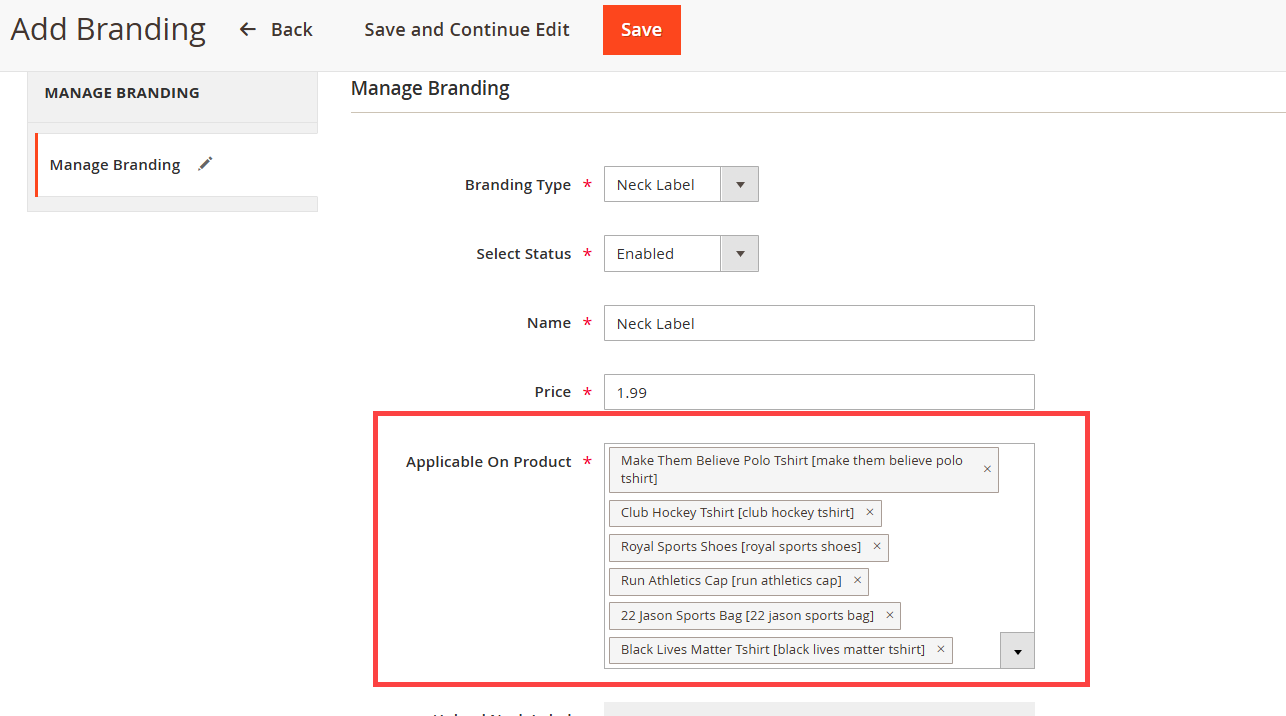
Admin can set applicable products from “Applicable On Product” Drop down. [3]
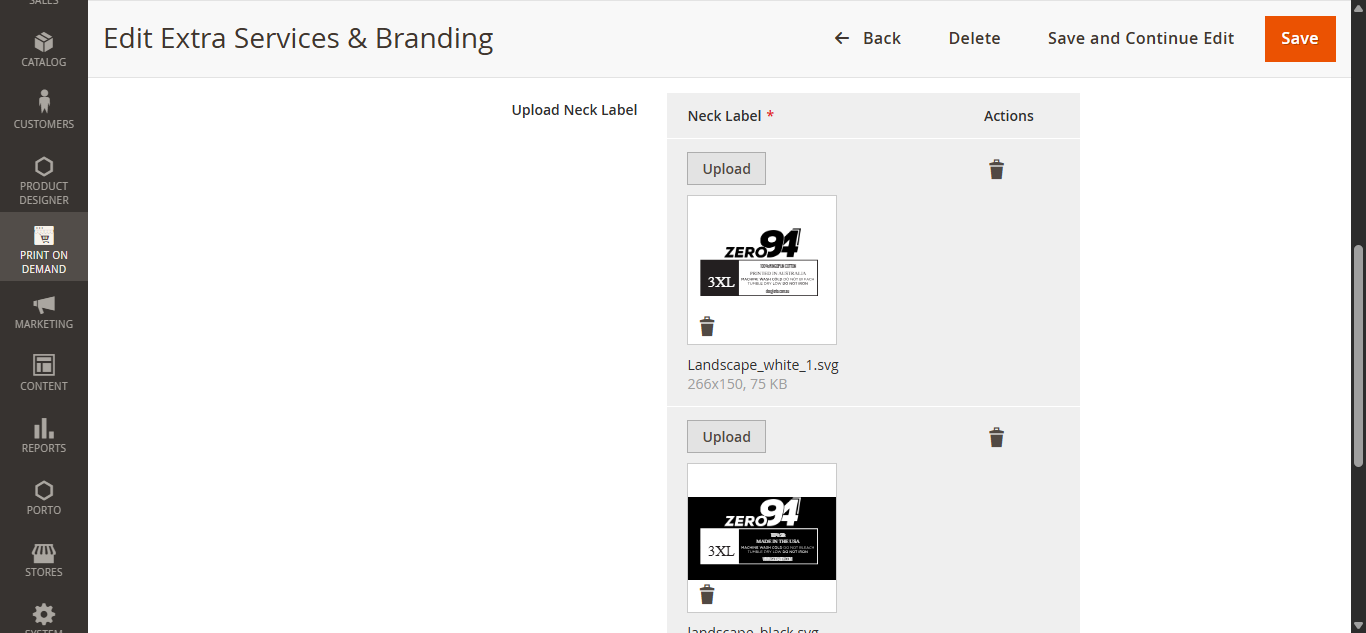
The admin can upload neck labels using the “Upload Neck Label” option. Multiple neck labels can be uploaded, and existing ones can be deleted by clicking the “Delete” action button. Only SVG image files are supported for upload. [4]
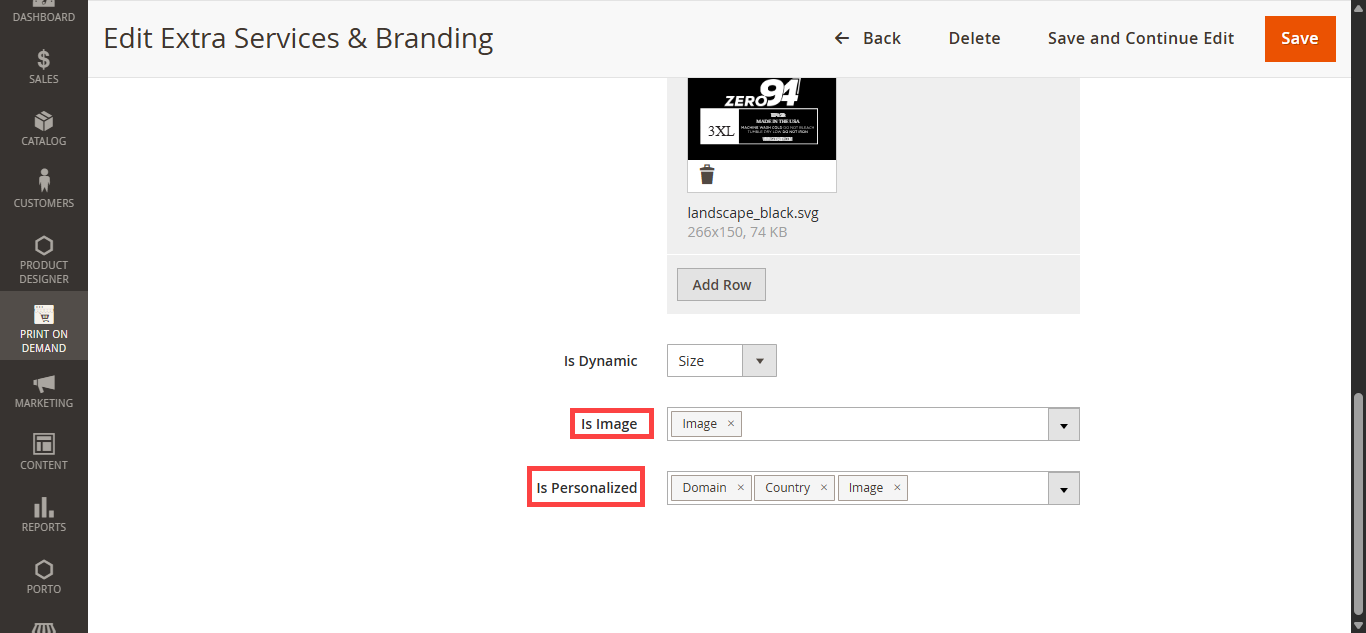
The admin can select a dynamic value from the “Dynamic” dropdown. This value will automatically display on the neck label based on the product configuration — for example, the product size will appear on the label if “Product Size” is selected. [5]
Admin can set the image and Personalized field from “Is Image” and “ Is Personalized” in Is Personalized drop down admin can set entities which are personalized by reseller. To save the service click on the “Save” button. [6]
Packaging
On the Add Branding page admin select Branding Type Packaging From the “ Branding Type” drop down. [1]
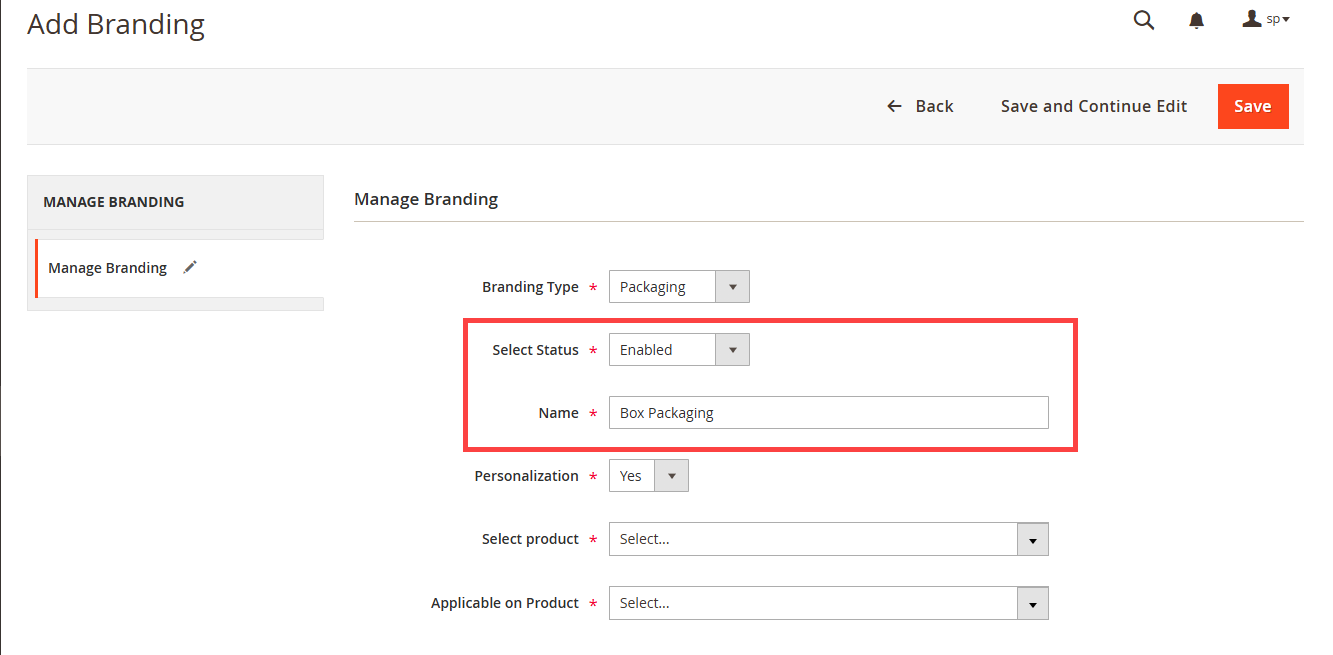
Admin can set Status and Name from Following Options. [2]
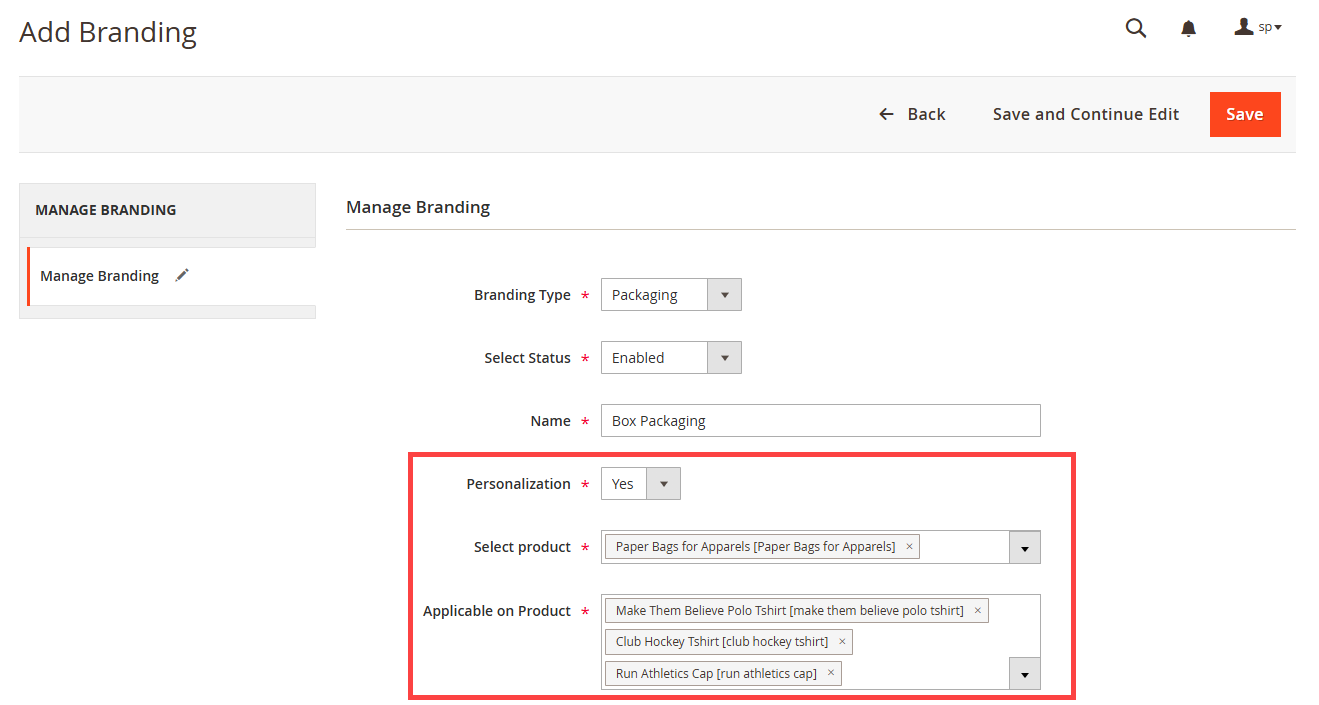
Admin can Personalize the Packaging from Personalization drop down. From the “Select Product” dropdown, the admin can choose different Packaging products. Applicable On Product drop down admin can select Packaging Branding applicable product. After filling all the mandatory fields click on Save button to save the service. [3]
Pack In
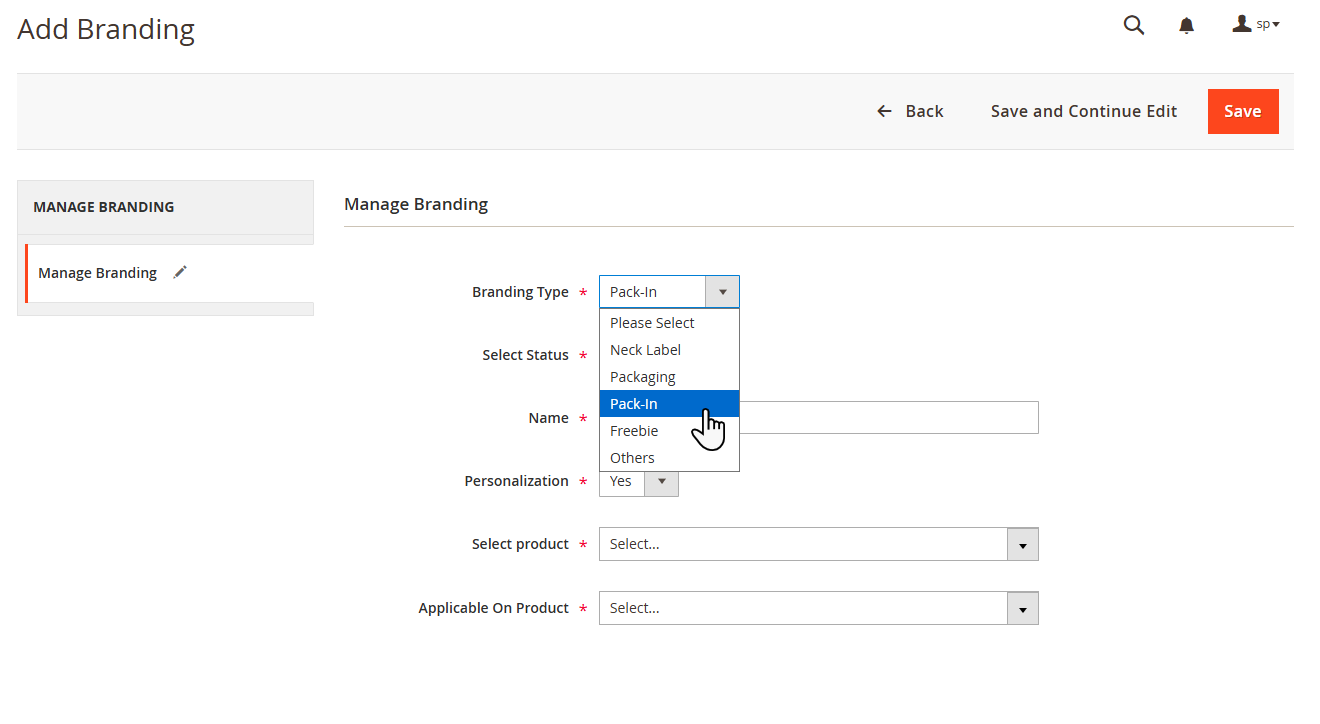
On the Add Branding page admin can select Service type Pack-In From the “ BrandingType” drop down. [1]
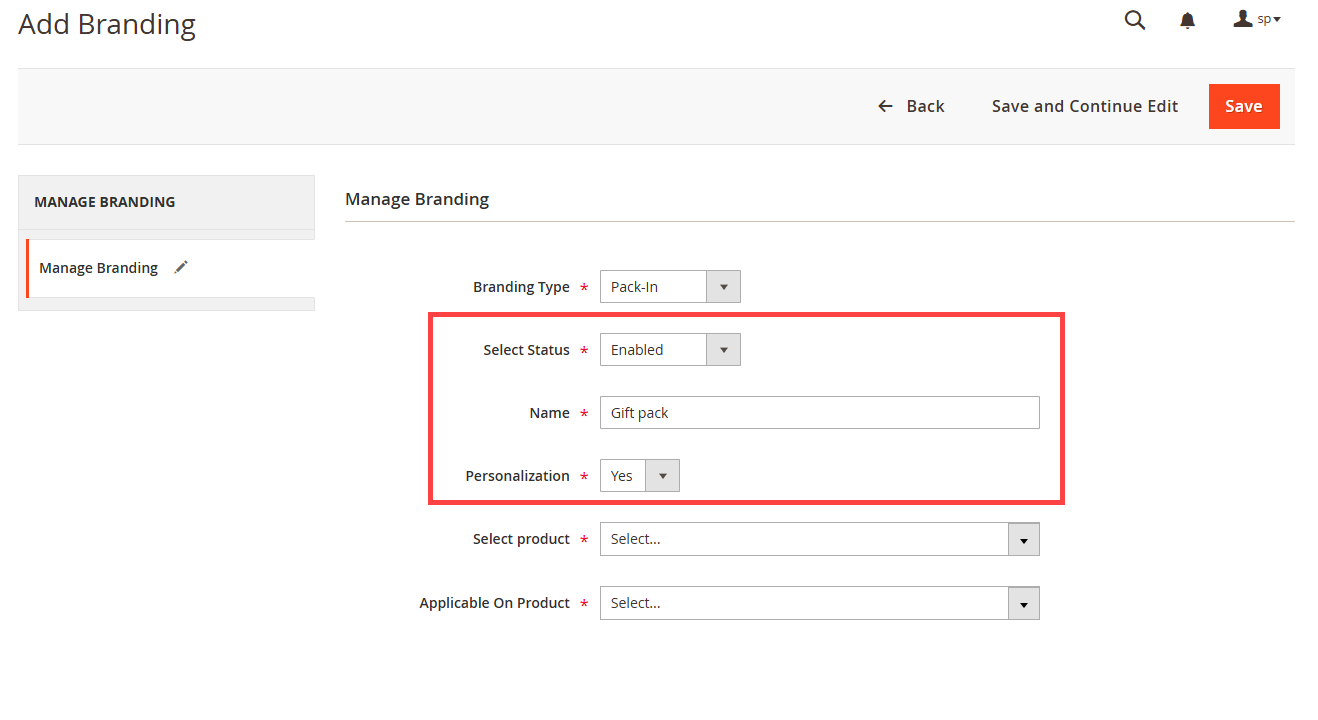
Admin can select the status and Name of the product from Status and Name Option. [2]
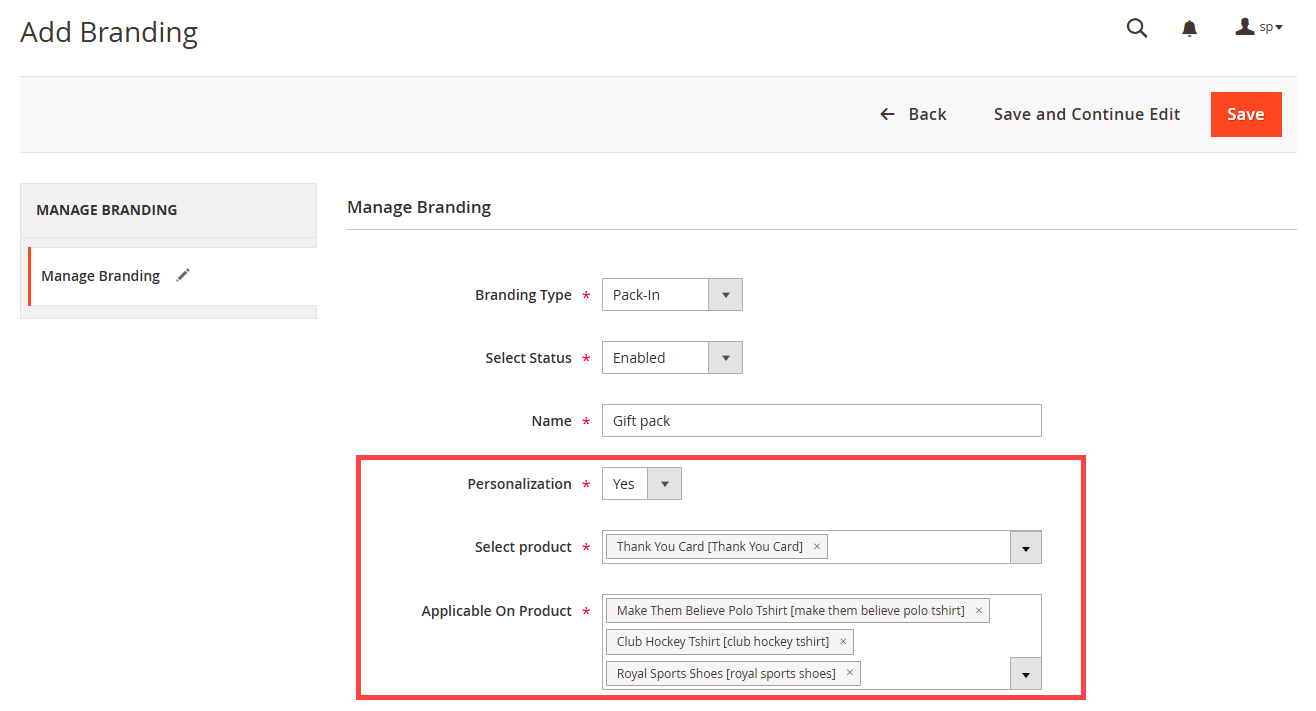
Admin can set the Personalize Pack In branding from Personalization Drop down. From the “Select Product” dropdown, the admin can choose different Pack in products. Applicable On Product drop down admin can select this Pack In branding applicable product. After filling all the mandatory fields click on Save button to save the service.[3]
Freebie
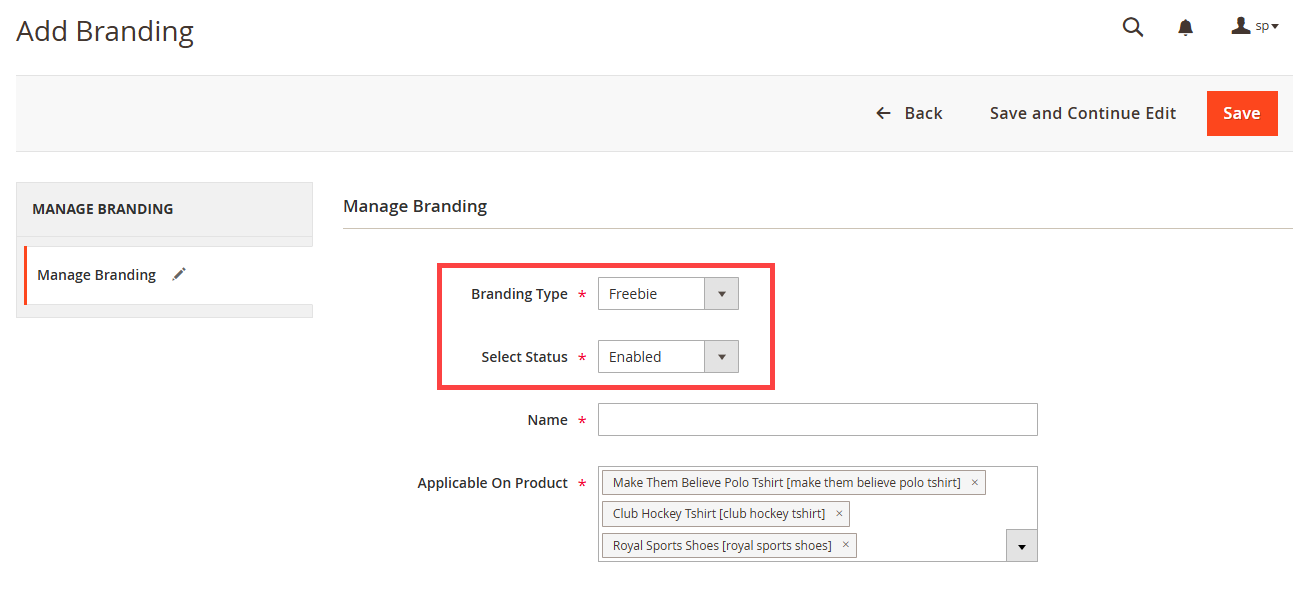
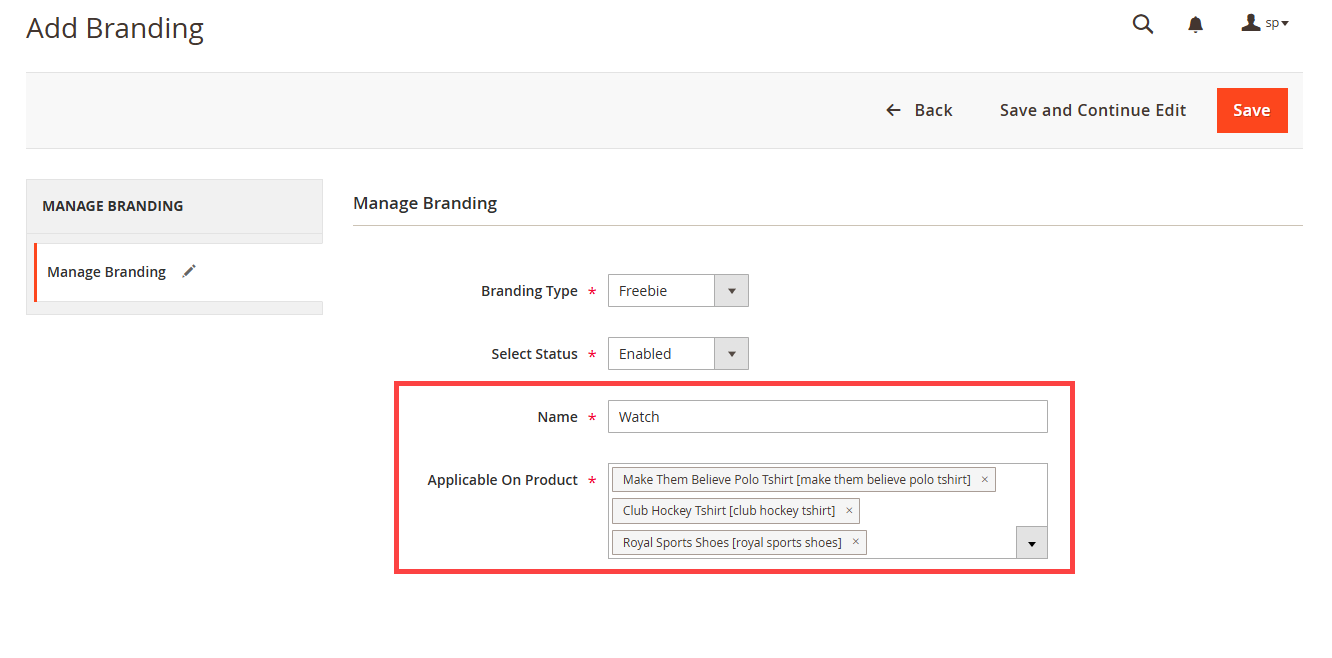
On the Add Branding page admin select Service type freebie From “ Branding Type” drop down. And the status of service from Status drop down. [1]
The admin can assign a name using the “Name” field and link the service to a product using the “Applicable On Product” dropdown. After completing all configurations, the admin must click “Save” to save the service. [2]
Others
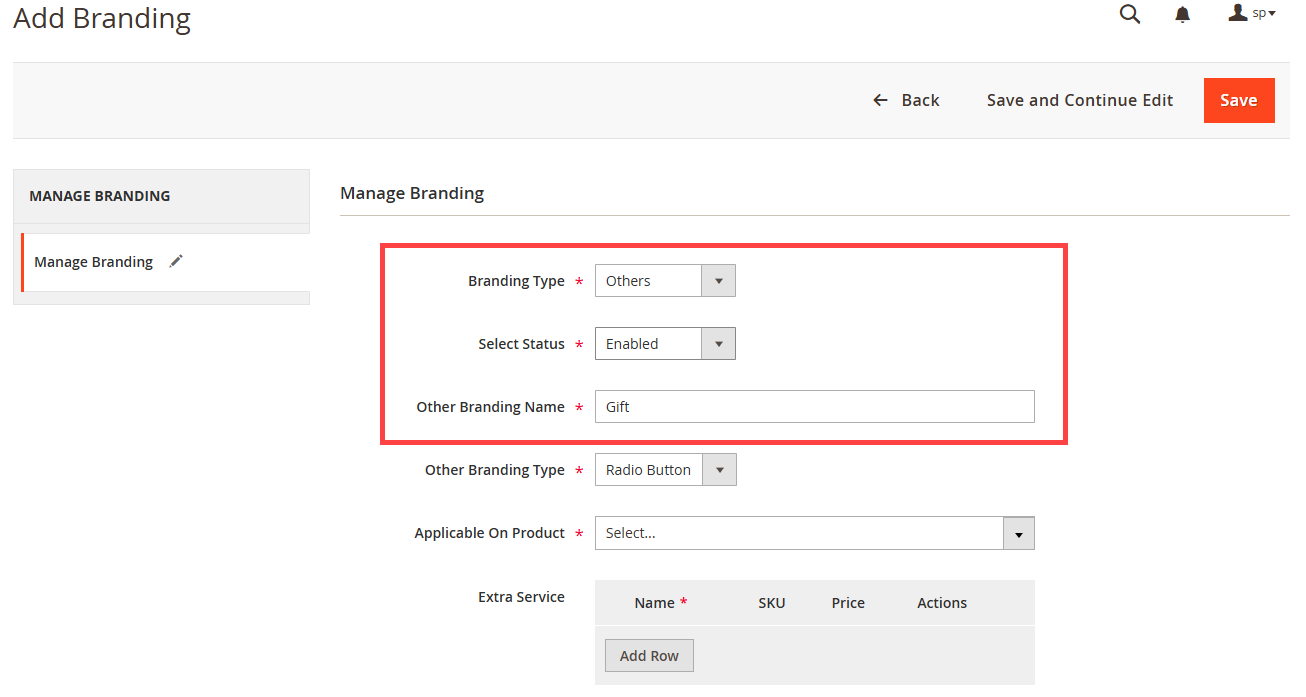
In the Others, the admin can add additional extra services to a product. On the Add Branding page the admin selects “Others” as the branding Type from the “Branding Type” dropdown, set the service status from the “Status” dropdown, and assigns a name using the “Other Service Name” field. [1]
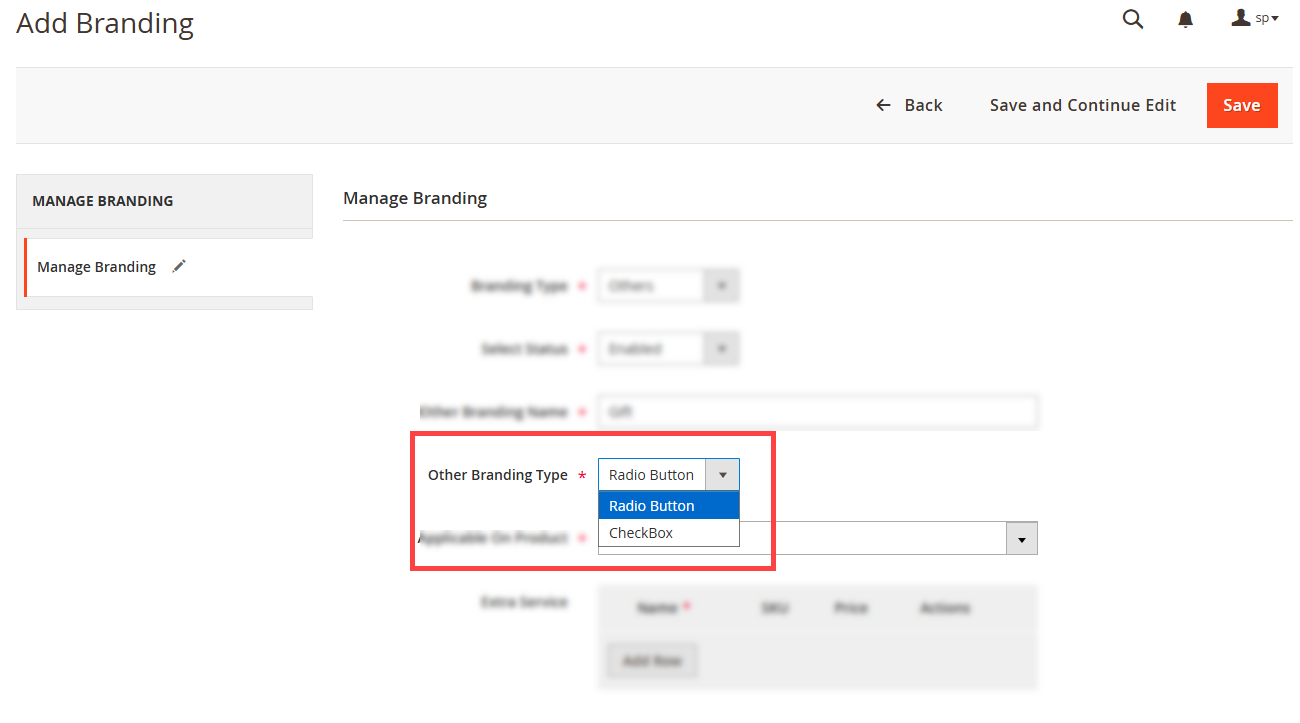
In Other Service Type drop down admin can select the method of selecting the other service. [2]
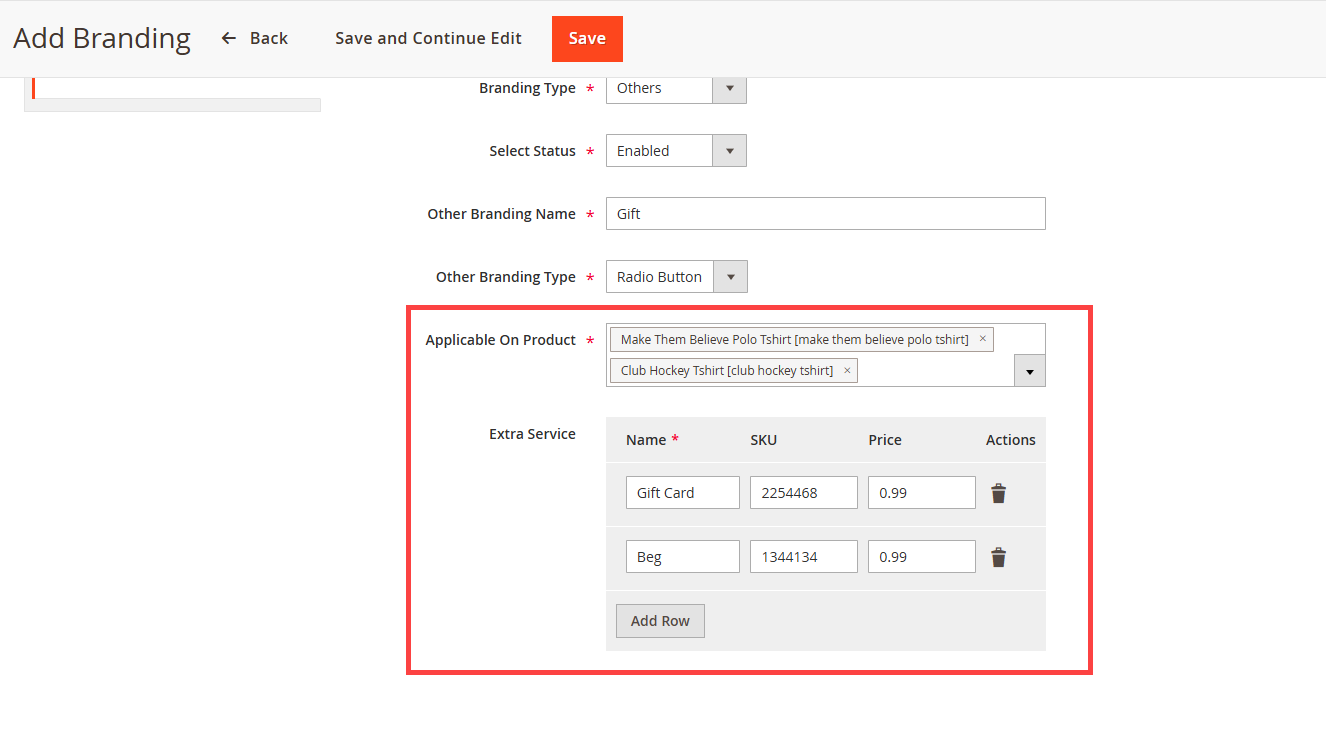
From the Applicable on Product section, the Admin can assign this service to products selected from the Applicable on Product dropdown.
In the Extra Service section, the Admin can add an extra service by entering the Name, SKU, and Price. New services can be added using the Add Row button, and existing services can be removed using the Delete button. Click on save button to save the changes. [3]